Getting Started
Find your control panel, manage your account and get help from our team.
- Find the right CloudExa control panel
- Open a support ticket
- Invite a teammate to your game server
- Understand upgrade invoices, account credit and renewal dates
- Protect your CloudExa accounts with 2FA and recovery codes
- Understand self-managed hosting and managed OS support
- Respond to a suspected account or server compromise
- Move to CloudExa from another hosting provider
Find the right CloudExa control panel
Your CloudExa services
Your billing account and service control panels perform different jobs. Use the links below to get to the right place.
- Client area: view your services, invoices and support tickets.
- Game panel: manage your game server console, files and backups.
- Dedicated panel: manage an assigned dedicated server.
For a VPS, use the control-panel link provided in your service details or welcome email. Panel access depends on the services assigned to your account.
Cannot sign in?
Use the password-reset option on the correct panel. If you still need help, open a support ticket from your client area. Never send your password or recovery codes in a ticket.
Open a support ticket
A clear support ticket helps us find the right service and inspect the right event. Include what you saw, when it happened and what you expected. Keep one ticket focused on one issue, especially when several machines have similar names.
Identify the service
- Sign in to the billing portal and open Services → My Services.
- Open the affected service. Record its service ID, name and assigned IP or connection address. Include the game server ID or panel URL if the issue concerns the game panel.
- Open a support ticket from your billing account. Choose the relevant service where the form offers that option.
- Use a specific subject, such as
Game console returns 504 on server [ID], rather than only “broken”.
Tell us which panel you used: billing, game, VPS or dedicated. Your billing email and an in-game username may differ. For security, contact us from the account that owns the service or through authorised access rather than borrowing another person's login.
Describe the effect and timing
State whether the problem affects one player, several players or the whole service. Tell us whether the application still works while its panel fails. For example, a working Minecraft connection with a broken web console points to a different investigation than a machine that nobody can reach.
Give the date, approximate start time and timezone, including whether the issue continues. If it repeats, provide two or three example times. Include recent changes such as a plugin update, DNS edit, firewall change, restore or new application. Reporting a change helps diagnosis; it does not establish the cause.
Attach useful evidence
- Panel error: copy its exact text and
request_idif present. Include the time of that error, since request IDs help locate a specific request. - Minecraft crash: include the relevant startup or crash log and version information. Use the log guide to find the right file.
- Network issue: provide the destination hostname, port and the result of a test from the affected device. Record the source public IP privately in the ticket if support needs it to trace filtering.
- Billing question: include the invoice number, service ID and agreed price or billing period.
For screenshots, show the error and enough surrounding interface to identify the task. A screenshot of a loading spinner alone provides little evidence. Plain text logs allow us to search an error; include a screenshot when the layout or button state matters.
Remove secrets before sending
Redact passwords, private SSH keys, API tokens, database connection secrets, recovery codes and full payment-card details. Console launch URLs and signed download links may contain access tokens. Replace their secret portion rather than posting the full address. Review plugin configuration and environment files before attaching them.
If we need secure access, use the method agreed in the ticket. Do not place credentials in a public chat or screenshot. Follow the account-security guide if you have already exposed a secret.
While waiting for a reply
Avoid repeated reinstalls, restores or forced power cycles to clear a spinner. Keep existing data and the last working backup. Add new evidence to the same ticket and tell us if you change anything. If you suspect an active compromise, use the compromise-response guide and flag the urgency in your ticket.
Invite a teammate to your game server
Use Users to let a teammate manage an existing game server. Use Splitter, where your plan includes it, to divide the plan's resources between separate game servers. Each action changes a different part of your setup; inviting someone does not create another server or transfer your billing account.
Invite a teammate
- Open the correct server at game.cloudexa-hosting.com. Check its name and address before changing access.
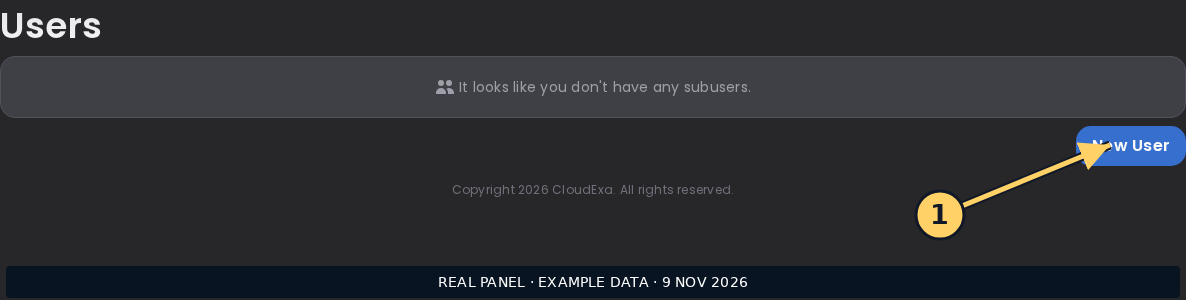
- Open Users and choose New User. Enter your teammate's own address in User Email.
- Choose a Role Preset as a starting point, then review the selected permission rows. Grant the actions they need for their role.
- Choose Invite User and confirm that their entry appears in Users.
- Ask the teammate to sign in using their own account and check that they can open the assigned server. A new panel user should check their inbox and spam folder for account-access instructions.
Review the permissions
Console commands can grant in-game privileges, file access can expose configuration secrets, and backup downloads can contain your server files. Full Access (Select All) and Power User (Control + Files + Backups) include actions that can change or delete data. The Moderator preset includes user management. Review those rows before granting access.
Review the Viewer preset too. In the current panel, its Console selection can include sending commands. Remove that permission if the person should only watch output. Test the intended access with the teammate rather than granting everything to solve a missing button.
To change access, edit their entry in Users and choose Save. To revoke it, use the delete control and confirm Yes, remove subuser. Removing a subuser revokes that person's access to this server; it does not remove the game files. Review access when a teammate leaves or changes role.
Understand server splits
A split creates a separate server using resources from its parent plan. It does not duplicate your full RAM, CPU and storage allowance. Resource allocations reserve capacity even while a child server is stopped. For example, a child allocated 4 GB from a 12 GB RAM entitlement leaves 8 GB for the parent and other children combined.
Leave enough RAM and disk for the parent to run. Check actual disk usage before reducing an allocation: setting a smaller limit does not remove files or make them fit. A split also needs an available split slot and a usable network allocation. CPU allocations and usage are different measures; the panel's current usage graph alone does not show the resources left to allocate.
Find Splitter in the left-hand server menu, as shown in the Users screenshot above.
Plan a split or resource change
- Check your plan's split allowance and the resources already assigned to children.
- Record the parent and child server IDs and the RAM, CPU and storage you intend each to use.
- Open Splitter on the parent and review the controls available to your plan. Ask support if the page or a needed allocation is unavailable.
- Review the proposed allocation before confirming a change. Check the resulting limits on both parent and child.
- Check each child's Users and Backups sections. Do not assume that a parent's teammate access or backup slots grant the same access or allowance on every child.
Before moving existing worlds or configuration between servers, take a backup and preserve both copies until you have checked the result. Do not remove a parent or child server to clear a resource error: server removal can delete files, and removing a parent can also remove its children.
If access or allocation fails
For invitations, check the address and existing user list before retrying. For a remaining-resource error, compare allocated limits across the parent and children, not just live usage. Send support the IDs, intended change, time and full error through a private ticket. Keep passwords and API keys out of screenshots.
Understand upgrade invoices, account credit and renewal dates
CloudExa lists your services, invoices and payment status in the billing portal. Check the invoice number and service before paying, especially when you have several machines with similar names.
Read the invoice before paying
- Sign in to the billing portal and open Billing → My Invoices.
- Open the invoice you need. Check the currency, amount, due date and each line description.
- Match the service and billing period against the service details under Services → My Services. An invoice creation date can precede the start of the period it covers.
- Check whether the status says Unpaid or Paid. If you have a payment receipt but the invoice remains unpaid, send support the invoice number and transaction reference.
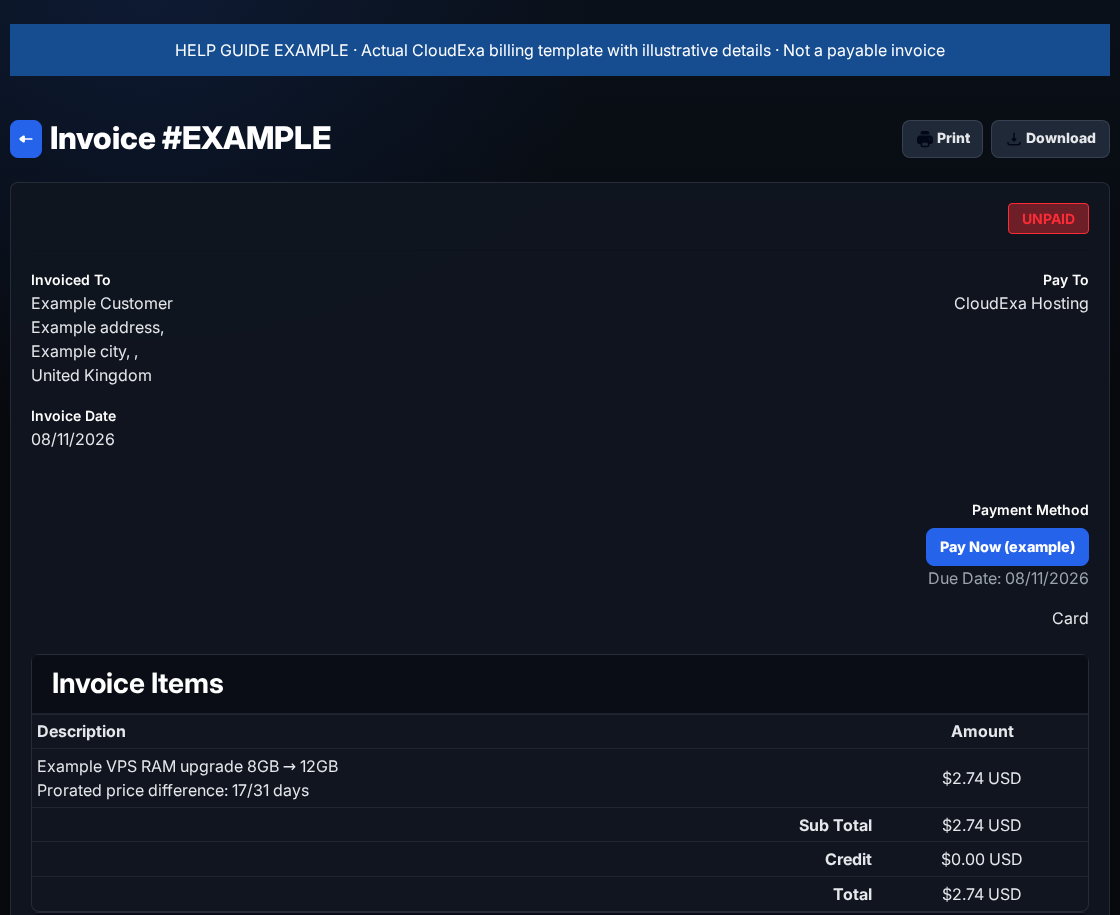
Use the payment options offered on that invoice. Do not send a second payment while a first payment is still processing. A payment provider receipt and an updated invoice can arrive at different times.
Understand a prorated upgrade
An upgrade can create a charge for the remaining portion of your current billing period. Your new recurring price then applies to later renewals. Read the upgrade invoice to confirm its dates; it should distinguish the price difference from a full renewal.
For example, suppose you move from a $10/month service to $15/month with 17 days left in a 31-day period. A prorated difference would be ($15 − $10) × 17 ÷ 31 = $2.74, rounded to cents. That example illustrates the calculation; your invoice states the actual charge, dates and tax where applicable.
An agreed custom price, waived upgrade charge or manually scheduled change can follow different arrangements. Keep the support confirmation and query any mismatch before paying. A plan change does not by itself promise a new renewal date, refund or free period.
Account credit and refunds
Account credit sits on your billing account and can reduce an eligible invoice balance. A refund returns money through an agreed payment route. They are separate outcomes. If support agrees a downgrade adjustment, check whether the confirmation says credit or refund, and confirm the amount and currency.
Check the invoice total and any credit applied before making an additional payment. Do not create another account to move credit between currencies. Ask support to review an incorrect balance or a payment you cannot identify.
Renewals, reminders and cancellations
Check the service's Next Due Date and billing cycle. A first-month discount may expire at renewal; compare the invoice against the recurring price agreed for your service. Read payment reminders as prompts to review the linked invoice, rather than assuming that a reminder creates a second charge.
To stop a service, open its service details and use Request Cancellation where offered. Read the timing choices before submitting. Save a copy of any data you need first: cancellation can lead to termination and data removal. Closing a game server or shutting down a VPS does not cancel its billing.
Grace periods and cancellation handling depend on the service and any agreement with support. If you need more time, contact support before the due date and obtain confirmation. Do not assume that an unanswered request pauses automation.
Send a useful billing query
Include the invoice number, service ID, expected price and relevant support agreement. Hide full card details and passwords. CloudExa can trace a transaction reference without you sharing payment credentials.
Reference: WHMCS upgrade billing behaviour.
Protect your CloudExa accounts with 2FA and recovery codes
This guide covers setting up two-factor authentication and recovering access across your CloudExa panels. For a quick routine review, use the account-security checklist.
Your billing, game, VPS and dedicated-panel accounts can have separate passwords and security settings. Enabling two-factor authentication in one panel does not prove that it is enabled in the others. Start with your email account, because password reset messages arrive there.
Use a strong password for each account
Save a unique generated password for each panel in a password manager. Keep the email address on your billing account up to date. Your server's Linux password is separate from your VPS panel login; use the Linux password guide when you need to change the machine login.
Open the panels from your bookmarks or CloudExa's service pages. Check the full hostname and HTTPS connection before signing in:
- billing.cloudexa-hosting.com
- game.cloudexa-hosting.com
- cloud.cloudexa-hosting.com
- dedicated.cloudexa-hosting.com
Enable two-factor authentication
- Open the account security settings in the panel you want to protect. In the billing portal, look for Security Settings. In the VPS panel, open your account and find Two-factor authentication.
- Choose the enable or setup action. Scan the QR code with your authenticator app, or enter the setup secret in the app.
- Enter a fresh code from the app to finish verification. Keep your phone's date and time set to automatic if codes fail.
- Save the backup or recovery codes that the panel provides. Store them in your password manager or another safe location you can reach if you lose the phone.
- Confirm the panel shows that 2FA is enabled. Test a fresh sign-in while retaining your working session and recovery codes.
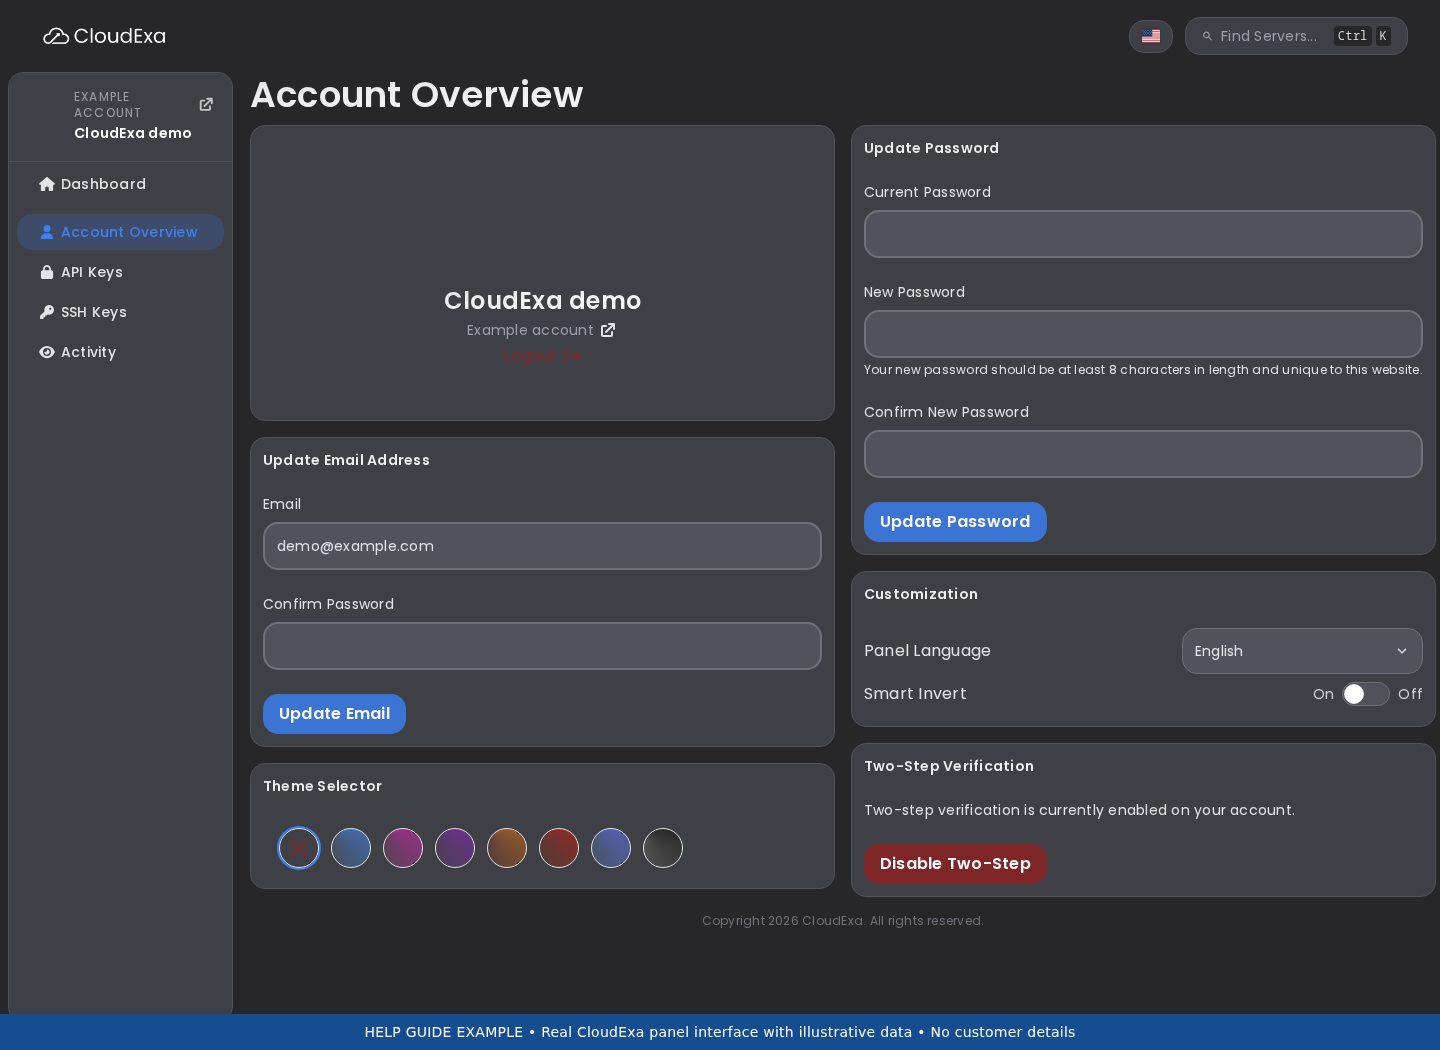
Never include a setup QR code, secret or recovery code in a support screenshot. In the VPS panel, Show recovery codes lets you review the saved codes after setup. Regenerate recovery codes replaces the old set, so update your stored copy if you choose it.
Give teammates individual access
Use subuser invitations and grant only the server permissions the person needs. Review access when someone leaves your team. A teammate who needs the console does not necessarily need permission to delete files, restore backups or manage other users.
Keep API tokens private and limit their permissions where the panel supports it. Give each integration its own token so you can revoke access without interrupting unrelated tools. Do not place tokens in public repositories, Discord messages or browser screenshots.
Handle suspicious messages and lost access
If an unexpected message asks you to pay or sign in, open your saved billing-panel address and check the invoice or ticket there. Do not send your password, 2FA code or recovery code in an email reply. Contact support through your usual channel if you cannot confirm a request.
If you lose the authenticator device, use the panel's backup-code sign-in option where available. Each panel may handle recovery differently. If you have no working code, contact support and follow account ownership checks. Reinstalling a server will not recover your panel account.
If you suspect a leak, change the affected password and revoke exposed tokens. Ask support to review suspicious account activity and active access. Tell us what happened and when, while keeping the exposed secret out of the ticket.
Reference: Using a billing-portal backup code.
Understand self-managed hosting and managed OS support
Your hosting plan provides resources and the controls for your service. The applications you install and any support add-ons affect who handles maintenance inside it. Check your order, active add-ons and support agreement before assuming that a task forms part of the plan.
Check the service you bought
- Open Services → My Services in the billing portal.
- Check the product name, resources, billing period and any active add-ons on the service.
- Read the description of your add-on and any written agreement in your ticket history. A product label alone does not describe every responsibility.
- If you are unsure who should perform a change, send support the service ID and the task before making it.
Running a self-managed VPS or dedicated server
For self-managed systems, plan to maintain the guest operating system, user accounts, access rules and applications you install. That includes web servers, databases, game software and control panels inside your machine. Review security updates, application compatibility and backups as part of your operating routine.
CloudExa provides the service and its available infrastructure controls. Contact support when you suspect a problem with provisioning, assigned networking, host infrastructure or panel access. Describe the symptoms and any guest-side checks you have made; support can then establish where the fault sits. A working power control does not prove that an application inside the machine is healthy.
What the managed OS add-on covers
The current add-on is Managed OS Security, Monitoring & Recovery. Its listed scope includes:
- Security updates for a supported operating system.
- Automated availability and resource monitoring after onboarding.
- Reasonable remote recovery assistance after a monitored failure.
The add-on excludes application, panel, plugin and game updates; development; backups; malware cleanup; and data reconstruction. It does not promise a guaranteed recovery time. Human response follows the applicable support terms.
Before relying on monitoring, confirm that onboarding has finished, required access works and the intended checks cover your service. An OS-level availability check does not necessarily test a website checkout, Minecraft login or every plugin. Tell support when you change ports, access credentials or services that a monitoring check depends on.
Game hosting and application changes
The game panel gives you controls for files, startup settings, backups and other features enabled on your plan. You still need to check the compatibility and effects of the plugins, mods, worlds and configuration you upload. Ask support for advice before changing a setting you do not understand.
A backup allowance describes the available backup feature or capacity. It does not mean a recent successful backup exists. Set your backup routine, confirm completion and keep an off-service copy of important data. The managed OS add-on does not add backups to its scope.
Agree the next action
When requesting work, state the desired result and what must stay intact. Mention downtime constraints and whether support may restart a service. A resize, application update and reinstall have different effects; specify the one you want. Keep a usable backup before changes that could affect data.
For a task outside the listed scope, ask whether support can offer it and what it would cost. Use the written response to agree the work. This guide explains the current add-on description; your order and applicable service terms remain the reference for your service.
Respond to a suspected account or server compromise
Unexpected logins, unfamiliar users, changed files or unexplained outbound traffic deserve investigation. Record what you saw and contact support. A single alert does not prove an intrusion, but you should act when someone may still have access.
Use a trusted device and contact support
- Use a device you believe is clean. Open the billing portal by typing its known address, rather than following a link in a suspicious message.
- Open a support ticket from your account. Give the affected service ID, time and timezone, symptoms and whether the activity appears ongoing.
- If an attacker is causing harm, tell support that you need urgent containment. Ask about restricting access or isolating the affected service while preserving its disk and logs.
- Keep a record of actions and times as you work. Avoid reinstalling, restoring over the system or deleting unfamiliar files before you preserve evidence.
If your email account may be compromised, secure it through its provider from the trusted device as well. An attacker with email access may intercept password resets. Tell CloudExa support if you cannot use the normal account-recovery route.
Secure accounts and credentials
Change exposed passwords to unique values, review recovery methods and enable two-factor authentication. Review known sessions, API keys, SSH keys and subuser access where the panel offers them. Remove access you do not recognise after recording enough detail for investigation. Do not disable a legitimate recovery route without arranging another one.
Follow the account-security guide for panel-specific controls. Rotating a panel password does not necessarily rotate a VPS root password, database password or plugin token. List the secrets an attacker may have obtained, then rotate each at its issuing service. Never paste replacement secrets into a public log.
Preserve evidence without spreading secrets
Keep relevant authentication, application and panel activity logs with their timestamps. Record suspicious account names, file paths, source addresses and error messages. Save copies in a private location with restricted access. Export only the evidence you need; configuration files can contain additional credentials.
For a VPS you can still inspect, avoid treating its own tools and logs as conclusive evidence of a clean system. A privileged attacker could change them. Support can help plan collection and recovery, but do not assume that restarting a service removes persistence.
If a file or plugin looks suspicious, do not run it on your computer to test it. Record its name, source and modification time, then ask how to preserve it. Keep untrusted archives separate from a known-good backup.
Contain, then plan recovery
Agree containment with support according to the risk. Restricting network access or disabling a compromised credential can reduce ongoing harm while leaving data available for investigation. Avoid stopping database writes by forcing power off unless the situation requires it and you understand the recovery implications.
Establish how the attacker entered before returning the service to normal use. Patch the affected software, correct access rules and rotate exposed credentials. Select recovery data from a point you have reason to trust. A backup taken after the first intrusion may contain the same problem.
Some incidents require a clean rebuild, but preserve evidence and data first and agree the process before replacing anything. Check application behaviour, accounts and monitoring after recovery. Malware cleanup and data reconstruction are outside the managed OS add-on's listed scope; ask support what assistance is available.
Use the support-ticket checklist to send evidence without exposing passwords, private keys or console access links.
Further reading: NCSC guidance on incident response.
Move to CloudExa from another hosting provider
A provider move includes access, application data, databases and DNS. Plan those pieces before cancelling your old service. This checklist applies to websites, VPS applications and game communities; use the Minecraft file-transfer guide for game-specific steps.
Write down what needs to move
List the services you actually use: application files, uploaded media, databases, scheduled jobs, mail, certificates and external integrations. Record software versions and storage usage. Check whether your old host runs a database or mail service outside your server; a machine or game-file backup may not include either.
Confirm that you can sign in to the old service, CloudExa and your domain's DNS account. Store recovery codes somewhere you can access during the move. Use your own accounts or authorised team access rather than sending passwords in chat.
Prepare a destination and rollback copy
- Check the new service's resources, assigned addresses and available disk space. An archive and its extracted contents need space at the same time.
- Start with compatible software versions. Keep upgrades separate until the move works so you can identify migration problems.
- Download a complete backup to a location outside both servers. Check that the archive opens and includes the folders you expect.
- Export databases using the application's supported procedure. Preserve database names, character sets and required users without publishing passwords.
- Choose a quiet maintenance window and tell users when writes or logins will pause.
Keep a record of the original DNS values and TTLs. Export the zone if your provider supports it, then check that the export includes your records. Preserve unrelated mail, verification and service records.
Transfer and test before changing DNS
Stop writes on the old application for the final file copy and database export. For Minecraft, stop the server and wait for saving to finish. Import files and databases into the destination, then update application connection details, paths, ports and scheduled tasks.
Test with the new address or a temporary hostname. For a website that requires its normal hostname, use a local hosts-file override or another application-supported test method. This changes only your test computer; other users still reach the original service.
Check login, uploads, database writes and application-specific actions. For a game, visit existing builds and verify inventories and permissions. Restart the application during the window and confirm changes persist. Check certificate names and redirects before relying on HTTPS.
Switch traffic and keep one writable copy
Change the intended DNS records after testing. Check both A and AAAA records where present. Keep the old application stopped or read-only while cached DNS answers expire, so users cannot write conflicting data on two machines. Recheck scheduled jobs and outbound integrations to avoid duplicate processing.
If you must roll back after accepting new writes, reconcile those changes first. Pointing DNS back alone can lose recent activity. Keep the old service and verified backups until you have checked normal traffic and any remaining commitments. Cancelling a service is a separate billing action.
For help, send a support ticket with your service ID, application, approximate data size and planned window. Never include passwords in screenshots.
Further reading: Cloudflare DNS import and export; Paper migration notes.