Game Hosting
Connect to your server, use the console and protect your game files.
- Connect to your Minecraft server
- Back up game files before making changes
- Upload an existing Minecraft Java world
- Install plugins on a Paper or Purpur Minecraft server
- Choose the Java runtime for your Minecraft server
- Find Minecraft logs and send useful troubleshooting details
- Move an existing Minecraft server to CloudExa
- Connect a domain to your Minecraft server
- Set up Geyser and Floodgate for Java and Bedrock crossplay
- Fix a game console that will not connect or shows a 504 error
- Connect a Minecraft plugin to a MySQL database
- Understand Minecraft RAM, CPU and storage usage
- Schedule game server backups and check retention
- Fix common Minecraft connection errors
- Update Paper, Purpur and plugins safely
- Set up a Velocity network with protected backend servers
- Investigate and recover from a full game server disk
- Manage Minecraft operators, permissions and the whitelist
- Install or change a Minecraft modpack safely
- Diagnose Minecraft lag with TPS, MSPT and spark
- Add a Java server resource pack and fix download errors
- Change Minecraft versions with a backup and rollback plan
- Plan a Rust wipe and choose a map seed safely
- Install and troubleshoot Rust Oxide plugins
- Fix Rust update and startup failures without wiping
- Choose an ARK Survival Ascended map and CurseForge mods
- Move an ARK Survival Ascended save safely
- Diagnose ARK Survival Ascended connection failures
- Move an existing Palworld world safely
- Edit Palworld server settings safely
- Fix Palworld password and joining problems
- Recover a Minecraft player inventory from a backup
- Recover a Minecraft server after griefing
- Set up EssentialsX commands and player permissions
- Use WorldEdit selections, limits and undo safely
- Protect a Minecraft spawn with WorldGuard regions
- Connect Minecraft chat to Discord with DiscordSRV
- Pre-generate Minecraft terrain with Chunky and monitor disk space
- Diagnose Minecraft mod conflicts on a test copy
- Create Minecraft ranks and inheritance with LuckPerms
- Connect Vault to an EssentialsX economy
- Install PlaceholderAPI expansions and fix raw placeholders
- Configure a Minecraft TAB list and scoreboard
- Allow compatible Minecraft Java clients with ViaVersion
- Inspect block changes and preview a CoreProtect rollback
- Change Minecraft difficulty, game mode, PvP and spawn protection
- Tune Minecraft view distance and simulation distance
- Install Minecraft Java data packs and plan safe removal
- Use a custom Minecraft world seed without overwriting an existing world
- Schedule Minecraft restarts with player warnings
- Tell a Java memory error from a killed Minecraft process
- Find setup and troubleshooting guides for your game server
- Set a Minecraft Java world border without stranding players
- Enable Minecraft keep inventory with the right version-specific gamerule
- Add or replace a Minecraft Java server-list icon
- Change the built-in Minecraft server-list MOTD
- Set Minecraft player slots without changing plan resources
- Configure an idle-player timeout on Minecraft Java
- Reduce player IP exposure in Minecraft server logs
- Diagnose Minecraft pausing when no players are online
- Check Paper world autosave intervals without disabling saves
- Separate Paper entity activation range from tracking range
- Enable and test Paper Anti-Xray in one world
- Read a Paper watchdog report without disabling its protection
- Repair a Paper YAML configuration error safely
- Fix Minecraft server.properties changes that do not apply
- Apply a Paper setting to one world using inheritance
- Enable Minecraft Query on an allocated UDP port
- Plan restricted RCON access for a Minecraft Java server
- Test a Minecraft network compression threshold change
- Fix “UnsupportedClassVersionError” when starting Minecraft Java
- Fix “Unable to access jarfile” in a Minecraft startup
- Resolve “Circular plugin loading detected!” on Paper
- Resolve “UnknownDependencyException” when a Paper plugin will not load
- Fix “Ambiguous plugin name” without losing plugin data
- Fix “Unsupported API version” when loading a Paper plugin
- Fix “This server requires you to connect with Velocity.”
- Investigate “A plugin tried to cancel a signed chat message.”
- Resolve a Fabric dependency error without bypassing mod requirements
- Find a client-only Fabric mod in a dedicated-server crash
- Fix a modern Forge startup path that points to a missing JAR
- Trace a Forge client-server mod channel mismatch when joining
- Resolve a NeoForge required-mod or version-range failure
- Find the active NeoForge server config after a mod update
- Game server will not start: choose the next safe check
- Players cannot join: follow the connection checks
- Server lag: choose checks for delays, freezes or low FPS
- Configure an Arma 3 server and test a first mission connection
- Diagnose Arma 3 connection failures and mission loading errors
- Prepare and find your Squad server for its first match
- Diagnose a missing Squad listing or failed server join
- Prepare an Assetto Corsa race server and verify the first join
- Diagnose Assetto Corsa startup, lobby and join failures
- Plan a Squad Workshop mod setup without losing server configuration
- Diagnose Squad Workshop mismatches and modded-map failures
- Install an Arma 3 mod set with the correct client and server roles
- Resolve an Arma 3 mod update or signature mismatch without bypassing checks
- Add custom cars and tracks to an original Assetto Corsa server
- Update Assetto Corsa content and isolate extension conflicts
- Find mod and plugin guides for your game
Connect to your Minecraft server
Find your server address
Sign in to the game panel and open your server. Copy its assigned connection address, including the port when one is shown.
Join from Minecraft
- Start the Minecraft edition and version your server supports.
- For Java Edition, choose Multiplayer, then Add Server or Direct Connection.
- Paste the connection address and join.
A Java server does not automatically support Bedrock clients. Bedrock access requires compatible server software or an appropriately configured bridge such as Geyser.
Connection trouble?
Check that the server is running and that its console shows startup completed. Confirm the address, port and game version. If the panel cannot reach the server, include the server ID and error in a support ticket.
Back up game files before making changes
Use the Backups section of the CloudExa game panel to keep a recovery point before changing plugins, worlds or server settings. Keep a downloaded copy somewhere outside your game server as well.
Before you start
- Sign in at game.cloudexa-hosting.com and check that you selected the right server.
- Your service needs an available backup slot. A subuser also needs backup permissions.
- For a consistent Minecraft world backup, tell players about the pause, stop the server through Console and wait for it to finish saving.
A game server file backup does not automatically include an external MySQL database. Export databases used by plugins through the database tools available to you, and keep those exports with the matching file backup. Ask support if you cannot find an export option.
Create a backup
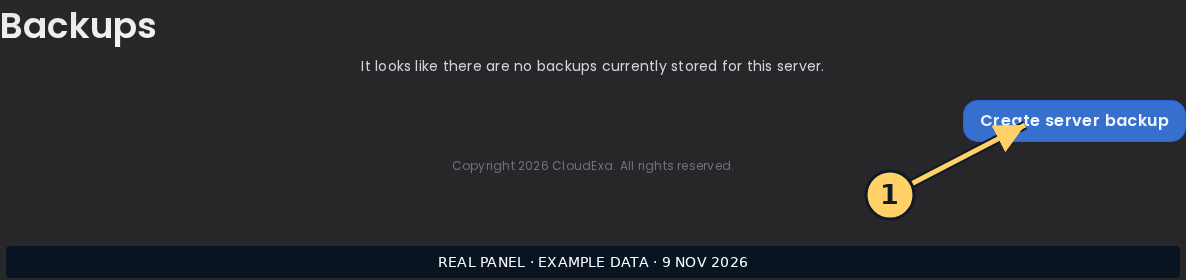
- Open Backups, then choose Create server backup.
- Enter a name that explains the recovery point, such as
before-plugin-update-2026-11-08. - Choose an Archive format. Use
tar.gzorzipto suit your download and extraction tools. - Review Ignored Files & Directories. Leave it empty unless you understand the exclusions. A
.pteroignorefile can still exclude files when this box is empty. - Enable Locked if you want to protect the archive from deletion and your permissions allow it.
- Choose Start backup. Wait for a successful completed entry before treating it as a recovery point.
- Open the backup's three-dot menu and choose Download if you need your own off-server copy. Start the game server again when the backup has completed.
Restore a backup
Restoring replaces files with older versions and can undo player progress. Download or back up the current files first. A restore can stop the server and make its file manager and power controls unavailable until it finishes.
- Confirm the backup name, date and server. Open its three-dot menu and choose Restore.
- Read the confirmation. The option Delete all files before restoring backup. removes the current server files before extraction. Leave it unticked unless you intend a complete replacement and have secured anything you need. Leaving it unticked can retain newer files that are absent from the archive.
- Choose Restore once and wait for the restore state to finish. Do not start another restore or reinstall to clear a spinner.
- Check the console, start the server if it remains stopped, and join to check the expected world and player data.
If a backup fails or a restore appears stuck
Record the backup name, time, server ID and any request ID shown in the error. Check available storage and your backup allowance. A large archive can take longer than a small world; repeated restore attempts can make investigation harder. Contact CloudExa support with those details. Do not delete the last working backup.
Next: upload a Minecraft world or install a plugin.
Upload an existing Minecraft Java world
Importing just a world? Use the steps below. To move plugins, settings, player access lists and any external database as well, use the complete Minecraft server migration guide.
Move an existing Minecraft Java world to CloudExa through File Manager or SFTP. This guide covers a move between compatible Java server installations. Bedrock worlds and modded-to-Paper conversions need a different process.
Check the source before uploading
Record the Minecraft version, server software and world name on the original server. Use a compatible destination, preferably the same software and version for the first start. Opening a world in a newer version can change its data; loading it in an older version can fail or damage it. Keep an untouched original copy.
Stop the source server before making the final copy. Copy the complete world and its dimension data, not just the region files. Include any extra worlds that your plugins manage. Older Paper/Spigot setups may have separate folders such as world_nether and world_the_end; other versions use a different layout. Keep the source structure intact and consult the Paper migration instructions if you change software or version.
Prepare your CloudExa server
- Open the destination at the game panel. Confirm the server name and address.
- Create a backup of the current destination files. Stop the destination server and wait for its console to finish saving.
- Check free disk space. An uploaded archive and its extracted contents need space at the same time. A download on your computer is safer than relying on a second copy inside the same server quota.
Upload the files
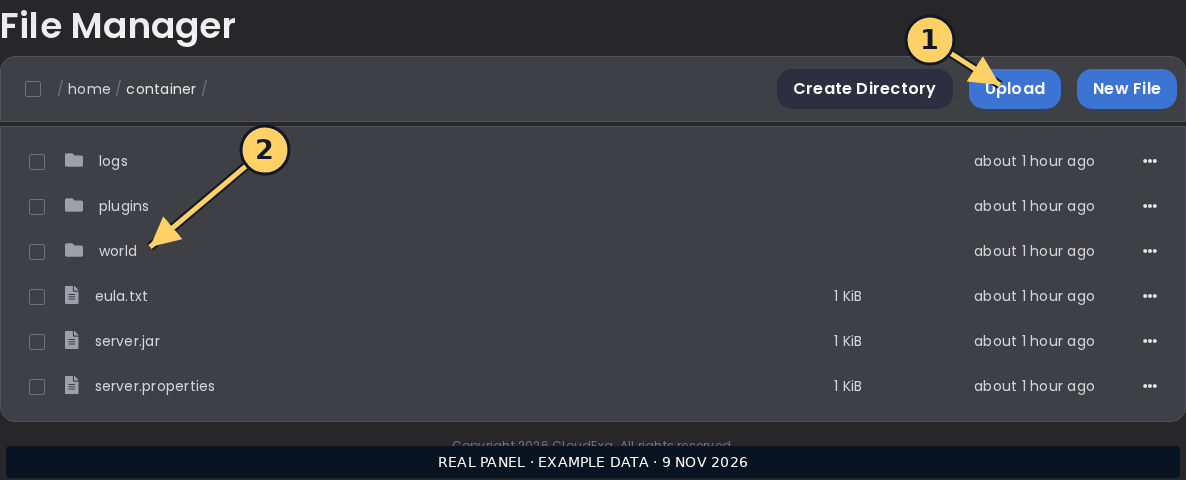
- Open File Manager. Choose Upload to send files or a folder from your computer. For large transfers, use the address and username shown under Settings → SFTP Details in an SFTP client.
- If you upload an archive, open its menu and choose Unarchive. Check the result before starting the server.
- Find
level.datin the world directory. Avoid an extra nesting level such asMyWorld/MyWorld/level.dat. - Open
server.propertiesand setlevel-nameto the correct world folder name, including letter case. Save the file. Plugins that manage several worlds can have their own configuration too. - Start the server. Watch the console for errors before inviting players back.
Check the result
Join and visit a known build. Check inventories, player positions, the Nether and the End. If you moved the whole server, also verify permissions, whitelist and plugin data. Preserve the original copy until these checks pass.
If you see a new or incomplete world
Stop the server rather than continuing to play. Check the world folder name, level-name, archive nesting and dimension folders. If the console reports an unsupported version or missing mod data, return to your untouched copy and ask support about the correct migration path. Do not delete folders to make the error disappear.
Install plugins on a Paper or Purpur Minecraft server
Use this guide to install a Paper or Purpur plugin, check that it works and find the cause when it fails. Start with one plugin at a time so you can tell which change caused a problem.
Check the plugin before downloading
Read the developer's release page. Match the plugin to your Minecraft version, server software and Java runtime. A project may offer separate downloads for Paper, Velocity and Fabric. A Fabric, Forge or NeoForge mod will not work as a Paper plugin. Use the developer's official site or project listing; avoid cracked JARs and files sent by strangers.
Check the dependency list too. Some plugins need another plugin before they can start. Keep the previous working JAR and configuration outside the active plugins folder if you intend to roll back.
Install or update a plugin
- Sign in at game.cloudexa-hosting.com, select the correct server and create a backup. Export any external database that the plugin uses.
- Open Console, stop the server and wait for it to finish saving.
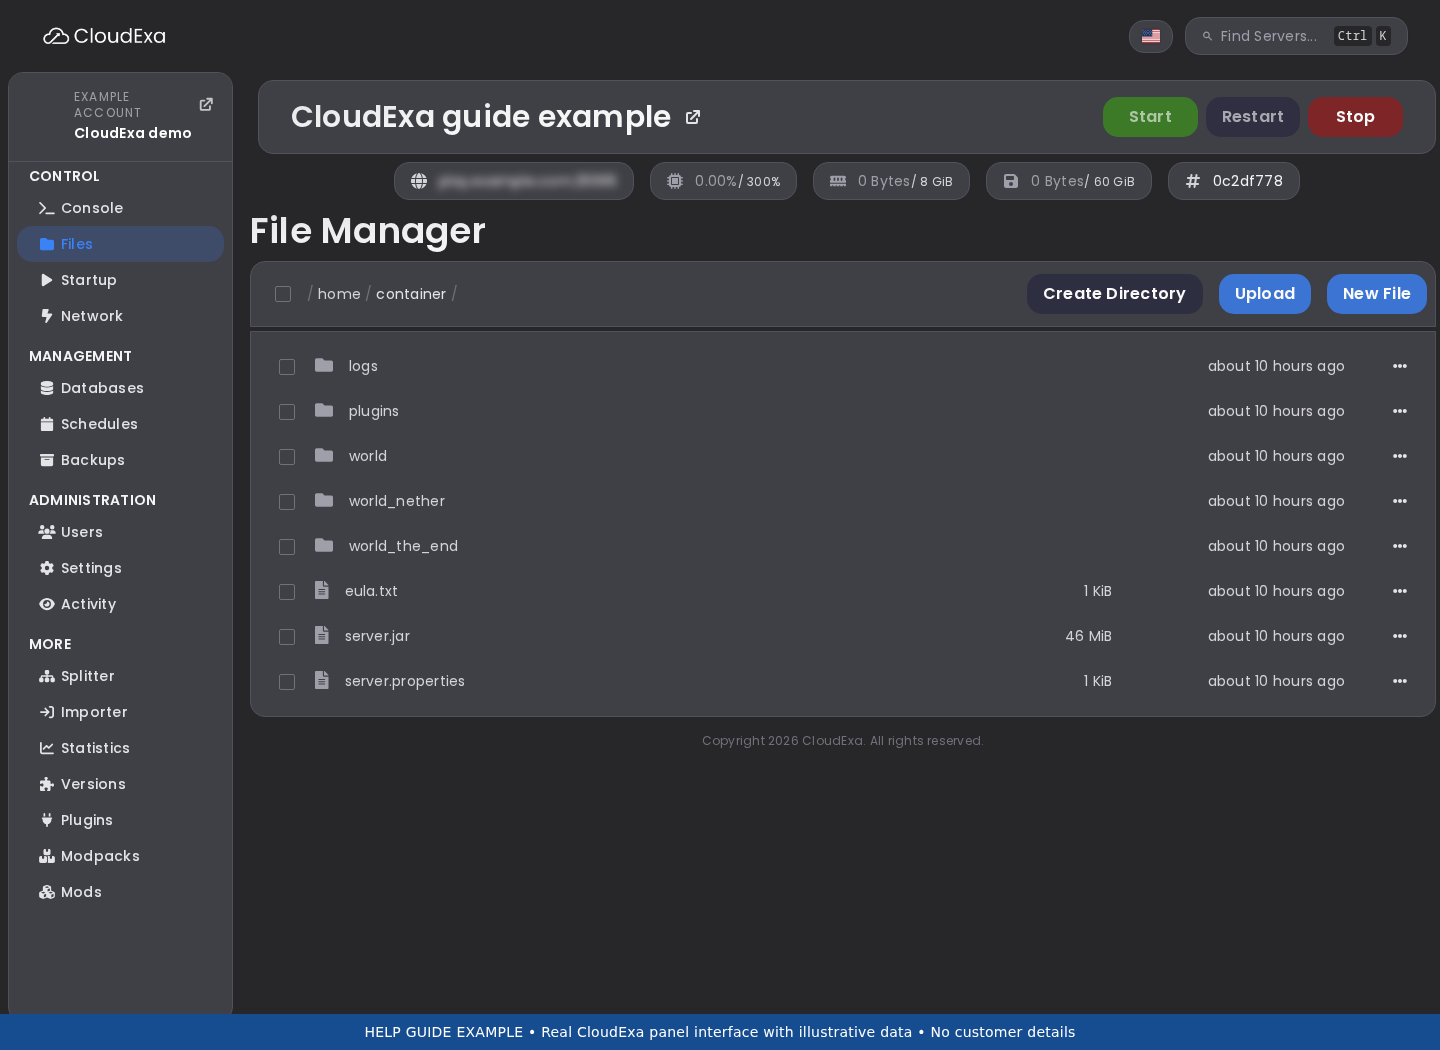
- Open Files and the
pluginsfolder. Confirm that your server runs Paper or Purpur if that folder is missing. - Choose Upload and select the plugin's
.jar. If the download is a ZIP, inspect the author's instructions and upload the correct JAR from it. - Upload any required dependency. When updating, move the previous version outside
pluginsso the server loads one copy. - Start the server. Read the first startup messages for the plugin, then run
pluginsin Console without a leading slash.
Configure it and test as a player
Many plugins create a folder in plugins after their first start. Stop the server before editing its configuration unless the author gives a supported alternative. Preserve YAML indentation and use spaces instead of tabs. Save your changes, restart, and test the feature with a normal player account as well as an administrator account.
A plugin can appear in the list while a database, permission or optional feature still fails. Check the action you installed it for. Use the author's documented reload command only where supported; Minecraft's general /reload command can leave plugins in an inconsistent state.
Find the first useful error
Open logs/latest.log through Files, or follow the log collection guide. Read from the start of the failed plugin's loading sequence. Later errors can follow from the first failure.
- Missing dependency: install the named dependency and check its supported version.
- Unsupported API or Java version: compare the plugin requirements with the server and Java versions in the startup log. Changing a world to an older Minecraft version can damage it; ask support before attempting that.
- Invalid configuration: check the file and line named in the error. Compare your edits with the author's example, keeping a copy before changing it.
- Database timeout or login failure: check the database endpoint, port, database name and allowed connections. Share error text through a private ticket, with passwords removed.
- Duplicate plugin or version conflict: inspect the folder for old JARs and check the developer's compatibility notes.
Roll back a failed installation
Stop the server and move the new JAR outside plugins. Keep its data and logs. Start again and compare with the previous working state. A plugin update may also change its database or data files, so restoring an older JAR alone may not undo the change. Contact support with the plugin name, download link, version and first error before restoring a backup.
Reference: Paper's plugin installation and troubleshooting documentation.
Choose the Java runtime for your Minecraft server
Use a Java runtime that matches your server software and Minecraft version. Changing Java does not update Minecraft, install plugins or convert a world.
Check the requirement first
Read the release instructions for the exact server or modpack you run. Paper's current guidance recommends Java 21 for Paper 1.20–1.21.11 and Java 25 for Paper 26.1 and newer. Older releases and modpacks can need other versions. Check the Paper Java compatibility table rather than assuming the highest number suits every server.
Plugins can have their own Java requirements. If a plugin requires a newer runtime than your server supports, choose a compatible plugin release or plan a server upgrade before proceeding.
Change the runtime in CloudExa
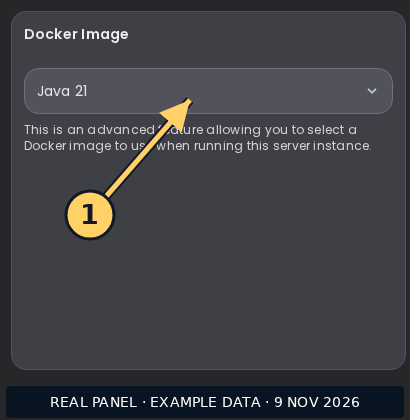
- Open your server at the game panel. Record the current runtime option so you can return to it if needed.
- Create a backup, then stop the server and wait for it to shut down.
- Open Startup and find Docker Image. The named options select the runtime environment for the server.
- Select the available Java option that matches your software requirements. Wait for the change to save before leaving the page.
- Start the server and read the opening console lines. Check the Java version and wait for Minecraft to finish loading.
- Join and test your important plugins or mods before inviting everyone back.
If you cannot select an option
A subuser can need permission to change the startup image. The field can also be read-only when an administrator has set a custom image or when the service offers only one image. Contact support with your server ID, Minecraft version and required Java version. Do not change unrelated startup variables to work around a locked selector.
If the server fails to start
An UnsupportedClassVersionError can indicate that a JAR needs a newer Java version. Check which JAR the log names. Other boot errors can involve incompatible flags or dependencies. Keep the error text, restore the previous runtime if appropriate, and use the log collection guide when asking for help. Changing the runtime alone does not require a reinstall.
Find Minecraft logs and send useful troubleshooting details
Send the log from the time a problem happened so support can trace the cause. A screenshot of the final error line often misses the earlier message that explains it.
Collect the right information
Write down the time and timezone, the server name or ID, the Minecraft version and server software, and what you did before the error. Include whether players saw a disconnect, the game process stopped, or the panel itself failed to connect. Mention recent plugin, configuration or version changes.
Open or download the log
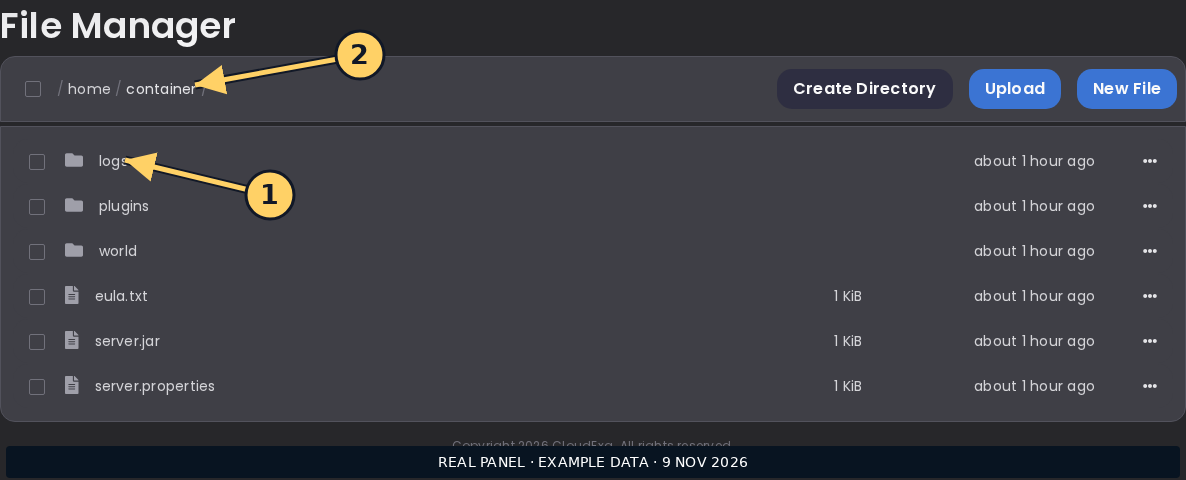
- Sign in at game.cloudexa-hosting.com and select the affected server.
- Open Console to read the current output. Capture the lines before the error as well as the error itself.
- Open File Manager, then
logs. On a typical Paper server,latest.logcontains the current session. Open it to read the text, or use its menu's Download action. - If the server has restarted since the incident, look for the dated log from the relevant session. Older logs can use
.gzcompression. Download and extract a copy on your computer rather than editing the archive on the server. - If the server created a report under
crash-reports, include the matching report with the log. Some failures never create a crash report.
Check before sharing
Logs can contain player IPs, chat, commands, connection strings or tokens printed by a plugin. Use a private support ticket. Redact secrets from a copy, preserve the surrounding error lines, and keep the original private. Do not post an entire configuration file or database password into a public chat.
Send a focused support request
Attach the log to a CloudExa support ticket and include the time, software versions and steps needed to reproduce the issue. For a panel communication error, include its request ID if shown. Keep the game log as well, even if the panel displays a separate error.
Avoid restarting over and over while collecting evidence. If you need to restart, download the relevant log first. If a plugin failed after installation, include its name and version; see the plugin installation checks. Ask support before deleting files or reinstalling to troubleshoot an unexplained crash.
Move an existing Minecraft server to CloudExa
This checklist moves a complete Minecraft Java server. If you only need to import a world into an existing installation, use the world-upload guide.
Use this guide when you want to move a complete Java Minecraft server from another host. Keep your old service and an independent backup until you have checked the new server in game. A file transfer does not move a plugin's remote MySQL database.
Before you transfer
- Record the old server software, exact Minecraft version, Java runtime and startup filename. Start with matching versions; upgrade after the move works.
- Check that your new plan has room for the extracted files and any upload archive. You may need space for both copies during extraction.
- Choose a maintenance window. Tell players to leave, then stop the old server so worlds and plugin data stop changing.
- Download a complete backup to your own computer or another safe location. Include hidden files if your transfer client offers that option.
Create and check a backup before replacing files. Stop the destination server too. Do not use Reinstall to move your files.
Copy the server files
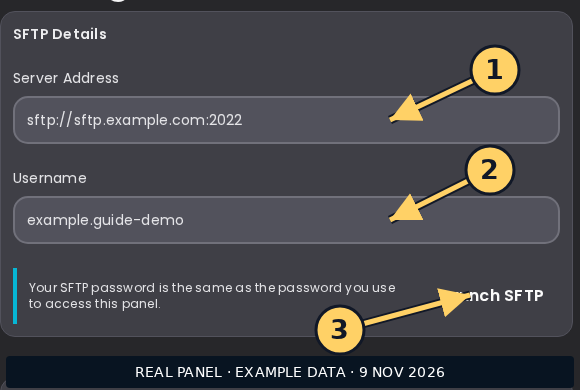
- Open your CloudExa server in the game panel. Use Files for uploads, or open Settings to copy your server's SFTP address and username. Use the values shown for this server, including its SFTP port.
- Transfer the contents of the old server's root folder into the new server's root folder. Avoid an extra folder level such as
old-server/world. Keep the original world folder names and structure, including dimension folders. - Include
pluginsand their configuration/data folders,server.properties, whitelist, operators and ban lists. Include any extra worlds and datapacks your server uses. Treat configuration files as private because they may contain credentials. - If your destination already has a generated world, retain a separate copy before replacing it. Ask support for help if you cannot distinguish the new files from your imported world.
- Open Startup and check that the selected runtime and server JAR filename match the files you intend to run. See choosing a Java runtime.
Move databases and adjust addresses
Export plugin databases from the old host and import them into the destination database before starting plugins that use them. Update each plugin's host, port, database name, username and password. Copy the destination connection details from Databases; do not assume the old credentials will work.
Keep CloudExa's assigned listening port in server.properties. Leave server-ip blank unless support has instructed otherwise. Check separate ports for Geyser, voice chat and web maps against your assigned allocations under Network.
Check before sending players over
- Start the CloudExa server and read Console. Wait for startup to finish, then connect using the new IP and port.
- Visit the main world and other dimensions. Check player inventories, permissions, plugin data and a sample of existing builds.
- Stop and start once during your maintenance window, then confirm that changes persist.
- Update your domain only after these checks. Keep the old server stopped to avoid two communities writing different copies of the same world.
If startup fails, stop and collect the error using the log guide. Changing server software or downgrading an upgraded world can damage data. Paper documents version-specific world layouts in its migration guide.
Connect a domain to your Minecraft server
You can give players an address such as play.example.com instead of a numeric IP. You need access to the DNS provider for your domain and the connection address shown in your CloudExa game panel. A domain changes how players find your server; it does not create a new port allocation.
Check the server address first
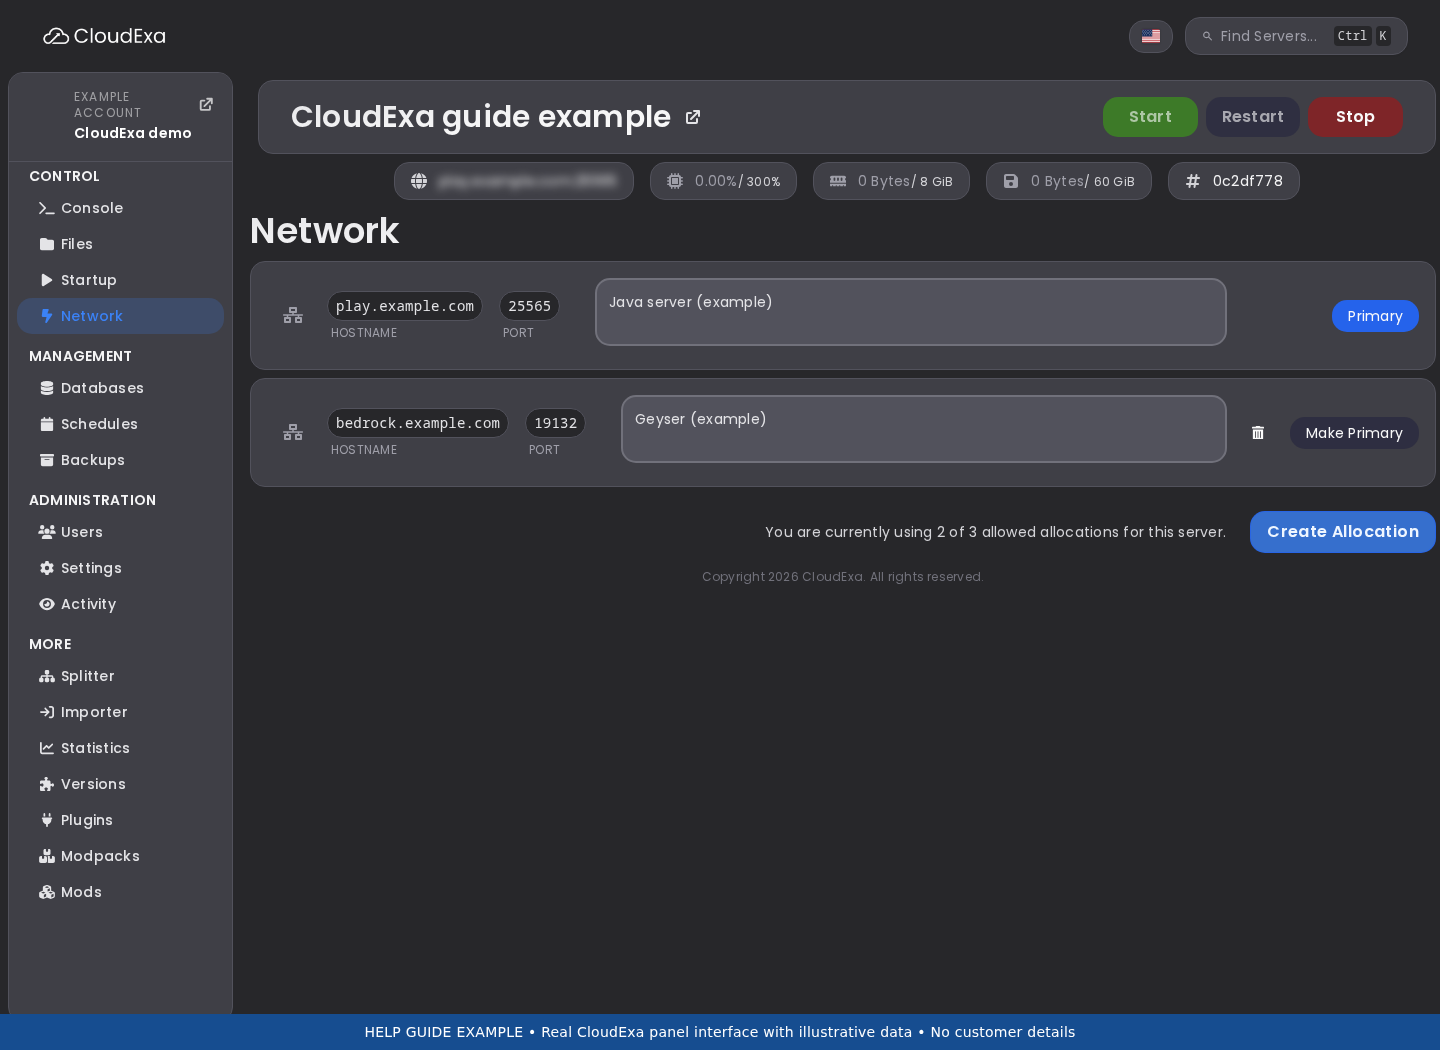
- Open your server in the game panel and select Network.
- Copy the assigned IPv4 address and Java port. If you offer Bedrock crossplay, also record the separate Geyser port from its configuration and allocation.
- Join with the numeric IP and correct port before editing DNS. Fix a failed direct connection first, since DNS cannot make an unreachable server work.
The addresses and ports below are examples. Replace 203.0.113.10, 25570 and 19132 with your own values.
Add the address record
At your DNS provider, create an A record with name play and value 203.0.113.10. Enter only the IPv4 address in the value field, without a colon, port or https://. Keep the existing records for your website and email.
If you use Cloudflare, set the game hostname to DNS only, shown as a grey cloud. The standard website proxy does not carry ordinary Minecraft connections. Do not add an AAAA record unless your service has a working assigned IPv6 address.
Let Java players omit a custom port
Java normally uses port 25565. If your assigned port is different, players can enter play.example.com:25570. To let them enter just play.example.com, add an SRV record:
| Field | Example value |
|---|---|
| Full record name | _minecraft._tcp.play.example.com |
| Target | play.example.com |
| Port | 25570 |
| Priority | 0 |
| Weight | 0 |
Some providers split the name into Service, Protocol and Name fields. Use _minecraft, _tcp and play in that case. Check the resulting full name to avoid adding your domain twice. The target must be a hostname with its own address record, not an IP address or URL.
Give Bedrock players both fields
Verify the change
On Windows, macOS or Linux, check the records with these commands if you have nslookup available:
nslookup play.example.com
nslookup -type=SRV _minecraft._tcp.play.example.com
Confirm that the first result contains your assigned IP and the second contains your Java port and target. Existing DNS caches may retain old values until their TTL expires. Test both the direct address and domain. If only the domain fails, send support the hostname, record results and edition you tested; never send your DNS account password.
Reference: DNS record types, Cloudflare proxy status and Geyser connection FAQ.
Set up Geyser and Floodgate for Java and Bedrock crossplay
Geyser lets Bedrock players connect to a Java server. Floodgate lets authenticated Bedrock players join without owning a separate Java account. These steps cover one Paper or Purpur server. A Velocity network needs its proxy-specific setup and forwarding settings; ask support before adapting these steps to a network.
Prepare your server and ports
Back up your server and record your current Minecraft and Java versions. Check Geyser's supported versions before downloading it. Some Minecraft Java server versions require ViaVersion to support the protocol expected by the current Geyser release.
Open Network in the game panel. Geyser's current NetherNet transport needs its assigned port reachable over TCP and UDP. It cannot share the Java listening port because NetherNet also uses TCP. Older RakNet-only instructions that mention just UDP do not cover NetherNet.
Use a separate allocation for Geyser. If you do not have one, ask support to assign and verify it. Do not pick an unused-looking port or change the server's primary allocation. The usual example port is 19132, but your assigned port may differ.
Install the Paper-compatible plugins
- Stop your server from Console. Download Geyser and Floodgate from the official download page, selecting the Spigot/Paper builds.
- Open Files, enter
pluginsand upload both JAR files. Keep one version of each plugin; retain a backup before replacing an older JAR. - Start the server once to generate configuration, then stop it before editing.
- Open
plugins/Geyser-Spigot/config.yml. Underbedrock, setportto your assigned Geyser port. Follow the comments generated by your installed build for the transport setting. Current NetherNet configurations usetransport: nethernet. - Find
auth-typeand set it tofloodgatewhen you have installed Floodgate. Follow the Floodgate instructions for your build if the configuration layout differs. - Save and start the server. Read the startup output for both plugins and confirm the Geyser listening port.
Keep your Java server's authentication protection in place. Do not disable online mode as a shortcut for failed Bedrock logins. Protect Floodgate's key file and do not paste it into tickets, screenshots or public configuration examples.
Test both editions
Join from Java with the normal Java address. Then use Bedrock's Add Server screen with the same public IP or hostname and the assigned Geyser port. Test from a separate internet connection if possible. A working Java connection alone does not prove that Geyser's UDP path works.
Check player permissions and account names with a test player before opening crossplay to your community. Keep Floodgate's identity settings consistent with your existing setup so plugins continue to recognise players.
If Bedrock cannot connect
- Java works, Bedrock times out: check the Geyser port, assigned allocation, and TCP/UDP reachability. Ask support to check the container and host route.
- Unsupported version: compare the client, server, Geyser and ViaVersion versions against Geyser's current compatibility guidance.
- Authentication error: confirm Floodgate loaded and Geyser uses the intended authentication mode.
- NetherNet trust prompt: built-in signalling may use HTTP. Ask support about HTTPS signalling rather than assuming a web proxy will carry game traffic.
Send support your server ID, versions, transport, assigned ports and the relevant startup errors. Current references: Geyser setup, TCP/UDP requirements and Floodgate setup.
Fix a game console that will not connect or shows a 504 error
If the console says it cannot connect, rejects websocket credentials or shows a 504 error, first check whether players can still join. The browser console and Minecraft use different connections. A failed console does not, by itself, prove that your game process has stopped.
Check without interrupting players
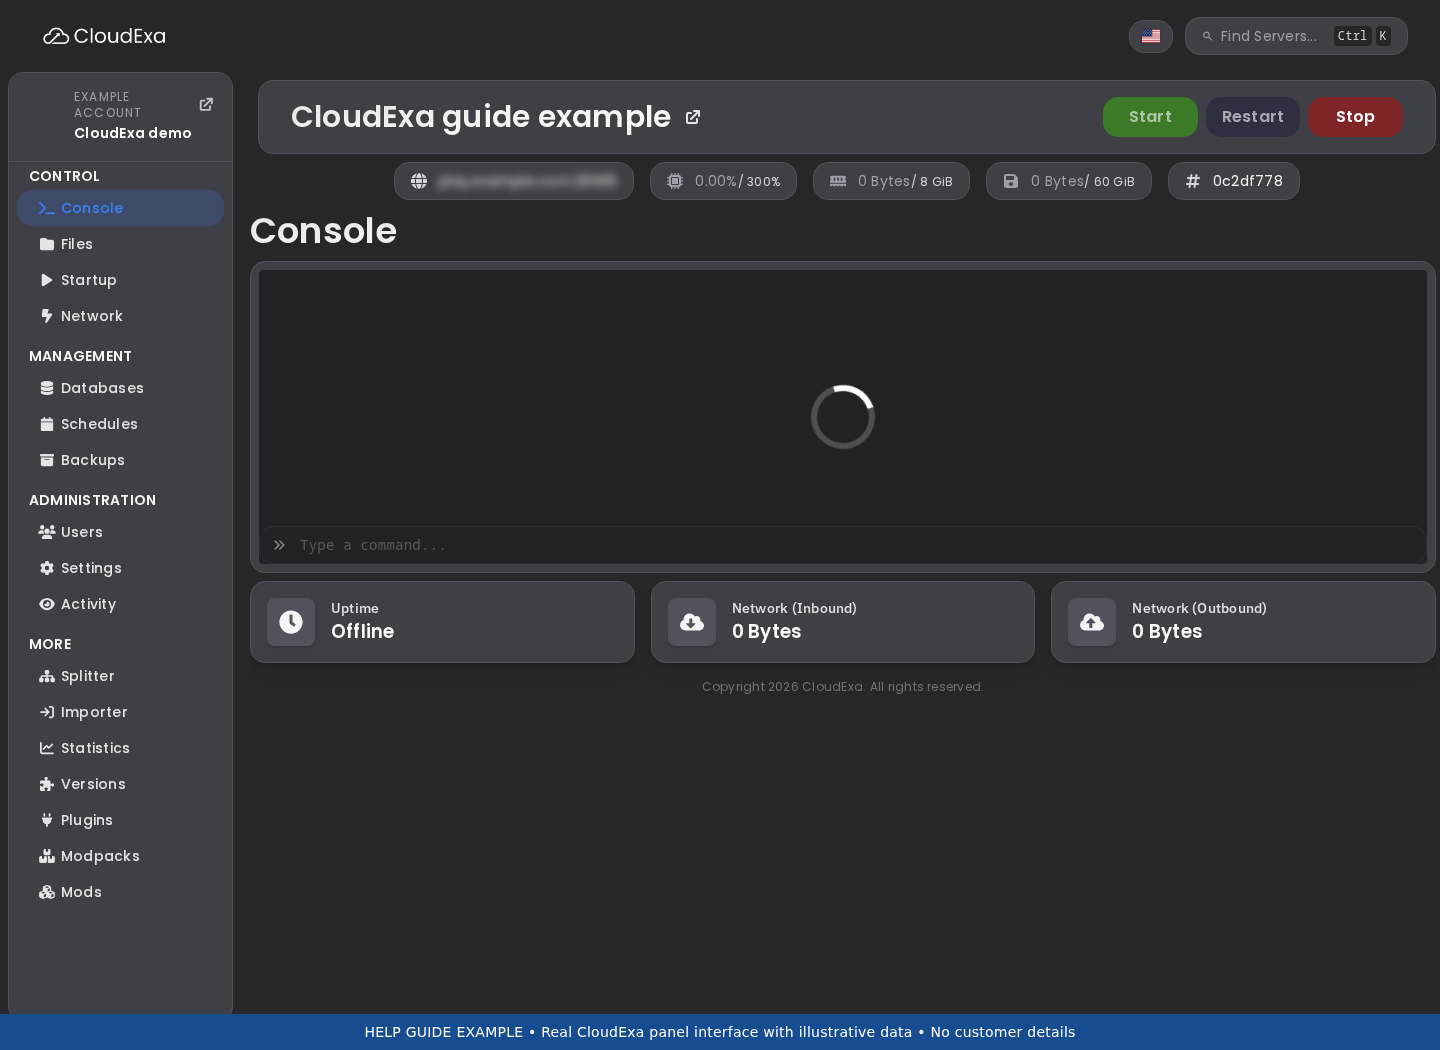
- Keep the error message and note the time, including your time zone. Copy any request ID shown by the panel.
- Ask a player already online whether the game still responds. Try joining using the IP and port from your server's Network page.
- Open the game panel in a new tab and select the same server. Check whether other sections, such as Files, load.
- If your server is transferring, installing, backing up or restoring, read its current status before pressing any power buttons. Contact support if progress has stopped; do not start another restore or reinstall.
A blank graph or an Offline label during a lost connection can be stale. Avoid repeated Start, Restart or Kill clicks while the panel cannot confirm the current state. A restart interrupts players and may hide the evidence needed to diagnose the problem.
Refresh your browser session
- Refresh the affected page once. A websocket credential can expire while a tab remains open.
- If the error remains, sign out and sign back in through your usual CloudExa account. Save any unsaved file edits before signing out.
- Try a private window or a second browser. This helps identify a cached page or extension issue.
- Temporarily test without a browser extension that filters requests, if you use one. Re-enable it afterwards. Do not disable your computer's security software or ignore certificate warnings.
- If practical, test on another connection, such as mobile data. Some workplace networks, VPNs or proxies restrict websockets.
Use the panel's normal HTTPS address. Do not edit a browser websocket URL, paste a token into another site or use a raw node address supplied by an unknown person.
Read the result
| What you see | Useful next check |
|---|---|
| Players online, only one browser fails | Session, cache, browser extensions or that network. |
| Players online, console fails in different browsers | Send support the console error. The panel-to-node connection may need attention. |
| Files and console both fail | Report both symptoms and whether other servers on your account work. |
| 504 Gateway Timeout | A gateway did not receive a timely upstream response. Support needs to check the affected request and node. |
| Console connects and prints a Minecraft error | Use the game log to diagnose that separate startup problem. |
Optional: check the panel address from your computer
If you are comfortable using a terminal, this read-only check can help describe a console problem. It makes one HTTPS request to the public panel; it does not log in or contact your game process. Run it on your own Linux or macOS computer in a POSIX shell with curl 7.47 or later, not in the game console:
curl --connect-timeout 10 --max-time 20 --silent --show-error --output /dev/null --write-out 'HTTP %{http_code}; total %{time_total}s\n' https://game.cloudexa-hosting.com/An HTTP response shows that this request reached a web server. Even HTTP 200 does not prove that the authenticated console or its WebSocket connection works. A timeout, certificate error or HTTP 403 also needs context; do not bypass certificate checks or disable protection to change the result. Stop after this one check and keep the exact error.
You can copy this outline into a private support ticket. Fill in observations, leave unknown values as unknown, and omit passwords, cookies, access tokens and full browser network exports:
Service ID: [your service ID]
Observed at: [date, time and time zone]
Exact console error / request ID: [if shown]
Players can still join: [yes / no / unknown]
Files section loads: [yes / no / unknown]
Another browser / network result: [what you actually tested]
Optional HTTPS check: [status/time or exact error]
For curl option meanings, see the official curl manual. A panel fault is not a reason to reinstall the game.
Send support the details we need
Include the server name and ID, the exact message, request ID if shown, first observed time and whether players can join. Mention which browsers and networks you tried. If three servers show the same problem, list their IDs rather than opening three unrelated reports.
Crop a screenshot to the error area. Hide email addresses, database details and tokens. Browser network exports can contain session credentials, so do not post an unredacted HAR file publicly. If Files still works, use this guide to find the relevant game logs.
Do not reinstall, delete server files, remove plugins or reset passwords to treat a websocket or gateway error. Those actions do not repair a host connection fault and can introduce a second problem. Reference: HTTP 504 explained by MDN.
Connect a Minecraft plugin to a MySQL database
Plugins such as permissions, login and player-data tools may store their data in MySQL or MariaDB. Copy the database details from your server's game-panel Databases page. Your billing password, game-panel password and database password are separate credentials.
Find the correct connection details
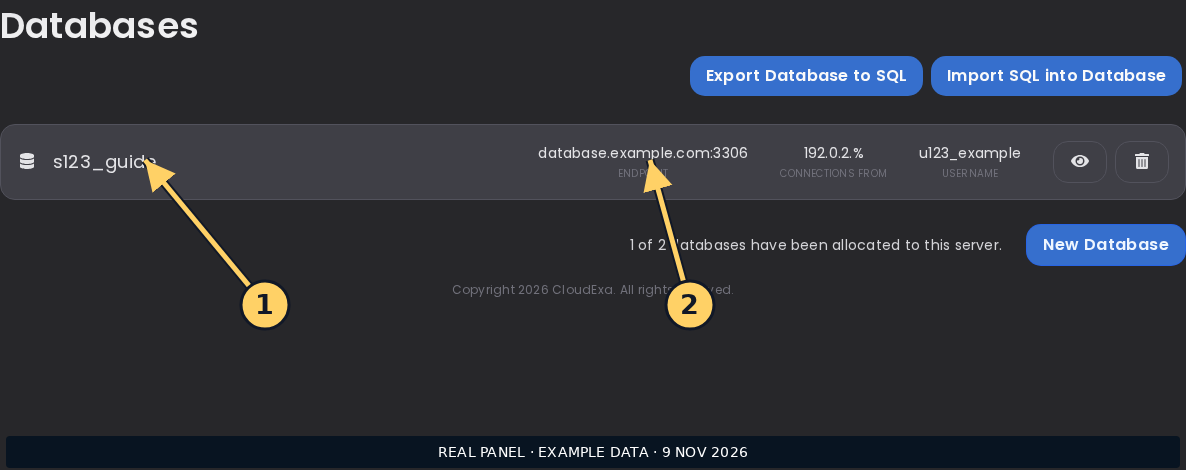
- Open your server in the game panel and select Databases. You need database permissions on the server to see or manage these details.
- Open the connection details for the database you intend to use. Record its host, port, full database name and username. Keep any prefix in the name.
- Reveal or copy the password only when you need to enter it. Keep screenshots and shared logs free of credentials. If a password has leaked, rotate it and update each application that uses it.
- If your plan permits databases but none exists, create one for this application. Ask support if your database allowance or required access is unclear.
Copy the endpoint the panel shows. Do not substitute the panel website address, Minecraft port or a different node's IP. The database port is often 3306, but you must use the displayed value.
Configure the plugin
Read the plugin author's configuration instructions, because field names and supported storage drivers differ. Stop the game server before editing its configuration unless the author documents a safe alternative.
Under Files, open the plugin's configuration in its own folder under plugins. Select MySQL/MariaDB storage if required. Enter the host, port, database name, username and password into their separate fields, then save.
# Illustrative fields only; use your plugin's actual configuration schema.
host: database.example.com
port: 3306
database: your_full_database_name
username: your_database_username
password: 'your_database_password'
Quote passwords according to the file format and the plugin's examples, especially when they contain punctuation. If a plugin accepts only a JDBC URL, follow its documented URL format and escaping rules. Keep credentials out of a URL when the plugin offers separate credential fields.
Do not use localhost or 127.0.0.1 unless support has told you to. Inside a game container, those addresses refer to that container. Two services on the same physical host can still require the displayed network endpoint.
Start and verify
- Start the server and watch Console for the plugin's database connection result.
- Test one normal plugin action that saves data, then check that it still exists after a planned restart.
- For a migration, import your old database into the correct destination before allowing the plugin to create fresh live data. Back up both databases before importing.
Match the error to the next step
- Access denied: recheck username, password and permitted client host. The network reached a database service, but authentication or permissions failed.
- Unknown database: check the full prefixed database name and endpoint.
- Connection timed out: send support the source server ID, endpoint and timestamp. A firewall, routing or listener problem needs a check from the affected container.
- Connection refused: check the endpoint and port. The database service may not be listening there.
- TLS or certificate error: use the plugin's supported TLS settings. Ask support for the intended connection policy; do not disable certificate checks as a default fix.
Increasing a timeout will not fix a blocked connection. Do not delete the database or expose it to every internet address to troubleshoot. Share the error with passwords removed. Reference: MariaDB connection troubleshooting.
Understand Minecraft RAM, CPU and storage usage
RAM, CPU and storage solve different problems. Check the panel graphs alongside the console and the time players reported a problem before changing your plan. A high reading on its own does not explain a crash or prove that you need an upgrade.
Record the problem while it happens
- Open your server's Console resource graphs and Statistics in the game panel.
- Write down the RAM, CPU and disk limits, player count and time of the issue. Capture a useful graph interval rather than a single reading.
- Read the console lines immediately before the error or stop. Use the log guide if you need an older event.
- Note what changed: a plugin, new world, view distance, player event or imported archive. Keep a backup before changing configuration.
RAM: check the limit and the error
Java reserves memory and reuses it, so you should not expect the RAM graph to return to zero after players leave. Panel memory can include more than Java's heap. Leave room for the runtime and native allocations; setting the Java heap to the entire container limit can cause a failure.
OutOfMemoryError in a Java log indicates a JVM allocation problem. A sudden process exit without a normal shutdown needs a wider check. Ask support to inspect the node and container events before assuming the game needs more RAM. A host-level outage can look similar from inside the game.
Compare memory while idle and during normal player activity. If usage keeps rising until each crash, review recent plugins and collect evidence before increasing the limit. Avoid changing several plugins and Java flags at once.
CPU: look for slow ticks
Chunk generation, entities and plugins can create CPU spikes. Minecraft can have a busy main thread even when other cores are free. Compare the graph with player reports, tick time and console warnings. A CPU percentage may use the convention of 100% per logical core; compare it with your assigned limit instead of treating 100% as the whole machine.
For supported Paper versions with spark available, collect a profile while players experience the lag. From the panel console, without a leading slash:
spark profiler start --timeout 600After the ten-minute sample, save the report link. Review it before sharing because reports can include server details. Use the plugin or Paper documentation if that command is unavailable. A profile recorded while the server is idle may miss the cause.
Storage: count archives as well as worlds
Check Files for large world folders, logs and uploaded archives. An extracted archive and its original ZIP or tar file can occupy space at the same time. World exploration, maps and plugin databases can also grow over time. A storage-full message is not a request for more RAM.
Do not delete world, player or plugin data to make space. Download and verify a separate copy before removing an archive you no longer need. If you cannot identify the largest files or the panel reports more usage than you can account for, ask support to inspect usage. Off-machine backups and temporary restore space have different capacity requirements.
Choose the next step
Send support the server ID, timestamp, graphs, error and spark report if relevant. State whether you want advice or a paid upgrade. We can help distinguish a plan limit from a plugin problem or node fault. Keep storage, CPU and RAM requirements separate when requesting a change.
Reference: Paper's spark profiling guide. For JVM settings, use documentation that matches your installed Java and Paper versions.
Schedule game server backups and check retention
Use Schedules in the CloudExa game panel to request backups at chosen times. A schedule saves you a repeated task, but you still need to check its results and keep an off-server copy of important recovery points.
Check your allowance and recovery needs
Open Backups and confirm your available slots. Your account needs schedule permissions and permission to create backups. A plan with no backup allowance cannot create scheduled backups. Read the backup and restore guide before choosing exclusions.
File backups do not include an external MySQL database. Arrange matching database exports for plugins that store data elsewhere. For a consistent recovery point, stop the game server and wait for its save to finish before taking a backup. Live backups can capture files at different moments.
Create the schedule
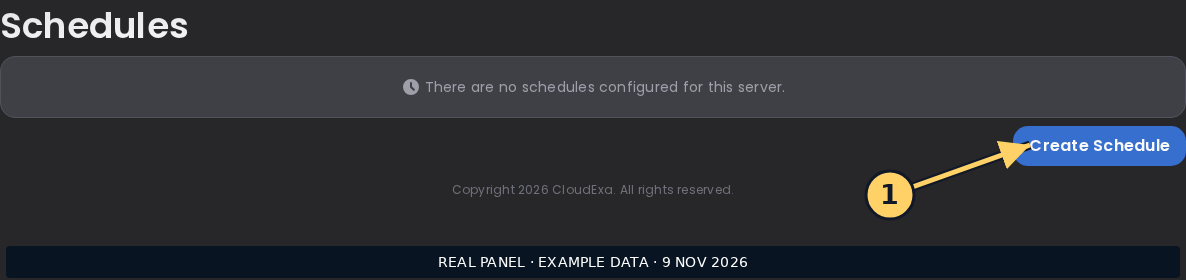
- Open your server at game.cloudexa-hosting.com, then select Schedules.
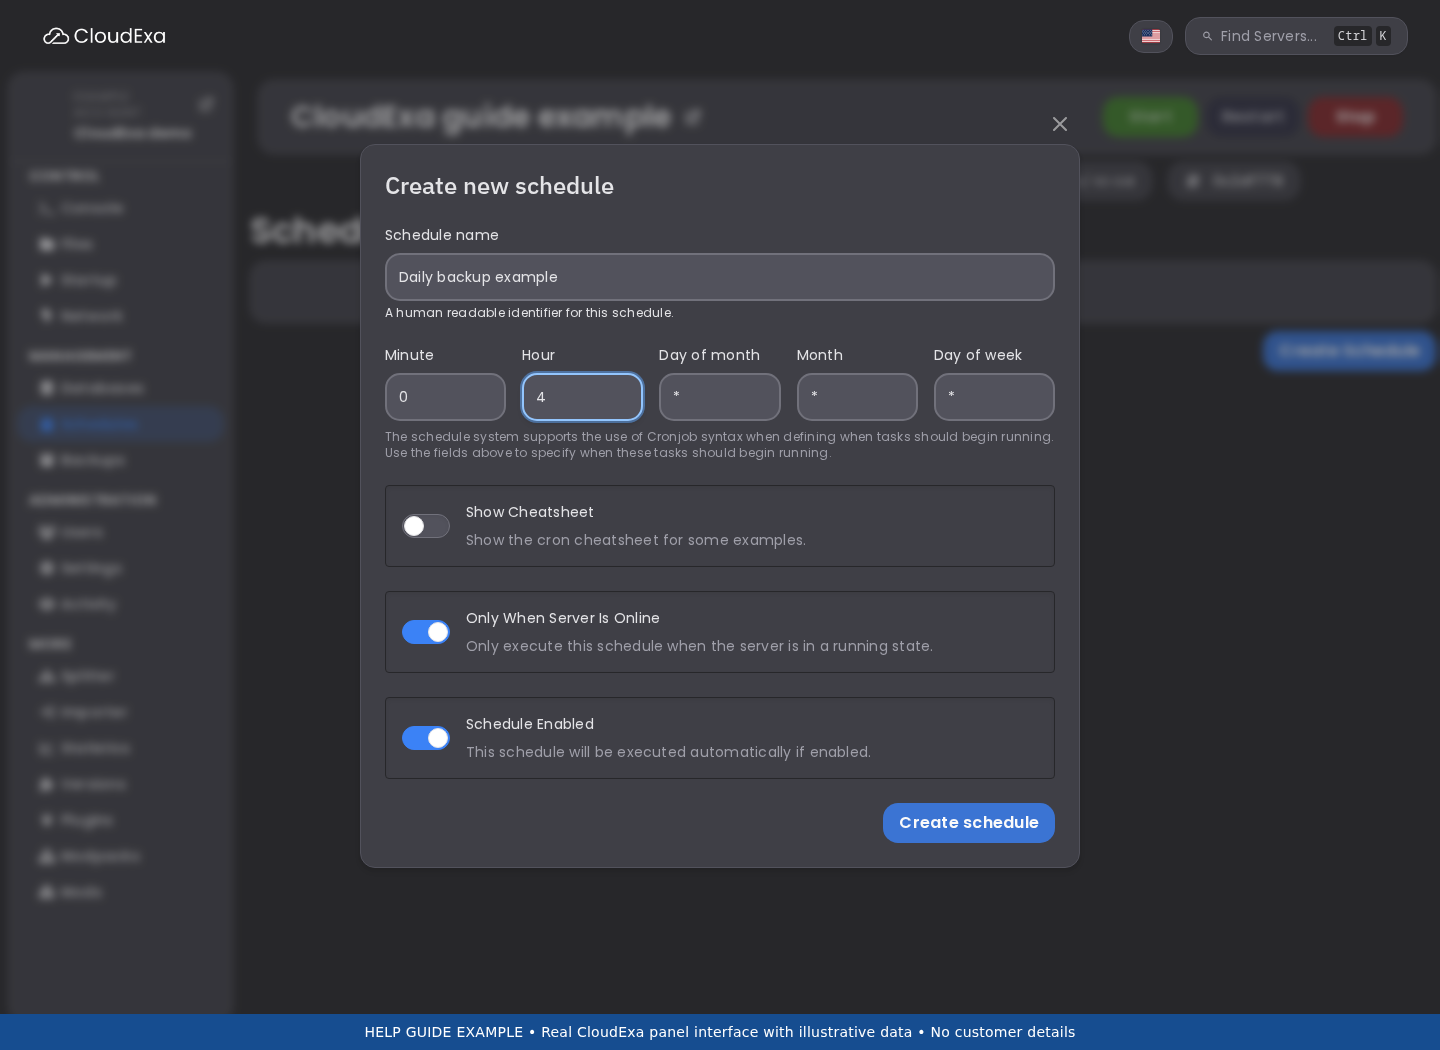
- Choose the create-schedule action and enter a name such as
Daily file backup. - Set Minute to
0, Hour to4, and Day of month, Month and Day of week to*for a daily 04:00 example. - Check the schedule or server timezone if the panel displays it. If none is shown, ask support to confirm it before relying on 04:00; it may differ from your computer. Review daylight-saving changes for a local timezone.
- Review Only When Server Is Online. Leave it enabled for a schedule intended only for running servers; turn it off if you need backups while the server is stopped.
- Keep Schedule Enabled on, then choose Create schedule.
Add a backup task
- Open the schedule and add a task.
- Under Action, select Create backup. Leave Ignored Files empty unless you intend exclusions. The server's
.pteroignorecan still exclude files. - Use a zero time offset for a single backup task. Save with Create Task.
- Check the next-run time. Run one manual test during a suitable maintenance window, then inspect the resulting entry under Backups.
A task offset delays the next task; it does not prove that a large backup has finished. Avoid chaining an automatic start immediately after a backup request when you need an offline, consistent copy. Ask support to help design that workflow.
Understand rotation
Current scheduled backups can rotate the oldest eligible unlocked successful backup when the slot allowance is full. The panel waits for the replacement to report success before removing the old copy. Locked backups are not rotation candidates; filling all slots with locked entries can block scheduled backups.
Slots count recovery points, not days. Two slots used by an hourly schedule do not provide a week of history. Download and verify any copy you need to keep before it becomes eligible for rotation.
Verify completion
Check the schedule's last-run time and the backup's completed status. A task that started is not proof of a usable archive. Check size and download a copy when practical; test recovery on a separate test server before depending on it. If a run fails or remains pending, send support the server ID, schedule name, timestamp, backup name and request ID. Do not start repeated backups to clear a stuck entry.
Fix common Minecraft connection errors
Start with the exact message your Minecraft client displays. A connection timeout, a whitelist rejection and an incompatible version need different fixes. Record the time, edition and address you used before changing configuration.
Confirm the address and server state
- Open your server's Console in the game panel. Check whether it is running and whether startup completed. Save the first startup error if it stopped.
- Open Network. Use the assigned address and port, without
http://orhttps://. A custom Java port belongs after a colon. - Test the assigned numeric address as well as your domain. If only the domain fails, check your DNS records.
- Confirm Java or Bedrock edition. Bedrock clients need a compatible crossplay setup and its separate port; see Geyser and Floodgate.
Connection refused
This often means that no process accepts connections on the address and port you tried, or that a network device rejected the connection. Check for a stopped server, failed startup or wrong port first. A running panel status does not prove that Minecraft finished loading.
If startup ends with an address-binding error, record it and ask support to check the allocation. Do not select another client's port or change the primary allocation to an unused-looking value.
Connection timed out
A timeout means the connection did not finish within the allowed time. It can involve the network path, filtering, an incorrect address or an unresponsive server. It does not prove that you need more RAM.
Try from another connection, such as a mobile hotspot, and ask one other player to test. Record whether everyone fails or only one network. If the panel console also fails, follow the console connection guide. Avoid reinstalling to troubleshoot a network timeout.
Incompatible or outdated version
Compare the Minecraft version in the server's startup output with the version selected in the player's launcher. A Java runtime version is a separate setting. Match the Minecraft release first, then review any protocol-compatibility plugins you use. Back up before changing the server version.
Whitelist, ban or authentication rejection
If the server says that a player is not whitelisted, confirm the intended username and add it from the server console using whitelist add PlayerName, without a leading slash. Keep the whitelist enabled if you run a private community. Review bans with the owner rather than removing them to test connectivity.
For an invalid-session message, have the player close the game and sign back into the official launcher. Check the provider's current service status if several authenticated players fail. Do not disable online mode on a standalone Java server to bypass an authentication error.
Send useful evidence
Send support the server ID, exact message, timestamp, edition, client/server versions and whether the numeric address works. Include relevant server logs, with tokens and passwords removed. Tell us whether the issue affects one player or everyone.
References: Server properties and Paper troubleshooting.
Update Paper, Purpur and plugins safely
Update during a planned maintenance window when you can watch the first startup and test the result. Separate a build update within the same Minecraft release from an upgrade to a new Minecraft version. The latter can change world formats and plugin compatibility.
Prepare a recovery point
- Record the current Minecraft release, Paper or Purpur build, Java runtime and plugin versions. Save the startup settings and the expected server JAR filename.
- Check each plugin's supported Minecraft versions and required dependencies. Download updates from the developer's official release page. Avoid mixing experimental builds into a routine maintenance update.
- Tell players about the pause. Stop the server through Console and wait until it finishes saving.
- Create and verify a full file backup. Include worlds, plugin JARs, plugin data and configuration. Export external plugin databases as matching recovery points.
- Keep a downloaded copy outside the server. Make sure you have space for the upload, current files and any temporary extraction.
Update the server JAR
For a file-based update, obtain the correct build from Paper's downloads or Purpur's downloads. Upload it while the server is stopped. Keep the previous JAR in your off-server recovery copy.
Match the new JAR filename to the server's Startup configuration, such as server.jar, where that setting is available. Do not rename world folders or remove configuration to make an update start. If your plan controls the JAR through a version tool rather than an editable startup field, ask support to confirm the update method and whether it retains files. A reinstall is not a routine JAR update.
Update plugins and runtime
Replace plugin JARs with compatible versions while the server remains stopped. Keep one active version of each plugin and preserve its configuration and data folders. Read migration notes before changing a plugin that stores a database schema.
Check the Java runtime guide for the target Minecraft release. Do not assume the newest runtime works with an older server. Change only the settings needed for the update so you can trace a failure.
Test before reopening
- Start the server and read the complete startup output. Look for missing dependencies, failed plugins and world-conversion errors.
- Join with a test player. Check the expected world, inventory, permissions, claims, shops and database-backed features you use.
- Check the console after a short session. Save the new build/version details and any warnings.
- Reopen the server once the checks pass. Keep the pre-update recovery point through the first normal play session.
If you need to roll back
Stop the server and preserve the failed startup log. Restore the matching pre-update files, settings and external database exports when required. Replacing only the JAR may leave converted worlds or plugin data incompatible with the older build.
Do not force an older Minecraft version to open a world saved by a newer version. Contact support before restoring if you cannot identify a complete matching recovery point. Include the versions before and after the update and the first relevant error.
References: Paper updates; Purpur compatibility.
Set up a Velocity network with protected backend servers
Velocity runs as a separate proxy in front of your Minecraft servers. Players join the proxy; it forwards them to a lobby or game server. This guide covers a modern Velocity and Paper network. Legacy clients and other server implementations need their own compatibility checks.
Plan services and protect the backend path first
Allocate resources for the proxy and each backend. Server splits share your parent service's allowance; creating a split does not add RAM or storage. Record each server ID and its assigned address and port.
Ask CloudExa support to confirm backend access restrictions before exposing an offline-mode backend. Only your authorised proxy should reach backend game ports. Modern forwarding adds identity protection, but it does not replace network isolation. On shared hosting, a source-IP rule may not distinguish other containers using the same outbound IP. Support must check the actual path.
Do not copy localhost recipes between separate game containers. Each container has its own network context; 127.0.0.1 inside the proxy does not identify another split.
Configure the proxy
- Back up existing servers and obtain a Velocity service or split configured with the correct runtime. Ask support if the required server type is unavailable.
- Start the proxy once to generate configuration, then stop it before editing
velocity.toml. - Set its listening port to the allocation assigned to the proxy. Use the container-compatible bind address supported by your service; do not bind it to a public host IP that is absent inside the container.
- Keep proxy
online-mode = truefor an authenticated Java network and setplayer-info-forwarding-mode = "modern". - In the existing
[servers]section, add each backend's reachable address and port. Set thetrylist to your lobby name. Use the addresses confirmed for proxy-to-backend traffic, not an example from this guide. - Keep
forwarding.secretprivate. You will copy its value into the backend configuration; never share it in a ticket or screenshot.
Configure each supported Paper backend
After support confirms the network protection, stop the backend and back up its configuration. For current Paper, enable proxies.velocity.enabled in config/paper-global.yml, set its secret to the proxy's forwarding secret, and set proxies.velocity.online-mode to match the proxy. Disable legacy BungeeCord forwarding in spigot.yml if previously enabled.
Set online-mode=false in the backend's server.properties only as part of this protected proxy setup. The proxy authenticates players. Do not apply that change to a standalone public Java server. Older Paper releases use different configuration paths; follow the matching upstream version instructions instead of adding duplicate settings.
Start and test the network
- Start the backends, then the proxy. Check every console for binding and forwarding-secret errors.
- Join through the proxy's public address with an authenticated test account. Confirm the correct lobby and player identity, inventory and permissions.
- Test switching to another backend and returning to the lobby.
- Ask support to verify that an unauthorised connection cannot bypass the proxy and reach a backend. Do not open backend access as a shortcut for a failed proxy test.
If connection fails, provide the proxy/backend IDs, target port, timestamp and redacted error. For secret mismatches, compare values privately. For timeouts, ask support to check the permitted network path. A public server list or hidden backend address alone does not protect a backend.
References: Velocity configuration, modern forwarding and backend security.
Investigate and recover from a full game server disk
A full disk can prevent Minecraft from saving worlds, writing logs or completing a backup. Treat the first storage warning as a reason to inspect usage. Adding RAM will not increase your storage allowance.
Protect current progress
If the game still responds, arrange a pause and stop it through Console. Wait for the shutdown result and note any save error. Avoid repeated restarts, imports or restores while storage is exhausted; they can create more temporary files or make recovery harder.
Write down your server ID, current disk usage and limit, and when the problem began. Read the resource usage guide if you need to distinguish the disk figure from memory.
Find likely growth
- Open Files and inspect the server's top-level directory.
- Look for uploaded ZIP or tar archives, especially after an import. An archive and its extracted contents can both remain on disk.
- Check known world folders, including additional dimensions and worlds created by plugins.
- Inspect logs, crash reports, rendered maps and plugin data. Record unusually large files and repeated errors rather than deleting their directories.
- Check whether a backup, restore, upload or import is still active. Ask support before altering files involved in an active operation.
A file manager may show individual file sizes without calculating every directory's total. If you cannot account for the panel's figure, ask support for a read-only usage breakdown. Hidden files, container bookkeeping or temporary operations may need a node-side check.
Reclaim only space you can account for
Start with an old upload archive that you no longer need on the server. Download it, verify that the download opens and contains the expected files, then keep that independent copy before choosing to remove the server copy. A matching filename alone does not prove the copy is complete.
Preserve worlds, player data, plugin databases, permissions and configuration. Do not remove a folder because its name looks unfamiliar. Do not delete the last known working recovery point or erase a world to make an update start.
If there is not enough space to create another local archive, download existing files through the available file/SFTP tools or ask support about a safe export path. Creating a large new archive on an already full disk can fail. External MySQL data requires its own export.
Check the cause before starting again
When logs grow quickly, save the relevant error and fix its source with the plugin developer or support. Deleting the log alone leaves the failure in place. World exploration, pre-generation and map rendering can also use substantial space; review their configuration before resuming them.
Wait for the panel's usage figure to refresh after a confirmed cleanup. Keep room for normal saves, updates and temporary operations. Start the server, check the console for save errors, then join to verify the expected world and player data.
If the usage still exceeds what you can explain, send support the limit, reported usage, operation in progress and the largest files you found. Request a storage upgrade if normal retained data genuinely needs more capacity. Specify storage separately from RAM and ask for a resize that preserves the installation.
Next: backup and restore checks or collect useful error logs.
Manage Minecraft operators, permissions and the whitelist
Minecraft operator status, plugin permissions and CloudExa panel access are separate. Give a moderator the commands their role needs without sharing your hosting password. These instructions cover a Java server running Paper or Purpur; other server types can use different permission systems.
Keep a recovery route
Sign in to the game panel and check that you can open the server's Console. Keep access through your own panel account while testing player permissions. A player who cannot run a command in-game does not need your billing or panel login.
Record the existing roles before changing them. Back up your permissions plugin's data and any external database it uses. On a public server, make one change at a time and test with an ordinary player account so operator privileges do not hide missing permissions.
Add or remove an operator
Enter these examples in Console without a leading slash. Replace PlayerName with the correct Java account name:
op PlayerName
deop PlayerName
Use op only for someone you trust with broad administrative access. Remove it with deop when they no longer need that role. A plugin can grant commands independently, so removing operator status may not remove every permission. Check both sources of access.
Grant a specific permission with LuckPerms
First install the compatible LuckPerms plugin and read the permission documentation for the command you want to allow. In Console, this example grants one player the vanilla ban-command permission:
lp user PlayerName permission set minecraft.command.ban trueTo remove that explicit assignment, use:
lp user PlayerName permission unset minecraft.command.banUnsetting an assignment allows inherited group permissions to apply again; it does not guarantee a denial. Check the player's groups and contexts if access remains. Use the plugin developer's exact permission node. Avoid broad wildcard grants such as * for routine staff roles. Keep LuckPerms administration itself restricted to trusted administrators.
Control who can join
A whitelist controls admission rather than moderation commands. Operators can bypass normal whitelist admission, so test with a non-operator account. Add your own account before enabling it:
whitelist add PlayerName
whitelist on
whitelist list
Remove a former member with whitelist remove PlayerName. Do not assume removing a name disconnects an existing session immediately; check connected players and the server's whitelist enforcement setting. If you edit the whitelist file manually, keep a copy and follow the server's reload procedure instead of changing it during an active write.
When staff leave or commands fail
Review operator status, permission groups, plugin-specific access and panel teammate permissions. These controls do not revoke one another. For proxy networks, confirm which server handles the command before editing permissions. Send support the command, exact error, server ID and the relevant permission node. Redact tokens and private editor links from screenshots.
Further reading: LuckPerms usage, Paper permissions and vanilla player data files.
Install or change a Minecraft modpack safely
Choose the exact modpack release before changing your server. A pack can require a particular Minecraft version, mod loader, Java runtime and server configuration. Uploading a collection of mods over an existing installation can leave incompatible files behind.
Check compatibility first
- Record the pack name, release number, Minecraft version and loader, such as Fabric, Forge or NeoForge.
- Read the author's server instructions and look for the matching server pack. A client export or manifest may need a pack installer and may not contain usable server files.
- Check the required Java version and the pack's RAM and storage guidance. Leave space for extraction and a recovery copy.
- Confirm that players can install the matching client release. A matching Minecraft number alone does not prove matching mods.
Protect the current installation
- Tell players about the maintenance window and stop the server in Console. Wait for saving to finish.
- Take and verify a complete backup, then keep a copy outside the game server. Export any external databases used by the current installation.
- Record the current startup settings, loader, Java image and world directory. Keep the previous pack files together as a matching recovery set.
- For an unrelated pack, use a separate test installation or ask support to arrange one. Do not merge its files into your only world.
Prepare the new files
Follow the pack author's server instructions. A server pack commonly includes mods, configuration and sometimes scripts or other data folders. Keep that structure intact. Do not upload your entire client profile or add client-only graphics mods to the server.
Ask support to confirm the supported loader and startup method if the current service is configured for Paper or a different loader. Do not press Reinstall to change packs until you understand what that operation replaces. An uploaded Windows batch file will not automatically become the startup command on a Linux game container.
Where you upload an archive through Files or SFTP, check its extracted location before starting. Avoid an extra enclosing folder that leaves the actual server files one level below the startup directory. Preserve the assigned network settings rather than copying another host's address or port.
Test the first startup
Start the server and read the loader's complete output. For a missing dependency, obtain the named compatible dependency from its developer; do not disable dependency checks. For a client-only mod error, compare the installation with the author's server pack before removing anything.
Join using the matching client pack. Check world selection, inventories and pack features. Changing or removing content mods can remove blocks or items from an existing world. Keep that world stopped until the author confirms the migration path. To roll back, restore the matching pre-change files and databases rather than swapping only the loader JAR.
Further reading: CurseForge server packs, Fabric mod compatibility and Fabric installation. For startup failures, collect the relevant logs.
Diagnose Minecraft lag with TPS, MSPT and spark
Record what players experience before changing RAM or configuration. Low frame rate on one computer, delayed network traffic and a slow server tick need different investigations. A short report captured while the problem happens is more useful than a list of settings changed afterwards.
Identify the type of lag
- Client frame rate: movement looks choppy on one player's screen, while other players and server timings remain normal. Test without shaders or a heavy client resource pack.
- Network delay: chat, actions or movement arrive late for some players. Compare affected locations and connection times; record disconnect messages.
- Server tick delay: several players see delayed mobs, block changes or commands at once. Check tick timings during that event.
A server targets 20 ticks per second (TPS), giving each tick a 50-millisecond budget. MSPT means milliseconds per tick. Sustained tick work above that budget lowers TPS. A healthy average can still hide short spikes, so record when the interruption occurs.
Capture a bounded spark profile
Paper bundles spark from Minecraft 1.21 onwards. For an older build or another loader, check the compatible spark installation instructions before adding it. Do not install a second copy without checking how that server loads the profiler.
- Wait until the affected players and workload are present. Note the time, timezone, player count and activity.
- In the game-panel Console, run this without a leading slash:
spark profiler start --timeout 60Let the one-minute capture finish and save the report URL. Use a leading slash when entering commands in Minecraft chat, with the required permissions. For intermittent long ticks, a separate targeted capture can help:
spark profiler start --only-ticks-over 100 --timeout 60This second example samples ticks over 100 milliseconds. It can miss shorter stalls, and an empty report does not prove that players had no network or client problem. Keep captures bounded rather than leaving diagnostics running without a plan.
Read the report in context
Check the capture period and tick timings before expanding the main server thread. Look for repeated expensive work associated with a plugin, entity processing, chunk generation or storage access. A large percentage identifies where sampled time went; it does not by itself prove a plugin defect.
Compare the same workload after one reversible change. Examples include reducing a specific plugin's scheduled work or testing a lower view distance during maintenance. Back up configuration first. Avoid deleting entities, removing world regions or disabling the watchdog as a generic fix. Those changes can destroy progress or hide a stalled process.
Send useful evidence
Include the report URL, affected time and timezone, software/build, player count and recent changes. Review report sharing settings and sensitive contents before posting publicly. Send CloudExa support private evidence if several services fail together or the panel also times out. Extra RAM may help a memory-bound workload, but it does not repair every slow tick.
Add a Java server resource pack and fix download errors
This guide covers a Minecraft Java server resource pack through server.properties. A pack changes client assets such as textures and sounds. It does not install server plugins or mods. Bedrock packs use a different format; a Java ZIP does not automatically become a Bedrock pack for Geyser players.
Prepare and host the ZIP
Use a pack compatible with the client Minecraft versions you support and confirm you have permission to distribute it. Test it locally in that Minecraft version before troubleshooting the server download. Keep a copy of the previous working ZIP and its configuration. In a Java pack ZIP, put pack.mcmeta at the archive root, rather than inside an extra enclosing folder.
Host the ZIP at a stable HTTPS address that downloads the file without a login, preview page or browser challenge. Open the address in a private browser window and download it. Check that the result is the intended archive rather than an HTML error saved with a ZIP name. Temporary sharing links can expire even after an initial successful test. Use a versioned filename for each release so caches can distinguish it from the old archive.
Putting a ZIP in the server's Files area does not itself provide a public download address. Do not expose SFTP credentials, private storage links or the whole server directory to make the pack available. Ask support if you need help choosing an appropriate hosting location.
Calculate the file hash
Download the published ZIP again and calculate SHA-1 from that exact downloaded file. On your own computer, use one of these examples; replace the filename with yours:
# Linux
sha1sum CloudExaPack.zip

# macOS
shasum -a 1 CloudExaPack.zip
In Windows PowerShell, use:
Get-FileHash .\CloudExaPack.zip -Algorithm SHA1Copy only the 40-character hexadecimal hash, without the filename or command output labels. Calculate it again after rebuilding the ZIP. SHA-1 here identifies the expected archive; it does not certify that an unknown pack author is trustworthy.
Update the server configuration
- Schedule a brief restart and stop the server through Console. Save a copy of
server.properties. - Open that file in Files. Set
resource-packto the public HTTPS ZIP address andresource-pack-sha1to its hash. - Keep
require-resource-pack=falseduring the first test so a failed download does not prevent everyone from joining. - Save, start the server and read any pack-related startup warning.
- Join from a test client with server resource packs enabled or set to prompt. Accept the prompt and check the expected textures or sounds.
If you later require the pack, confirm that supported clients can download it first. A player who rejects a required pack cannot join. When updating the archive, publish the new file and matching hash together, then repeat the test.
If it fails
Check the URL from the affected player's network, HTTPS certificate validity and any hosting size or access restrictions. Compare a fresh download's hash with the configured value. If the download succeeds but assets fail, check the pack's compatibility and ZIP structure against its author's instructions. Read the client's log for the first relevant error rather than changing unrelated server authentication settings.
Send support the server ID, Minecraft version, timestamp and redacted error. Do not publish signed links that grant private access. Further reading: Paper resource-pack settings and Microsoft's separate Bedrock pack format. See also Java and Bedrock crossplay.
Change Minecraft versions with a backup and rollback plan
Your Minecraft server version affects world data, plugins, mods and which players can connect. Decide whether you need a newer server, a different server type or just client compatibility before changing files. Keep the working installation intact until a separate test succeeds.
Record the working setup
In the game panel, check Console and Startup. Record the exact Minecraft version, server software, Java runtime and JAR filename. Include proxy, Geyser, plugin and mod versions if you use them. A label such as “latest” is not a reproducible rollback target.
Check the new release's requirements on the server project's official site. Review plugin and mod authors' supported versions too. A plugin working on one Paper release does not prove it works on another, and a modded server may require a matching client pack.
Make a recoverable copy before the change
- Announce downtime, stop the server and wait for the save to finish.
- Take a complete file backup, including all world and dimension folders, server settings, plugins or mods and their data.
- Export any external plugin databases while writes remain stopped. Keep the database export paired with the file backup.
- Save a copy outside the server and verify that you can open the archive. Note its timestamp and original versions.
- Test on a separate server or isolated copy when possible. Do not let both copies write to the same production database.
Use the backup guide before proceeding. A backup entry that still says pending is not a confirmed recovery point.
Choose the kind of change
For a newer Paper or Purpur version, follow the safe-update guide. Stop before replacing the running server JAR. Select a supported Java runtime using the Java guide, and check the startup filename against the uploaded file.
Switching from Paper to a mod loader changes more than a version number. Review the loader's requirements and world compatibility before using the existing world. Do not run a reinstall or replace folders as an experiment on your only copy.
If players use a different client release, first test with the exact matching release. Protocol-compatibility plugins can help specific supported combinations, but they do not add newer blocks or gameplay to an older server. Check the plugin's compatibility table rather than assuming it supports every client.
Do not force a world downgrade
Loading an existing world in a newer server can upgrade its data before anyone joins. Starting an older JAR afterward does not reverse that conversion. Paper does not support world downgrades. Do not bypass world-version checks to force an older release to load newer data.
To return to an earlier release, restore the complete backup from before the upgrade alongside its matching server software, configuration and database state. Changes made since that backup will need separate consideration. Stop and ask support if you have no compatible recovery copy.
Verify before reopening
Read startup logs, then test login, inventories, permissions, plugins, multiple dimensions and known builds. Check a stop/start cycle during the window. Send the relevant logs and exact old/new versions if a test fails; keep players out while investigating.
Further reading: Paper updates; Paper world-version errors; Paper runtime requirements.
Plan a Rust wipe and choose a map seed safely
A Rust wipe is a planned reset, not a repair for every startup problem. Decide which progress should disappear before touching files. A seed change alone does not describe what happens to blueprints, plugin economies or player records.
Choose the reset you actually want
- Map wipe: replace the active world. Terrain, placed structures and world entities belong to that world; describe the effect on inventories explicitly in your announcement.
- Player-data reset: reset the relevant player state. This is a separate decision from selecting a new map, and plugins can maintain their own records.
- Blueprint wipe: remove learned crafting blueprints. A community can keep blueprints across a map wipe, unless a game update or its own policy requires otherwise.
- Full community reset: agree whether plugin balances, kits, teams, statistics and permissions are included. They are not necessarily stored with the map.
Record and protect the current setup
- Tell players the maintenance time, timezone and exact reset scope. Check Facepunch's current update announcement rather than assuming every reset follows an old calendar.
- Record the current startup settings, server identity, map type, seed and world size. Include any custom-map URL and framework or plugin versions.
- Stop the server cleanly through the panel and wait for it to be fully offline. Make a completed backup and download a separate copy. Include the identity directory, configuration and plugin data. Confirm you can browse the archive before continuing.
Apply the intended map change
For a procedural world, Rust uses server.level, server.seed and server.worldsize. Keep the level set to Procedural Map when using a procedural seed. A familiar seed is not a promise of identical terrain after future game-generation changes.
Use the configuration exposed for your service. Do not replace its complete launch command with an example from another host: that can change ports or the active save identity. If the relevant setting is unavailable, ask support to apply the recorded change.
For the agreed wipe, identify the active world and any separately selected player or blueprint records before moving them out of the active location into your protected archive. Do not run wildcard deletion commands. If you cannot distinguish the files, stop and ask support to identify them. Preserve unrelated saves and plugin databases.
A custom map instead uses server.levelurl and a direct map download. Do not combine conflicting custom-map and procedural settings. Changing an existing map's terrain underneath buildings is not a safe way to preserve a wipe's progress.
Check before reopening
Start once, watch generation complete, join and inspect the expected map. Check blueprint retention and representative plugin records against your announcement. A wipe countdown or weekly tag does not prove an automated reset is configured. Keep the pre-wipe backup until the new world has been accepted.
Further reading
Install and troubleshoot Rust Oxide plugins
Rust plugins need a compatible server framework. This guide covers Oxide for Rust, whose plugin directory is oxide/plugins. The uMod website hosts Oxide plugin documentation, but its separate Agent workflow uses different directories. Carbon and other frameworks also need their own compatibility checks.
Check the framework first
- Open your server's Console and check startup messages for Oxide. On a working Oxide installation,
oxide.versionreports its version. An unknown command means you should establish whether the framework loaded before uploading plugins. - Confirm the plugin supports Rust and your chosen framework. Read its dependencies, current release notes and permissions. A Minecraft
.jaris not a Rust plugin. - If Oxide is absent, ask support about the supported framework option for your existing service. Do not use Reinstall or unpack an unknown server bundle over a working world.
Prepare a recoverable change
Plan a short maintenance window. Stop the server cleanly and create a completed backup, including the world and the entire existing Oxide directory. Download a copy, record the current plugin versions and keep a copy of the file you will replace. Framework installation must match the server's operating environment.
Download the plugin from its author's official listing or release repository. Use the actual source download, not a saved web page with a renamed extension. Keep the author's filename and .cs extension. Treat plugins as executable code: reject unexplained binaries, private download mirrors and requests for your panel password.
Add one plugin and verify it
- Use Files or SFTP to upload the
.csfile tooxide/plugins. Do not put it in the server root or inside an extra archive directory. - Start the server and read the compilation and loading messages. Oxide can automatically load changed source files while running, which is another reason to stage changes during maintenance.
- Check the generated configuration, commonly under
oxide/config. Follow the developer's instructions for each setting and validate JSON before saving. Keep API credentials private. - Grant only the permission nodes that the plugin documents, to the group that needs them. Test as a normal player as well as an administrator: owner privileges can hide a permissions problem.
- Check the expected behaviour and logs before adding the next plugin. Record the successful version and configuration change.
Handle failures without wiping data
If compilation fails, capture the first error, plugin version and framework version. Check dependencies and compatibility. Stop before changing another component. Preserve the plugin's configuration and oxide/data records; removing data to fix a loading error can erase balances or progress.
To roll back, stop the service and restore the previous plugin and its matching configuration or data from your backup as needed. A .dll extension is a different installation category and may require a restart; follow its developer's instructions rather than putting it beside source plugins. After a Rust update, use the update checks before blaming every plugin.
Further reading
Fix Rust update and startup failures without wiping
A Rust server can take time to generate a map, or fail because its game files and framework no longer match. Neither situation automatically means the save needs deleting. Start with the first useful console error and keep the existing world protected.
Capture the failure before changing anything
Open Console and note whether the process exits, repeats a download, hangs at one message or continues producing generation output. Record the time, recent changes and last successful startup. Save the first error plus the surrounding lines; a final “server stopped” message often describes the result rather than its cause.
Check whether the panel shows an installation or update still in progress. Do not repeatedly press Start, run a second update or force-stop an active update because progress pauses briefly. Ask support if there is no meaningful progress, with the timestamps and log evidence.
Protect the world and apply updates in order
- Arrange maintenance, stop the service cleanly and make a completed backup. Keep an external copy of the identity directory, configuration and plugin files. Record the active identity, branch, map, seed and ports.
- Use the update method supported for your service. Rust dedicated servers use Steam application
258550; the game branch must match the players you expect to join. Do not paste an unmanaged SteamCMD script over the panel's installation. - If using Oxide, check compatibility with the new Rust build. A game update may replace framework-patched files, so restore a compatible framework after the base game update. Match its operating environment.
- Start once and observe the complete log. Rust's
Server startup completemessage is a useful readiness checkpoint. New terrain generation can be slower than loading an existing world.
Match the symptom to the next check
- Unknown Oxide commands or plugins missing: check whether the framework loaded, then use the Oxide plugin checks. Preserve plugin configuration and data.
- Plugin compilation or dependency errors: isolate the last changed component during maintenance. Retain its files and follow its developer's compatibility guidance.
- Map download or checksum errors: check that a custom map URL still downloads the correct file directly. Replacing a map while reusing its filename can leave clients with a cached mismatch.
- Process killed or storage errors: check the panel's resource history and available disk space. Downloading and unpacking updates needs working space beyond the installed game's size.
Do not turn troubleshooting into a wipe
Keep the server identity stable. An accidental identity change can make a working save appear to have vanished. Do not change the seed, clear player databases or reinstall the service as an experiment. If an update requires a map reset, treat that as a separately announced wipe.
Once startup succeeds, join with an updated client and check the world, player access and important plugins. If it still fails, send support the server identifier, error time, relevant log excerpt and recorded versions. Redact RCON passwords and download credentials.
Further reading
Choose an ARK Survival Ascended map and CurseForge mods
ARK: Survival Ascended (ASA) and ARK: Survival Evolved (ASE) use different maps, mod systems and server builds. Instructions for Steam Workshop IDs or ASE's ActiveMods are not instructions for ASA. Check the game shown for your service before making changes.
Prepare a safe change
- Write down your current map, enabled mods in order, game version and startup configuration. Confirm which player platforms must connect and whether each proposed mod supports them.
- Tell players when maintenance will begin. Stop the service cleanly and make a completed backup of the save, configuration and relevant mod data. Download a separate copy and verify the archive is usable.
- Check available disk space before starting downloads. A mod update can require space for downloading and unpacking as well as its final installed size.
Select the correct map
ASA uses map identifiers such as TheIsland_WP and Ragnarok_WP. Use the identifier documented for the intended ASA map, including spelling and case. A display name in the server browser is not necessarily its startup identifier.
For a custom map, find the author's ASA CurseForge page and read both its required mod project ID and its map launch instructions. Do not guess the launch name from the downloadable file. Some maps depend on other content or need a particular game build.
Apply only the relevant setting available in Startup. If a map field is not exposed, ask support to make the change rather than replacing the whole command line. Preserve allocations, passwords and unrelated options. Starting another map does not convert your existing world; keep its save intact for a later return.
Add compatible mods
ASA's -mods= argument uses a comma-separated list of CurseForge project IDs. These are not Steam Workshop IDs. Where the service exposes a mod list, follow that field's instructions instead of adding a second competing argument.
- Choose one mod initially. Read its server requirements, dependencies, compatibility notes and any premium entitlement requirements.
- Preserve the author's required ordering when dependencies or interacting mods specify one. Keep a copy of the previous complete list.
- Start the server once and watch the download and loading output. ASA can update selected mods at startup; a long download is not proof the process has frozen.
- Join with an updated client on each intended platform. Check that the map loads and that the mod behaves correctly before adding more.
Keep the rollback usable
Removing a content mod from an established world can remove creatures, structures or items associated with it. A previous mod list alone may not reverse that damage after a save. Stop before experimenting and preserve a matching save backup.
If a change fails, collect the first download or loading error and restore the previous configuration during maintenance. Restoring world data requires a deliberate rollback too. Do not delete the entire mod cache or world to clear a single download failure. For joining issues, continue with the ASA connection checks.
Further reading
- ARK Official Community Wiki: server configuration
- CurseForge: ARK Survival Ascended creators getting started
Move an ARK Survival Ascended save safely
Moving an ASA world means moving a consistent save set, not just finding one large map file. Plan a maintenance window and keep the original service available as a rollback until players have verified the destination.
Check that the move is compatible
Confirm both installations are ARK: Survival Ascended. An ARK: Survival Evolved save is not a drop-in ASA world. Single-player imports and cross-platform character ownership can also require additional handling; do not guess profile renames from an older ASE tutorial.
Record the source game build, map identifier, mod project IDs and order, configuration and any custom save-directory setting. Prepare the destination with a compatible ASA build and the same required content. Preserve its assigned network ports rather than copying the source's full launch line.
Locate the actual save directories
Start from the installation's ShooterGame/Saved directory. A common dedicated-server world location is ShooterGame/Saved/SavedArks, with an ASA map subdirectory. Inspect the current files and startup settings to identify the active location; AltSaveDirectoryName changes the save directory, and custom maps can use their own names.
ASA's server executable is the Windows build, ArkAscendedServer.exe. A service hosted on Linux can run it through a compatibility environment. That does not make ASE Linux paths correct for ASA: configuration may still be under Config/WindowsServer. Windows drive paths, container paths and the directories visible in Files are different views. Ask support if the active directory is unclear.
Copy while both sides are stopped
- Ask players to leave, allow the source to save and stop it cleanly. Wait until fully offline. Stop the destination too; never copy over a running world.
- Create a completed backup of each service and download independent copies. Back up the complete source Saved tree, configuration and any separately configured cluster or mod data. Protect passwords inside configuration files.
- Keep the destination's original data in a clearly labelled archive outside its active save path. Transfer a copy of the source save set into the destination's confirmed active location. Check that extraction has not added an extra nested Saved directory.
- Retain world, player and tribe information together, including companion files or subdirectories used by that build. Do not cherry-pick only a
.arkfile, merge unrelated saves or rename player identifiers without verified guidance. - Compare transferred sizes and file counts; use checksums where available. Confirm upload completion and available working space before starting.
Validate before opening access
Start the destination once and inspect its loading messages. Join privately and check the map, established structures, tribe access, characters, inventories and important mod content. If a new-character screen appears unexpectedly, stop and investigate the save path and identity instead of creating replacement characters.
Keep the source stopped during validation so progress cannot diverge. If the destination fails, preserve its logs and return to the untouched source only after stopping the destination. Once accepted, take a new destination backup and retain the migration archive for an agreed period.
Further reading
Diagnose ARK Survival Ascended connection failures
An ASA server can be running in the panel while still downloading mods or loading a large save. Separate “not listed”, “cannot connect” and “joins then disconnects” before changing settings. These checks begin with observations and do not require deleting any files.
Establish what is failing
- Confirm you launched ARK: Survival Ascended, not Survival Evolved. Record the exact error, time and timezone, player platform and client version.
- Open the server Console and check whether startup is progressing, repeatedly restarting or reporting a loading error. A green running indicator alone does not prove the game is ready to accept players.
- Ask whether everyone is affected or only one player. Check whether the problem began after a game update, map change, mod update or network change.
- Use the game address and allocated game port shown for this service. Do not substitute a panel URL, an RCON administration port, an old host's address or a default port from a guide.
Check the server browser and client
Search the appropriate unofficial/community listing and review active filters, including map, password protection and platform. Clear a narrow name search and retry after startup completes. Listing delays and filters can hide a server that is otherwise reachable.
Update the client through its platform. Compare the server's version and recent update status rather than assuming “latest” means both completed the same release. If one player fails, compare their platform, installed content and error with a player who can join. Do not ask them to disable account security or publish their password.
Crossplay also depends on the server's supported platforms and its content. A mod working on PC is not proof it is available to console players. Check the author's current CurseForge compatibility information and any required ownership or entitlement.
Review changes safely
If the server is stuck downloading content, note the project ID and first error. Check free disk space and whether the download is making progress. Use the ASA map and mod guide to confirm correct identifiers. Do not start overlapping installs or remove the whole save to clear a content issue.
Before changing startup settings, updating binaries or testing a different mod list, stop cleanly and create a completed backup. Keep the previous configuration and save together. Removing a mod can affect existing world content, so test on an isolated copy where possible.
When the endpoint needs investigation
If every player times out after a completed startup, send support the endpoint, timestamp and relevant console output. Ask us to check the assigned game traffic, network rules and node connectivity. Keep the service's allocated ports; opening every port, disabling the firewall or changing the game port at random makes diagnosis harder and can expose management services.
If the console itself cannot connect, record that separately: panel-to-node access and player-to-game traffic are different paths. Include the server identifier and request ID where shown in your support report, but redact passwords, tokens and private player details.
Further reading
- ARK Official Community Wiki: server configuration
- ARK Official Community Wiki: server setup
- CurseForge: ARK Survival Ascended creators getting started
Move an existing Palworld world safely
A Palworld transfer needs the world and its related player saves together. A server that starts successfully can still load the wrong world or ask returning players to create characters. Keep the original installation until you have checked both the world and several existing characters.
Identify the source before copying
Record the game version, server operating system and whether the source is a dedicated server or a locally hosted co-op game. Moving between Windows and Linux, or converting a co-op host into a dedicated-server player, can require player-identity repair. A folder upload alone does not guarantee that characters will match.
On a dedicated installation, inspect Pal/Saved/SaveGames/0/ beneath the server directory. The world normally occupies an ID-named folder containing Level.sav and a Players directory. If your installation uses a mounted save directory, confirm its mapping with support first. Do not choose a world solely because its folder is newest: compare modification times with a known recent save and retain all candidate folders.
Create a complete recovery copy
- Announce maintenance and ask players to leave. An authenticated administrator can use
/Save, then arrange an orderly shutdown. Wait until the process has exited. - Download the complete
Pal/Saveddirectory, including configuration, all world files and available built-in backups. Keep an untouched copy outside the server. - Check that the download finishes and its archive opens. Compare the extracted folder structure and file sizes against the source. See our backup checklist.
- Record the destination's existing configuration and take a separate backup before replacing anything there. Do not merge different worlds' player folders.
Prepare the destination while it is stopped
Confirm that the destination supports the source save version and required modifications. If a first startup is needed to generate directories, complete that before uploading and stop again. Transfer the complete selected world folder into the dedicated save directory, preserving its name and contents. An extra enclosing archive folder will leave the files in the wrong location.
Ask CloudExa support to confirm which world the destination selects before starting it; the configured world identifier must match the transferred folder. Do not guess a startup variable or overwrite every configuration file from the old host. Linux uses Pal/Saved/Config/LinuxServer/; Windows uses Pal/Saved/Config/WindowsServer/. Keep the destination's assigned network settings.
Check characters before reopening
Start the destination with a small test group. Check the expected bases, Pals, guild membership and player inventories. If an existing player receives character creation, stop testing and preserve both copies. Do not delete their save or repeatedly create replacement characters. Send support the source and destination operating systems, game versions and affected platform; identity conversion needs a reviewed recovery plan.
Once checks pass, give players the destination address and keep the old server stopped to prevent two diverging saves. Retain its recovery copy until the community confirms the move. Never upload world archives to an unfamiliar conversion website: saves can contain player identifiers and community data.
Further reading: Pocketpair's save and shutdown commands and configuration locations, plus the official Docker save-directory example.
Edit Palworld server settings safely
Change Palworld settings in small, recorded steps. A malformed configuration can prevent startup, while a valid gameplay change can still have unwanted effects on an established world. Keep the previous file and a verified world backup before changing the rules your players rely on.
Find the active configuration
Within the dedicated server's installation, Windows uses Pal/Saved/Config/WindowsServer/PalWorldSettings.ini and Linux uses Pal/Saved/Config/LinuxServer/PalWorldSettings.ini. These directories are generated after an initial startup. The file named DefaultPalWorldSettings.ini is a template; editing that template alone does not update the active server.
If your service exposes a setting through the game panel, check with support whether startup regenerates the file. A value written by the startup process can replace a manual edit. Do not keep editing both locations and assume that the most recent one will win.
Save, stop and keep a rollback copy
- Tell players which setting will change and when. Record the current value and your intended value.
- Use the normal save and shutdown process. Wait for the server to finish stopping; avoid changing files while it can still write them.
- Verify a complete backup and download a separate copy of the active configuration. Keep passwords out of public tickets, chat and screenshots.
- Edit only the setting you intend to change. Preserve the existing section,
OptionSettingsstructure, commas, parentheses and quotation marks. Do not replace the whole file with an old example from another server.
Choose changes that are easy to test
For a simple first test, change the displayed server name and check it after a restart. Then make gameplay adjustments individually. Write down what you changed so you can return to the previous value without reconstructing a large pasted configuration.
Treat population, spawn and base limits as capacity decisions. Raising them may increase resource use; test with a few players before advertising higher limits. Settings that remove abandoned guild assets, change death penalties or enable permanent losses need explicit agreement from your community. Reversing a setting later may not recreate objects or characters already removed while it was active.
Keep the joining password separate from the administrator password. Share the joining credential only with intended players and give administrative access only to trusted operators. Do not change assigned ports as part of a gameplay edit. In particular, an advertised community-server port is not necessarily the listening-port setting.
Confirm the result
Start the server and watch its output for configuration errors. Confirm that it loads the expected existing world, then test the changed behaviour in game. If startup fails immediately after the edit, stop the server and restore the saved configuration before investigating additional changes.
If the value keeps reverting, send support its name, the file path and a redacted before-and-after excerpt. Include whether it reverts at startup or after saving. A world restore is a separate recovery decision; changing a setting does not normally require reinstalling the server.
Further reading: Pocketpair's current configuration reference and administrator command reference.
Fix Palworld password and joining problems
Start with the exact error when a player cannot join Palworld. A password rejection, a timeout and a new-character screen point to different problems. Reinstalling the server or removing its saves will not diagnose any of them and can make recovery harder.
Check the address and startup
- Copy the server's assigned game address and port from your service details. Use the game allocation, rather than the game panel's website address or an administration port.
- Check the console for a completed startup and a running process. Repeated exits, save errors or storage exhaustion must be resolved before testing connections.
- Confirm that the player's game and the dedicated server use compatible releases. Record the actual version numbers instead of saying that both are “latest”.
- Where the client's platform provides direct dedicated-server connection, enter the address and port there. An absent community-list entry does not by itself prove the server is offline.
The default dedicated game port is UDP 8211, but a hosted service can use another assigned port. Do not substitute 8211 for your allocation. A successful website request or TCP-only port test does not establish that UDP game traffic reaches the server.
For an incorrect-password message
The joining credential is ServerPassword. AdminPassword is for administrative privileges and should not be distributed to players as the join password. Check the intended value privately with the owner and avoid copying quotation marks or spaces from a formatted message.
If the owner changes the joining password, save and stop the server normally, preserve the current configuration, edit the active file and restart. Use the settings checklist rather than pasting a whole replacement configuration. Ask the player to retry through the current client's supported joining flow. Client menus and password prompts can differ between platforms and releases.
For a timeout or a missing server
Ask one other player to test the same address, ideally using another connection. If everyone times out while the server is running, report the endpoint and timestamp to support so the assigned allocation, UDP listener and network path can be checked. Do not disable the host firewall or expose REST and RCON ports to attempt a fix.
If only one platform is affected, compare the current server's permitted platforms with Pocketpair's configuration reference and check the client release. Avoid copying deprecated platform settings from old tutorials. If direct joining works but discovery does not, investigate community-server advertisement separately; changing an advertised public port alone does not move the listening port.
For a character-creation screen
Stop before creating a replacement if this is an existing world. After a transfer, player identity or world selection can be wrong even though joining succeeds. Follow the world transfer checks and retain the original save.
Send a support report with the precise error, platform, versions, time and whether other players can join. Redact passwords and access tokens. Further reading: Pocketpair's connection guide, network requirements and configuration reference.
Recover a Minecraft player inventory from a backup
A Java Minecraft player's saved inventory can sometimes be recovered without rolling back everyone's world. You need a usable backup from before the loss and the correct player identity. Without a backup or an inventory plugin's retained history, there is no guaranteed way to reconstruct the missing items.
Decide what needs recovering
Ask when the loss happened and whether it affected carried items, an ender chest, a chest in the world or a plugin-managed inventory. These are not interchangeable. A chest placed in a chunk is world data; a separate inventory plugin may store its own files or database records.
In a standard Java dedicated server, vanilla player files are under <level-name>/playerdata/<UUID>.dat. Read level-name in server.properties to identify the main world. Plugins can change how inventories are handled, so inspect the installed inventory and authentication plugins before assuming this file is the only source.
Identify the player safely
Match the UUID against the server's trusted records, such as a relevant successful-login log entry or usercache.json. A public username lookup may not match an offline-mode, proxy or Bedrock-linked identity. If authentication settings changed, ask support to reconcile the identities rather than renaming files until one works.
Explain the effect before restoring: a whole player-data file contains more than items. It also carries state such as location, health, experience and other saved player information. The player can return to an older position or lose legitimate progress made since the backup.
Restore one file while the server is stopped
- Ask the player to disconnect, announce a maintenance window and stop the server normally. Wait for its final save and exit.
- Take and verify a current full backup, including relevant external plugin databases. Keep this recovery point separate from the older backup.
- Extract the older archive into a separate local directory. Confirm its timestamp, world and UUID. Do not restore the entire archive over the live server to obtain one file.
- Download the current matching
.datfile to a clearly dated recovery folder. Copy the older matching file into the same server path without changing the UUID. - Start the server with the same software and version. Let the player join and check inventory, ender chest, position and experience before normal play resumes.
Check for plugin conflicts
Per-world inventory, economy, graves and item-tracking plugins can keep state elsewhere. Restoring a vanilla file while leaving newer plugin records can duplicate, remove or overwrite items. Follow each plugin author's restoration procedure and use a consistent backup point where its database and world state depend on each other.
If the result is wrong, stop again before restoring your saved current file. Do not delete all playerdata or switch authentication mode as a recovery shortcut. An inventory-only NBT edit needs separate review and a backup; this guide deliberately restores the complete saved record rather than guessing individual tags.
Further reading: Paper's upstream player save/load API documentation. For damage to builds, see grief recovery.
Recover a Minecraft server after griefing
Contain the incident before trying to repair it. Restrict access for the accounts involved, preserve evidence and decide whether you need a few builds repaired or an entire server rolled back. Keep a current backup even if it contains damage: it preserves the remaining good work and gives you a way back if recovery goes wrong.
Stop further changes and record the scope
For active destruction, stop the server or temporarily restrict joining through your established access controls. Record approximate times with a time zone, affected worlds and coordinates. Save relevant logs and identify whether the damage came from a player, an exploit, a compromised operator or a plugin.
Review operator and plugin permissions before reopening. If credentials may be compromised, follow the account compromise checklist. Repairing a build while the attacker still has access leaves the original problem unresolved.
Check what recovery evidence exists
CoreProtect can help with actions that it actually recorded and still retains. Installing it after griefing cannot reconstruct earlier events. Logging exclusions, purged history, unsupported actions or unavailable databases can also leave gaps. Check the plugin's status and database before assuming the whole incident is recoverable.
A full backup gives a different recovery point: restoring it also rewinds legitimate changes made after its timestamp. If there is no suitable history or backup, explain the limit to players rather than promising that every item or build can be restored.
Preview a small CoreProtect rollback
- Verify a current full backup, including the CoreProtect database and other external plugin databases. Test on a separate copy when the incident is extensive.
- As a trusted operator in game, stand at the affected location in the correct world. Use
/co inspectto inspect blocks and identify relevant recorded activity; toggle it off afterward. - Look up a bounded example, replacing
SuspectNameand the time window with the confirmed incident:/co lookup u:SuspectName t:1h r:20 a:block. - Preview the same scope:
/co rollback u:SuspectName t:1h r:20 a:block #preview. Here the radius is centred on your in-game position; do not paste this into the server console expecting the same centre. - Read the preview and follow your installed version's confirmation instructions only when its user, time, area and actions match the evidence. Cancel an incorrect preview and narrow the scope.
The block filter does not mean that container contents, inventories or every entity will be restored. Investigate these separately. Avoid global rollbacks and broad time windows that also undo other players' work. CoreProtect's restore operation can reverse recorded rollbacks, but it is not a replacement for a verified recovery backup.
When a backup is the better option
For widespread corruption or changes outside logging coverage, keep the server stopped and compare available backup timestamps with the incident. Agree the lost-progress window with players. Restore a consistent set of worlds and dependent plugin data, then test privately before reopening.
Further reading: CoreProtect commands and preview filters, logging configuration and individual player-data recovery.
Set up EssentialsX commands and player permissions
EssentialsX adds commands such as homes, teleport requests and moderation tools to compatible Bukkit-based Minecraft servers. Install only the modules you need, then decide which commands ordinary players may use. Operator access can hide permission problems, so keep a separate player account for testing.
Check compatibility and keep a recovery copy
Record your Minecraft version, Paper or Purpur build, Java runtime and current plugins. Check EssentialsX's supported platforms before downloading a release. A Fabric or Forge installation needs different software; uploading a Bukkit plugin does not convert that server into Paper.
Stop the server and take a completed file backup. Include the existing plugins/Essentials/ data if replacing an older installation, and export external databases used by related plugins. Keep the old JAR and configuration together so you can return to a matched setup. See backups and restores.
Install the required modules
- Download the core EssentialsX JAR from the project's official download links. Add optional modules only when you need their features, such as separate spawn or chat functionality.
- Use the game panel's Files area or SFTP to place the chosen JAR files in
plugins/. Keep one version of each module. - Check the documented dependencies for the features you selected. LuckPerms handles permissions; Vault provides integrations used by group, prefix and related features.
- Start the server and read Console from the beginning. Confirm that EssentialsX enables without a dependency or compatibility error.
- Stop again before editing generated configuration, keep a copy, and change one setting at a time. Preserve YAML indentation and restart to test.
Give players only the intended commands
With LuckPerms installed, these Console examples grant one named test player the home commands. Replace PlayerName; Console commands have no leading slash:
lp user PlayerName permission set essentials.sethome true
lp user PlayerName permission set essentials.home true
Join with that non-operator account, run /sethome, move away and test /home. Use a safe location. These grants do not configure every home limit or grant all teleport commands. Check the permission reference for each feature rather than giving players a wildcard or operator status.
When removing a temporary grant, use LuckPerms' unset action and inspect inherited group permissions too. See operators, permissions and whitelists before changing staff access.
Check conflicts and preserve player data
If a command opens another plugin's feature, inspect the installed command providers before removing anything. If homes or balances appear missing after an update, stop further changes and compare the data folder, permissions and versions with your backup. Do not delete player files to make the plugin regenerate them.
Send support the exact command, error, EssentialsX version and relevant startup log. Keep UUID-linked player data and private configuration out of public screenshots. Further reading: EssentialsX installation and permission reference.
Use WorldEdit selections, limits and undo safely
WorldEdit can replace thousands of blocks with one command. Start on a small, empty test area and keep a backup outside the server. Undo helps with recent edits, but it is not a replacement for a recoverable world copy.
Prepare the server and permissions
Install the WorldEdit build for your server platform and Minecraft release using the plugin installation guide. A plugin build and a mod-loader build are different downloads. Check startup logs before using commands.
Before a substantial edit, stop the server, wait for its save to finish and take a completed backup. Include related plugin data and any external databases that must match the world. Reopen only when you have confirmed that recovery copy. Ask builders to keep away from the test area so another person's work is not mixed into the operation.
Grant editing permissions only to trusted builders. Review the project's permission reference for the actions they need. Do not give every player a broad administrative wildcard to solve a single denied command.
Select a small cuboid
- In Minecraft chat, run
//wandwith the required permission. - Left-click one corner with the selection tool and right-click the opposite corner. Choose a small volume away from builds, containers and redstone.
- Run
//sizeand read the selection's dimensions and block count. Check the vertical range as well as its footprint. - For this test, run
//limit 1000. This requests a personal change limit; the server's configured maximum and permissions still apply. - Only after confirming the selected area, use a small operation such as
//set stone. Watch for errors before issuing another command.
These are in-game WorldEdit commands. A Console session does not share your player's position, selection or clipboard. Do not paste a bulk edit into Console assuming it targets the same area.
Undo and check the result
Run //undo to request reversal of your most recent recorded edit. Inspect the area before using more undo or redo commands. A count can reverse several recorded operations, which may include an earlier edit you wanted to keep.
WorldEdit records direct changes in its history. Flowing liquids, falling or attached blocks and other indirect effects may need separate recovery. History availability depends on the version and configuration; do not assume it survives a logout, restart or cleared history. Keep the backup for changes that history cannot repair.
Scale up only after a successful test
Large selections, schematics and repeated operations can consume CPU, memory and disk space. Break work into bounded sections and monitor the server while players are online. A block-count limit is not a guarantee that an operation will be cheap.
If an edit stalls, capture the command, selected size, timestamp and Console error instead of submitting it repeatedly. See lag diagnosis. Further reading: WorldEdit quick start, commands and limits, and history limitations.
Protect a Minecraft spawn with WorldGuard regions
WorldGuard applies protection rules to selected areas of a compatible Minecraft server. Use it to protect a spawn or control PvP, then test with a player who has no bypass permissions. Region protection reduces future damage; it does not reconstruct builds that someone has already destroyed.
Install matching dependencies and save your setup
WorldGuard requires WorldEdit. Check that both releases support your Minecraft version and server platform, install them using the plugin guide, and read startup logs for errors. Do not assume a similarly named mod provides the Bukkit plugin's commands.
Before changing established protections, back up the world and the existing WorldGuard configuration and region data. Record important region names and rules. Keep a copy outside the server and check it before replacing an existing configuration. Work first on a small test region that does not overlap player homes.
Define the region you intend to protect
- Join the correct world as an authorised administrator. Use WorldEdit's wand to select opposite corners of the area.
- Check the selection with
//size. Include the intended height range; selecting two ground-level blocks alone may leave the air above or caves below outside your selection. - In Minecraft chat, run
/rg define spawn_testusing an unused region name. This creates a region from your selection. - Inspect it with
/rg info spawn_test. Confirm the world, bounds and existing memberships before adding rules. - To deny player-versus-player combat inside this test region, run
/rg flag spawn_test pvp deny.
The examples use a player selection and belong in Minecraft chat. Do not assume a server Console has that selection or world context. Replace the example name consistently when creating your real region.
Give builders membership without opening the area to everyone
Where a trusted builder should work inside the region, add the correct player with /rg addmember spawn_test PlayerName. Review the distinction between a member and an owner: an owner may have additional region-management authority when their permissions allow it.
A region member is not a CloudExa panel teammate. Review Minecraft permissions separately. Avoid setting broad build-allow flags as a shortcut when your goal is to admit one builder.
Check overlaps and bypasses
Regions can overlap. Priority and inheritance affect which memberships and flags apply, so a rule on one region may not explain the final result. Inspect the regions covering the test location before changing priority. Give each priority change a purpose rather than raising numbers until a problem disappears.
Test block placement, breaking and PvP with an ordinary player account. Administrators may bypass protections; a successful admin test does not prove visitors have the same access. Other claims or protection plugins can also influence the outcome.
If behaviour differs from your plan, send support the world, coordinates, region names, relevant flags and test account's permission context. Keep private configuration out of public posts. Further reading: WorldGuard regions, priority and inheritance, and permissions.
Connect Minecraft chat to Discord with DiscordSRV
DiscordSRV can bridge Minecraft chat to a Discord channel and link player accounts. Treat its bot credentials as a password. Start with a private test channel and a simple chat bridge before enabling role synchronisation or requiring linking to join your server.
Check requirements and protect the existing server
Use the DiscordSRV release that supports your Bukkit-based server and Minecraft version. Obtain it through the project's official release links rather than an unofficial mirror. Follow the plugin installation guide, keeping a backup of your current world and plugin configuration before adding the JAR.
Start once to generate configuration and inspect Console for startup errors. Stop before editing files. Existing installations may already have account links or role rules, so preserve their data rather than replacing the whole plugin directory with another server's example.
Create a dedicated bot and configure the bridge
- Use Discord's Developer Portal to create an application and bot for this community. Follow DiscordSRV's current initial-setup instructions for the required intents and installation options.
- Invite it only to the intended Discord server. Review the requested permissions and channel overrides. Do not grant Administrator solely to bypass a missing channel permission.
- Copy the bot token into the appropriate setting in
plugins/DiscordSRV/config.yml. Keep it out of screenshots, support tickets, public repositories and shared chat. - Enable Discord Developer Mode when needed to copy the intended channel's numeric ID. Map a Minecraft channel to that Discord channel using the generated configuration's comments and syntax.
- Save, start the Minecraft server and check the first relevant startup message. Test a harmless message from each side in the private channel.
Bot tokens, application IDs and channel IDs have different purposes. A channel ID cannot replace a token. If a token leaks, reset it in the Developer Portal and update the private configuration; removing a public message alone does not make the old credential safe.
Test linking before making it compulsory
Follow the documented account-linking prompts with a test Minecraft account and its own Discord account. Keep linking codes private. Confirm the resulting link belongs to the intended identities before using any role synchronisation.
Do not enable every integration at once. Role synchronisation can change Discord access, and console-channel features can expose logs or command execution to channel members. Leave those features disabled until you have reviewed their permissions and purpose.
If you want linked accounts to be mandatory, first complete the ordinary bridge setup. Review linking.yml, the required memberships or roles and a recovery route for legitimate players. Test in a maintenance window before enforcing it on everyone.
Troubleshoot without exposing secrets
If messages travel one way only, check channel mapping, the bot's access in that channel and the documented intents. If the bot cannot connect, inspect the exact error and confirm the token privately. Do not disable Minecraft authentication to fix a Discord bridge.
Send support redacted logs, the DiscordSRV version, timestamp and failed direction. Further reading: initial bot setup and require linking to join.
Pre-generate Minecraft terrain with Chunky and monitor disk space
Chunky generates terrain before players explore it. This can reduce later terrain-generation work, but the task itself uses resources and writes world data to disk. Pre-generation does not fix every source of lag or keep every generated chunk loaded in memory.
Plan the world, radius and available storage
Record the exact world you intend to generate, the centre and the area players need. A radius measures distance from the centre; it is not the full width. Increasing both horizontal dimensions can make the amount of terrain much larger than the change in one radius suggests.
Check free storage and allow room for world growth, backups and normal saves. Avoid choosing a huge radius just because the command accepts it. Start with a modest test and measure the result on your own world rather than assuming another server's disk estimate applies.
Stop the server and take a completed backup before a substantial generation job. Keep a recovery copy outside the server. Install the compatible Chunky plugin or mod for the actual server platform; use plugin installation for Paper or Purpur.
Start a bounded example task
Schedule a quiet maintenance window. Restrict access if the task would compete with players, then start the server. In the game-panel Console, run the following without leading slashes:
chunky start world square 0 0 500This example requests a square in the world named world, centred at coordinates 0, 0, with a radius of 500 blocks. Replace the world and dimensions with your confirmed plan. It is an example, not a recommendation to generate every dimension using the same values.
Read the selection and task response before starting another job. Check the installed version's help if it rejects the syntax. In Minecraft chat, commands need a leading slash and suitable permissions. Do not run parallel tasks across several dimensions until you understand their combined load.
Watch progress and pause when needed
Use chunky progress to inspect active work. Monitor free disk space and tick performance while it runs; an early completion estimate can change as terrain and workload vary. See TPS, MSPT and spark if players experience delays.
Run chunky pause world to pause that world's task and save progress. Use chunky continue world when you are ready to resume. Confirm the reported state before restarting the server or assuming a job has finished.
chunky cancel discards task progress; it does not remove chunks already generated. Chunk deletion or trimming is a separate, destructive operation. Do not use it as a quick rollback or run it against a live world because storage is tight.
Finish and keep the result under review
Confirm completion, check remaining storage and test normal play. A generated area does not stop players exploring beyond it unless you separately configure a suitable boundary. Keep the backup until you have checked the intended worlds and server health.
Further reading: Chunky task commands and project FAQ. If storage is already full, follow the disk-recovery guide before requesting more generation.
Diagnose Minecraft mod conflicts on a test copy
A modded server can fail because of a missing dependency, wrong loader, incompatible version or interaction between mods. Diagnose the first useful error before replacing files. Removing a content mod from your only world can remove or invalidate its blocks, items and entities when that world loads.
Save evidence and build a safe test copy
Record the Minecraft version, loader and loader version, Java runtime, pack release and the last change before the problem. Save logs/latest.log and the relevant file in crash-reports/ when one exists. A short final error may hide the dependency explanation earlier in the log.
Stop the production server before taking a full file backup, including every world, mods/, configuration and scripts. Export any external databases while writes remain stopped. Keep the original installation and a copy outside the server; inspect the completed archive before continuing.
Use a separate test server with copied files and an isolated database where needed. Do not let the test instance connect to production databases or integration accounts. If you cannot isolate the test, ask support before experimenting with the live world.
Rule out a mismatch before removing mods
- Check that each file matches the intended Minecraft release and loader. Fabric, Forge and NeoForge builds are not interchangeable because their names look similar.
- Read dependency requirements for the exact mod release. Install required libraries at supported versions and keep dependent mods together.
- Remove client-only tools from a dedicated-server test setup when their author says they do not belong there. Check the author's environment support rather than guessing from a filename.
- Compare client and server pack releases when the server starts but players cannot join. Include configuration or scripts the pack distributes.
Do not bypass dependency checks to force a mod to load. Fabric's dependency overrides are an advanced pack-development feature, not a routine repair for incompatible releases.
Isolate an interaction on the copy
- Reproduce the same failure on the untouched test copy first. Record a repeatable trigger, such as startup or a particular action.
- Use a disposable test world when removing content mods. Preserve the copied production world untouched for later compatibility testing.
- Disable a small, recorded group of suspect mods while keeping their dependencies and dependants consistent. Move files outside the loaded mods directory rather than deleting them.
- Repeat the trigger, save the result and narrow the group. A new missing-library error is a different failure and does not prove you found the original conflict.
- Confirm the suspected combination by restoring the other files and reproducing the problem. Then check the authors' supported fix or compatible release.
Return to production with a tested plan
Test the proposed change against a fresh copy of the backed-up world before reopening the live service. Check affected blocks, inventories and dimensions. Restore matching files and database state if returning to an earlier version.
Send support the reproduction steps, exact versions and redacted logs. Keep tokens and private connection details out of public uploads. See safe modpack changes and useful logs. Further reading: Fabric's crash reports, log sharing and dependency override warning.
Create Minecraft ranks and inheritance with LuckPerms
LuckPerms controls which actions Minecraft players may perform. A rank is a group of permissions; its visible chat prefix is a separate presentation setting. Design access first, then add colours or labels. A moderator should not need full administrator access merely to receive a staff title.
Prepare a small permission plan
Install the LuckPerms build for your server platform using the plugin installation guide. Record whether you are configuring a Paper backend or a proxy: their permission stores can differ. Keep a backup of the existing LuckPerms configuration and its database before changing an established rank structure.
List what each role needs. Start with ordinary players and one helper role rather than recreating an entire hierarchy at once. Read the relevant plugin's permission reference for each command. A permission node is not necessarily the same as its command name, and a group name alone grants no command access.
Create and assign a limited group
These examples are for a Paper server's Console, without leading slashes. Replace PlayerName with the intended player. They create a helper group with access to the vanilla kick command:
lp creategroup helper
lp group helper permission set minecraft.command.kick true
lp user PlayerName parent add helper
Run one line at a time and read the response. Check that the player and group are correct before assignment. Do not use wildcard permissions or operator status as a shortcut to make a single command work.
Use parent add when you want to retain existing memberships. The parent set operation can remove existing parents in the selected context. If a player already has a paid role or another staff responsibility, replacing their memberships can remove access unexpectedly.
Use inheritance deliberately
To make an existing moderator group inherit helper permissions, use lp group moderator parent add helper. The direction matters: moderator gains helper access. Giving helper the moderator parent would grant the more powerful role to helpers instead.
Check inherited permissions as well as directly assigned ones. A permission scoped to one world or server is different from an unrestricted permission. Record contexts so that an allowance intended for a build world does not silently apply to the survival world.
Review and apply editor changes
Open a focused session using lp group helper editor. Keep the editor URL private because it exposes your permission structure and editing session. Review the target group, permission values, parents and contexts before saving. The editor supplies a command to apply the saved changes; saving the browser page alone does not complete the server-side update.
Test with an ordinary, non-operator account that has the intended memberships. Check both an allowed command and a command the role must not use. If access is wrong, inspect inherited groups and contexts before granting more permissions. Keep your console available while testing, and retain the previous data until the new permissions have been checked.
Related CloudExa guides
- Manage Minecraft operators, permissions and the whitelist
- Install plugins on a Paper or Purpur Minecraft server
Further reading
Connect Vault to an EssentialsX economy
Vault provides an integration layer between Minecraft plugins. Installing it does not create a bank, shop or currency balance by itself. An economy provider stores balances, while a shop or rewards plugin asks that provider to make transactions through Vault. This guide uses EssentialsX as the provider.
Identify the existing economy first
Before adding anything, inspect the installed plugins and startup log. Record which plugin currently holds player balances and which plugins spend or award money. If the server already has a working provider, adding another may change which service an integration uses.
Stop the server and back up its files. Include EssentialsX player data and configuration, plus exports for external databases used by shops or other economy plugins. Keep matching copies together. A world backup alone may not preserve currency balances held elsewhere.
Install a compatible combination
- Check the supported Minecraft, Java and server-platform versions for EssentialsX, Vault and the shop plugin you intend to use.
- Download the plugins from their official project release links. Use the normal plugin installation process; retain a copy of any older working JAR before replacing it.
- Use one intended economy provider for this setup. Do not install several providers to discover which one makes an error disappear.
- Start the server once and inspect Console. Resolve dependency errors before changing prices or permissions.
A plugin reporting that it found Vault is only one part of the check. Confirm that it also found the expected economy service. Vault cannot supply another plugin's missing dependency or convert an unsupported shop into a compatible one.
Set the economy rules
Review the generated EssentialsX configuration rather than copying an unrelated server's entire file. Its economy settings include a starting balance for new players and optional command costs. Changing the starting balance is not a migration of every existing balance.
Decide who may check balances, pay other players and administer money. Administrative economy commands must remain staff-only. Grant only the relevant permission nodes using your permissions plugin, then test with a normal player instead of relying on an operator account.
Test a small transaction
Use a dedicated test account and record its opening balance. From Console, eco give PlayerName 10 is an example EssentialsX administrative command to add a small amount; replace the name deliberately. Verify the resulting balance in game, then make one inexpensive purchase through the actual shop.
Check both sides of the transaction: the item or reward should arrive and the correct amount should leave the same account. Repeat with insufficient funds to ensure the shop refuses the purchase. Remove temporary test funds through a recorded adjustment after testing.
If the provider is missing
Keep the existing economy data intact. Save the first relevant startup error, exact plugin versions and the shop's provider message. A permissions denial, disabled provider and database connection error need different repairs. Do not clear player data, reset balances or repeatedly replace the economy plugin to fix a dependency message. Ask support with redacted evidence if the provider cannot be identified.
Related CloudExa guides
Further reading
- Vault project and supported integrations
- EssentialsX economy configuration
- EssentialsX command definitions
Install PlaceholderAPI expansions and fix raw placeholders
PlaceholderAPI lets compatible plugins display information such as a player's name or economy balance. A placeholder appearing as %player_name% usually means part of the integration is missing or the receiving setting does not support it. Installing every available expansion is unnecessary.
Check the receiving plugin
Start with the plugin that will display the text: a scoreboard, chat formatter or menu, for example. Read its documentation to confirm that the specific configuration field supports PlaceholderAPI. Support elsewhere in the same plugin does not guarantee every text field parses placeholders.
Record the placeholder exactly, including punctuation and capitalisation where relevant. Confirm the Minecraft version, PlaceholderAPI version and receiving plugin version. Save a copy of the configuration before editing it. If you need to install or replace a JAR, take a completed backup and follow the normal plugin installation process.
Install only the required expansion
Some plugins register their own placeholders when they load. Others require an expansion downloaded separately. Check the official placeholder listing or expansion page to distinguish these cases and identify any required provider plugin.
For a simple Player expansion example, run these commands in game with appropriate administrator permissions:
/papi ecloud download Player
/papi reload
/papi list
/papi parse me %player_name%
The first command downloads the named expansion from the official eCloud. The reload command refreshes PlaceholderAPI; it is not the server-wide Bukkit reload command. Check that the expansion appears in the list and that the parse result matches your player's name.
In Console, omit leading slashes and replace me with an actual player's name for player-dependent tests. A null player is not a substitute for a real player when the expansion needs account-specific information.
Add the working token to your display
Put the exact tested placeholder into a supported text field, preserve YAML indentation and apply the receiving plugin's documented configuration refresh. Test with the intended player account. Start with one placeholder and one line so that a malformed surrounding configuration is easier to identify.
A Vault balance placeholder also needs the appropriate expansion and a working economy provider. Installing a display expansion does not create the underlying economy or player data. Check the provider independently before changing scoreboard formatting.
Separate download errors from parsing errors
If eCloud downloads time out, save the destination and exact error with its timestamp. Check the project's current connection guidance and ask support to investigate outbound connectivity. Do not disable certificate verification or download an expansion from an untrusted mirror to bypass a network problem.
If the expansion loads but still returns raw text, verify its documented placeholder syntax, dependency requirements and the receiving field's support. If a direct parse works but the display does not, investigate that plugin's integration and refresh method.
Keep diagnostic uploads private and review them for tokens or database credentials. Send support the failing placeholder, redacted configuration section, direct parse result and relevant versions. Avoid public broadcasts or command-execution parsing tests when a private text parse is enough.
Related CloudExa guides
- Install plugins on a Paper or Purpur Minecraft server
- Find Minecraft logs and send useful troubleshooting details
Further reading
Configure a Minecraft TAB list and scoreboard
TAB can customise the player list, names and sidebar scoreboard. Configure one feature at a time so that a formatting error is easy to locate. Changing a display should not require replacing a world, deleting player data or giving ordinary players operator access.
Choose where TAB belongs
For a standalone Paper server, use the supported backend installation. A Velocity network needs a deliberate choice about proxy or backend installation. Follow TAB's network guidance rather than installing it everywhere: overlapping instances can control the same display features and overwrite each other's output.
Record existing plugins that manage scoreboards, nametags or tab lists. Keep their configuration before making changes. Back up the server, stop it and install the compatible TAB release through the usual plugin process. Start once to generate files, inspect startup errors and stop again before editing the initial configuration.
Start with a static header
Open TAB's generated configuration and locate the documented header/footer feature. Keep its existing structure, use spaces for indentation and change a short header line to your own server name. Leave animations and external placeholders out of the first test.
Enable only the feature you intend to use, following the comments for your installed release. Do not paste a complete configuration from a different TAB version over the generated file. Options can move or change meaning, and an old template can hide the original cause of a warning.
Start the server, join normally and check the player list. Make sure the server name appears in the intended place. Test with more than one player if you plan to show ranks or player-dependent information.
Add a small sidebar
Use the installed version's scoreboard example as a structure. Begin with a title and one static line, then add a documented placeholder only after the static display works. If using PlaceholderAPI values, test those values independently before adding them to TAB.
Check the scoreboard's selection or display conditions as well as its text. A correctly formatted scoreboard may be hidden by a condition, another selected board or a player's visibility preference. Avoid very frequent refresh intervals for information that changes slowly.
Apply and diagnose changes
For supported configuration edits on a backend installation, /tab reload refreshes TAB's configuration. Read the command response and Console for validation warnings. Proxy installations use /btab commands instead, and backend operator status does not automatically grant proxy permissions.
If a display flickers or disappears, compare the features controlled by other installed plugins. Disable one overlapping display feature through its documented setting on a test copy, then repeat the same join and world-change checks. Do not remove several plugins at once because a disappearance alone will not identify which integration conflicted.
Check Java clients and, where supported by your setup, Bedrock clients separately. Scoreboard limits and presentation can differ. If asking support, include the TAB version, installation location, affected feature, player/client version and redacted warnings. Keep the last working configuration so you can restore a display change without rolling back gameplay data.
Related CloudExa guides
- Install plugins on a Paper or Purpur Minecraft server
- Diagnose Minecraft lag with TPS, MSPT and spark
Further reading
Allow compatible Minecraft Java clients with ViaVersion
ViaVersion translates Minecraft Java network protocols so supported client versions can join a server running a different Minecraft version. It does not upgrade your world or add every block, item and gameplay feature from a newer release. Keep the server's actual version clear when advertising compatibility to players.
Write down the versions you need
Record the server software and exact Minecraft version, proxy version if present, Java runtime and the client versions players need. Use the project's current compatibility guidance or setup tool for that combination. A broad label such as “latest” is not enough to diagnose a protocol mismatch.
ViaVersion generally serves newer clients joining older server protocols. Older clients joining newer servers require the appropriate related project, commonly ViaBackwards, within its supported range. Very old clients may require ViaRewind as well. Confirm the supported combination rather than installing every add-on.
These are Java protocol tools. They do not replace Geyser for Bedrock access, turn a Java server into a Bedrock server or solve a modpack's missing client mods. Use the relevant crossplay or modpack guide for those requirements.
Choose one translation location
Back up the existing server files and record the currently working client/server combination before installing anything. On a standalone supported Paper server, install the compatible plugin through the ordinary plugin process.
For a network, follow the project's guidance on placing translation at the proxy or backends. Do not assume adding the same translators at every hop improves compatibility. Keep your proxy current and preserve its existing forwarding and backend-access protection.
Check the release's Java requirements against your runtime. A dependency or Java startup failure is different from a player being rejected for an unsupported protocol. Fix the first startup error before changing the world's version or authentication configuration.
Test before reopening access
- Start the server and confirm that the translators load without errors.
- Join with a client matching the server's own Minecraft version. This checks the ordinary route before testing translation.
- Join with each additional client version you intend to support. Test movement, inventory, chat and important gameplay interactions.
- If using a proxy, test the public entry address and switching between the intended backends.
- Record any resource-pack, anti-cheat or plugin differences separately from connection success.
A successful login does not prove every visual or gameplay interaction behaves identically. Newer content can need substitutions on older clients, and anti-cheat or packet-sensitive plugins may have their own compatibility requirements. Test the actual activities your community uses.
Keep failures specific
If one client is rejected, capture its exact version, the server/proxy versions and the first relevant connection error. Compare them with the installed translator releases and current support range. Avoid repeated world upgrades as a fix for an unsupported client.
Do not disable online authentication or expose protected backend ports to bypass a translation error. If you decide to remove the translators, use a maintenance window and the saved working files, then test the original supported client again. Protocol changes should remain separate from world migration and data recovery.
Related CloudExa guides
- Set up a Velocity network with protected backend servers
- Set up Geyser and Floodgate for Java and Bedrock crossplay
Further reading
Inspect block changes and preview a CoreProtect rollback
CoreProtect records supported actions while its logging is enabled. It is useful for investigating who changed a block and reversing a specific recorded incident. It cannot recreate history from before installation or after the relevant records have been purged. Keep ordinary server backups as a separate recovery method.
Check logging before an incident
Install a compatible release and inspect the generated configuration for the events you need recorded. Confirm the database is working and has room to grow. On a test area, place and break a harmless block with a known account, then check that the history appears.
Give investigators only the permissions they need. Inspection and lookup are different capabilities from rollback, restore and purge. Keep database access and destructive administrative commands restricted. A staff title or a panel subuser account does not automatically define the correct Minecraft permissions.
Inspect the affected location
In game, enable the inspector with /co inspect and examine the affected blocks using the documented interactions. Run the command again to turn inspection off when finished. Record the world, coordinates, suspected player and approximate time rather than guessing a server-wide recovery period.
Use a lookup before changing anything. An example from the affected location is /co lookup u:PlayerName t:30m r:10 a:block. Replace the player deliberately. This searches recorded block actions within a ten-block radius during the last thirty minutes. Run it in game at the correct location; a radius is relative to where you execute it.
If the result is empty, check the account, world, time window and logging configuration. No result does not prove the player did nothing, especially when logging began after the incident.
Back up, preview and narrow the scope
Before applying a rollback, stop player changes in the area and take a completed server backup. Preserve the matching CoreProtect database and any relevant external plugin data. Test the proposed operation on an isolated copy for valuable or complicated incidents.
Use the same confirmed filters for a preview, for example /co rollback u:PlayerName t:30m r:10 a:block #preview. Review the preview and its confirmation instructions carefully. Previewing is an opportunity to reject an overly broad selection; it is not a reason to skip the backup.
Restrict the action, time, player and location to the incident. Do not substitute a global radius because a local lookup missed something. Avoid including container or inventory actions unless you understand how those recorded events interact with the recovery you need.
Apply only the reviewed operation
Proceed using the plugin's displayed confirmation flow only after the preview matches the intended repair. Keep players out until processing completes. Inspect repaired blocks, nearby builds and relevant containers before reopening the area.
A CoreProtect restore can reverse recorded rollback effects, but it is not a promise to recover every later interaction or external plugin state. Keep the pre-operation backup and command record. Do not purge the database during an investigation. If the scope remains uncertain, send support redacted lookup output, coordinates and the incident time rather than experimenting with a larger rollback.
Related CloudExa guides
Further reading
Change Minecraft difficulty, game mode, PvP and spawn protection
Use this guide when a Java server starts correctly but its gameplay rules do not match your community. Changing one setting at a time makes it easier to identify a plugin override or an unexpected side effect. These steps apply to the server configuration, not the video settings on a player's computer.
Record what you want to change
Write down the intended difficulty, whether players may fight, and the default mode for new arrivals. Decide separately whether everyone should have their mode reset when reconnecting. Tell players before introducing a rule that could affect combat, building or survival progress.
In the game panel, confirm the server name and connection address. Stop it normally and wait for saving to finish. Download a copy of server.properties, then take a completed file backup before changing several rules. Keep the copy under a recognisable name outside the server rather than overwriting the only previous configuration.
Edit a small set of properties
Open server.properties in the file manager. Find the existing line for each setting instead of appending duplicates. A typical survival example is:
difficulty=normal
gamemode=survival
force-gamemode=false
pvp=true
spawn-protection=16
difficulty chooses peaceful, easy, normal or hard. gamemode sets the default mode; force-gamemode=true reapplies that default on joining. pvp controls player-versus-player damage. spawn-protection controls the protected area around world spawn; zero disables it, and the vanilla protection needs at least one operator.
Do not change authentication, networking or port settings while working on gameplay rules. A copied configuration from another host may contain unrelated values that stop players connecting. Keep the rest of the file intact and save it once you have checked the edited lines.
Restart and test as a player
- Start the server and watch Console until startup completes.
- Join using an ordinary test account. Administrative permissions may bypass restrictions.
- Check the intended mode on a new or suitable test player, then disconnect and reconnect to test your force-mode decision.
- Test combat only with consenting players in a safe area. Keep valuable inventories out of the test.
- Check block placement near spawn and outside the protected area. Record the coordinates and result.
A protection plugin, per-world plugin or mod can add its own rules. If one world behaves differently, inspect that world's configuration and active protection rules before repeatedly changing the global file. A successful operator test does not prove visitors have the same permissions.
If your change does not stick
Stop the server and reopen the file to confirm the value was saved. Note any startup configuration that regenerates it. Record your software version, the changed properties and the exact test that failed. Ask support to inspect a suspected panel or startup override; do not reinstall to reset a gameplay option.
To reverse this configuration edit, restore the saved lines while stopped and restart. This does not undo player actions that occurred under the new rules. See operator and whitelist permissions. Further reading: Paper's property reference.
Tune Minecraft view distance and simulation distance
Players seeing distant terrain and the server processing nearby activity are different workloads. This guide helps you adjust Minecraft Java distance settings without treating every performance problem as a need for more RAM. Make a small measured change, then compare the result under similar conditions.
Choose the problem you are testing
view-distance controls the world data sent around a player. simulation-distance controls the range of entity simulation. Both are chunk distances around the player, rather than the full width. Client rendering settings can also limit what an individual player sees.
Describe the symptom before changing anything: terrain arrives slowly, players see a short horizon, or active areas produce slow ticks. Ask whether everyone is affected and whether the problem happens while exploring or while standing still. A client with low frame rate needs a different investigation from a server whose tick time rises.
Save a baseline
- Record the current distances, Minecraft version and server software.
- Record player count and what those players are doing. Exploring new terrain is not the same test as standing at spawn.
- Measure TPS and MSPT using the available profiling tools. Keep a short report from the affected period.
- Stop the server normally and download the configuration files you will edit.
Choose a quiet window for the restart and explain the test to players. Keep the original values in your notes so reversing the setting is straightforward. Avoid combining the distance change with a plugin update, map generation job or Java change: several simultaneous changes make the comparison less useful.
Change the effective configuration
In server.properties, locate the existing distance lines. For example, view-distance=8 with simulation-distance=6 is a test configuration, not a universal recommendation. Keep values within the supported range for your installed version.
On Paper, check spigot.yml for world-specific distance overrides. A value of default or -1 inherits the corresponding server property. Preserve other worlds' settings unless you intend to change them too. Use the reference matching your installed build rather than copying an old Paper configuration file.
Save and start the server. Read startup warnings before joining. If a value is rejected or another configuration layer overrides it, resolve that first; repeating a test with a value that never applied proves little.
Compare the result fairly
Repeat the same route or activity with a similar number of players. Check tick time, terrain delivery and player experience. Record the new values and the observation period. Lowering distances can affect how players use farms and travel, so ask the affected players to test their normal activity before keeping the change.
Do not increase both values to their maximum because the server appears idle with nobody online. Separated players can create a substantially different workload. A pre-generated map also does not remove the cost of processing active gameplay.
If there is little improvement, restore your baseline and investigate the profiling evidence. See TPS, MSPT and spark. Further reading: Paper's per-world overrides and distance properties.
Install Minecraft Java data packs and plan safe removal
A Java data pack changes server-side game data and may run functions. It is different from a plugin JAR or a client resource pack. Some packs alter recipes or advancements; others introduce world-generation content that becomes part of the save. Choose a pack for your exact Minecraft release and test it before using your only world.
Check the pack and its requirements
Download from the author's official release page and read its installation and removal notes. Record the pack version, supported Minecraft versions, dependencies and whether a matching resource pack is required. A pack metadata format can change between releases, so do not edit a version number merely to silence an incompatibility warning.
Inspect the archive on your computer. A normal data pack has its metadata file, pack.mcmeta, at the pack root alongside its data content. A ZIP containing another distribution ZIP is not necessarily ready to install. Follow the author's packaging instructions rather than repeatedly extracting files until the server accepts something.
Protect the world and test separately
- Record the active world name and take a completed backup while the production server is stopped.
- Keep an off-server copy of that backup and of the pack's original download.
- Create an isolated test server using the same Minecraft release. Begin with a disposable world for unfamiliar generation packs.
- Do not connect the test server to production databases, Discord bots or other integrations.
For a conventional Java world, packs are placed in the datapacks directory inside that world's save folder. Identify the actual world first; do not assume a folder with an appealing name is the active one. An extracted pack folder or supported pack ZIP must retain its expected internal layout.
Start and verify the feature
Start the test server and read the first data-loading errors in Console. Run datapack list without a leading slash in the panel console to inspect enabled packs. In Minecraft chat, authorised commands use a leading slash. Use the exact pack identifier shown by the server if following the author's enable instructions.
Test a specific feature the author documents, such as a recipe or advancement, with a normal player. Record whether it works and whether unrelated packs still behave correctly. Load order and overlapping definitions can matter. Do not assume a successful startup means every feature or dependency is correct.
Use a controlled stop and start when testing installation. Avoid using a broad server reload as a substitute for checking startup. Some registry or generation changes require more than reloading functions, and repeatedly reloading a busy plugin server can obscure the original failure.
Plan removal before production
Disabling a pack does not guarantee that everything it changed is reversed. Commands may already have changed player data or blocks, and generated terrain remains in the world. Follow the author's cleanup procedure on the test copy, then test loading and normal play again. For packs with no supported removal path, keep the complete pre-install backup as the recovery plan.
If loading fails, preserve the error and stop experimenting on the production save. Send support the exact pack release, Minecraft version and redacted log. Further reading: Minecraft's data-pack format changes Fabric's explanation of generated data packs and Paper's data-pack loading notes.
Use a custom Minecraft world seed without overwriting an existing world
A seed is an input to world generation, not a command that replaces existing terrain. If you want a fresh Minecraft Java map with a chosen seed, test a separate world and preserve your current installation. Do not delete the live world to see whether a number looks right.
Decide whether you want a new map
Separate two requests: keeping your community's current builds, or beginning a fresh map. Existing terrain will not become a different landscape because you type another value into a configuration file. If you want to retain builds while adopting a new generation setup, ask support to help plan a controlled migration rather than editing world metadata in place.
Check the seed's intended Minecraft edition and release. A screenshot or seed list may use a different version, generator, mod or data pack. Record the exact setup you are trying to reproduce, including the coordinates of an advertised feature. A seed alone is not enough evidence that the result will match.
Keep a recovery point
- Tell players about the test and stop the existing server normally.
- Take a completed backup containing all worlds, configuration and player data. Export any external plugin databases separately.
- Keep a copy outside the server and record the active world name.
- Note any multiworld plugins or custom dimension configuration before making changes.
A world can include several dimensions and related folders. Preserve the complete setup rather than downloading only the overworld's region files. Keep your existing recovery point until the replacement has been tested and players have confirmed the migration plan.
Create an isolated seed test
The safest approach is a separate test server with a new, empty world location. Use the intended Minecraft version and generation packs. Do not copy production database credentials or integrations into that test server. Confirm there is enough storage for both the existing save and the test world.
For a standard Java server, level-name identifies the world folder and level-seed supplies the generation seed. Set these before the new world is first created. Use an unambiguous new name, such as seed-test-november, only on the test installation. Keep the production world's folder and files untouched.
Start the test and inspect the console for the world being loaded. Join and check the expected coordinates, biomes and structures. Confirm the generator and data packs match your plan. Test more than the spawn area if the decision depends on a distant structure or a special dimension.
Choose how to go live
If the map is suitable, schedule a separate change window and agree what happens to player inventories, permissions and plugin data. Starting a new map does not automatically reset every plugin database. Conversely, replacing unrelated account data can destroy things you intended to keep. Avoid copying a few folders into production without a complete plan.
If the test is unsuitable, stop the test instance and keep production unchanged. Do not try to repair the result by swapping the live world's metadata files. When importing a prepared map, use the existing-world upload guide. Further reading: Paper's world properties and world-layout migration notes.
Schedule Minecraft restarts with player warnings
A planned restart should give players time to finish and should use a normal stop-and-start action. It is not a substitute for investigating crashes or a memory leak. Begin with one supervised test before leaving a schedule to run unattended.
Choose a maintenance window
Ask when players are least active, and publish the expected interruption. Confirm the schedule timezone rather than assuming the panel uses your computer's clock. A local timezone can change with daylight saving; check the next-run time whenever a seasonal clock change matters to your community.
Open your server's Schedules section in the CloudExa game panel. Create a clearly named schedule and review its timing fields, enabled state and online-only behaviour. A stopped server does not need an ordinary daily restart, and console warning commands cannot reach a process that is not running.
This real panel example shows the schedule form with illustrative backup timing. Choose your own restart warning time; the image is not a saved restart schedule.
Build a warning sequence
The following is a five-minute warning plan, with the scheduled start representing the first warning rather than the restart itself. Use the command and power actions offered by the panel. Commands in the panel console do not need a leading slash.
- At the schedule start, send
say Planned restart in 5 minutes. Please finish up safely. - Wait four minutes, then send
say Planned restart in 1 minute. - Wait one minute, then request the normal Restart power action.
For task systems using a time offset from the preceding task, that is an initial zero offset, then 240 seconds, then 60 seconds. Read the form's description and inspect the saved task order. Do not enter five minutes again on every step: relative delays add together.
Use a normal restart, not a terminate or kill action. Give the game time to finish saving. Avoid repeatedly pressing restart when a save is slow; inspect Console and ask support if the process cannot stop normally.
Keep backup completion separate
A backup request is not proof that an archive has finished. A fixed delay before restarting cannot guarantee a consistent recovery point when file sizes or storage speeds vary. Do not add a backup task and assume the next power action will wait for its completion.
If you need an offline backup in the maintenance window, use a supervised sequence: warn players, stop normally, wait for saving to finish, create the backup, verify successful completion, then start. Arrange automation with support if it must check backup completion before starting. Keep external database exports aligned with the file backup where plugins use them.
Run one supervised test
Choose a quiet moment and tell players this is a test. Check each warning arrives once, the delays match your intention and the server restarts only once. Confirm startup completes, join the world and check player data. Review the next-run time and ensure another plugin or schedule is not also restarting the server.
If a task fails, record the schedule name, server ID, time and error. Disable the faulty schedule while investigating rather than repeatedly running it against active players. Read backup scheduling and retention. Further reading: upstream task actions and offsets.
Tell a Java memory error from a killed Minecraft process
A server disappearing at high memory usage does not identify the cause on its own. A Java exception, a container memory limit, a host problem and a forced power action require different evidence. Preserve the event details before restarting repeatedly or changing your entire plugin setup.
Save the final useful evidence
Record the exact time and timezone, server ID, Minecraft version, Java version and last change before the failure. Download logs/latest.log and any matching crash report. Capture the panel's final console lines, exit status and memory graph if available. Explain whether the server saved normally or disappeared mid-activity.
Do not reinstall to obtain a clean log. Keep the failed installation and a completed backup before making changes. If the server can start, save a short reproduction description: for example, the failure occurs during the same teleport or generation job. Stop repeating a trigger that risks damaging the world.
Read the Java error message
java.lang.OutOfMemoryError: Java heap space indicates an allocation failed in Java's heap. It does not, by itself, prove a memory leak. An insufficient heap or an unusually large workload can also produce it. Other details, such as Metaspace or inability to create a native thread, point to different resources and should be reported exactly.
The Java heap limit, usually expressed by -Xmx, is not a limit on the whole process. The JVM also needs memory outside that heap. Do not set the heap equal to the full hosting allowance simply because the two numbers look related. Ask support to check the active startup configuration and available overhead instead of copying unrelated flags.
Recognise an abrupt external kill
A log that ends suddenly with no shutdown sequence can indicate an external interruption, but does not prove out-of-memory termination. Exit status 137 is commonly associated with a process receiving SIGKILL; it still needs a reason from the machine or container records. A manual kill, limit enforcement and host incident can look similar to the application.
On managed game hosting, send the timestamp to support so they can correlate container events and host logs. Linux cgroup memory-event counters can record OOM activity, but those are infrastructure evidence rather than a repair command for the game console. Customers should not need to alter host limits to keep a normal server running.
Test a specific repair
- Identify whether the evidence points to heap exhaustion, another Java resource, an enforced limit or an unresolved interruption.
- Choose one change related to that finding. Keep its previous value and a rollback plan.
- Test the same workload on an isolated copy when practical.
- Watch the relevant memory measure and logs over a comparable period, rather than only checking that startup succeeds.
High allocated memory alone is not a leak, and regular forced restarts can hide recurrence without fixing it. Share redacted logs privately; heap dumps can be large and may contain sensitive application data. Further reading: Java error categories, Paper crash diagnosis and Linux memory events.
Find setup and troubleshooting guides for your game server
Find setup and troubleshooting help for all 18 games currently listed on the CloudExa website. Choose your exact game below. ARK: Survival Evolved and ARK: Survival Ascended have separate guides; their files, mods and networking requirements are not interchangeable.
Mods, plugins and Workshop content
Find mod and plugin instructions for every offered game, including compatibility checks, client requirements, safe updates and recovery.
Choose your game
- Minecraft
- Rust
- ARK: Survival Ascended
- Palworld
- Valheim
- 7 Days to Die
- CS2
- Satisfactory
- Terraria
- Squad
- ARK: Survival Evolved
- Arma 3
- DayZ
- Garrys Mod
- Unturned
- Factorio
- Assetto Corsa
- Hytale
Before changing a server
Use the addresses and ports allocated to your service. Match the guide to your server build, platform and template. Keep a completed recovery backup before changing saves, maps, mods or frameworks. Keep passwords, server tokens and licence details private. A hosting plan does not grant unrestricted access to its underlying machine.
Minecraft
- Connect to your Minecraft server
- Upload an existing Minecraft Java world
- Install plugins on a Paper or Purpur Minecraft server
- Fix common Minecraft connection errors
- Diagnose Minecraft lag with TPS, MSPT and spark
Rust
- Find Rust server.cfg and the correct identity save folder
- Diagnose Rust game, query and RCON connection ports
- Plan a Rust wipe and choose a map seed safely
- Fix Rust update and startup failures without wiping
ARK: Survival Ascended
- Choose an ARK Survival Ascended map and CurseForge mods
- Move an ARK Survival Ascended save safely
- Diagnose ARK Survival Ascended connection failures
- Restore an ARK Ascended checkpoint with consistent player and tribe data
Palworld
- Move an existing Palworld world safely
- Edit Palworld server settings safely
- Fix Palworld password and joining problems
- Read Palworld crash and memory evidence before changing resources
Valheim
- Transfer a Valheim world without losing the original
- Connect to Valheim using Steam or crossplay networking
- Check Valheim BepInEx mods before updating a server
- Set Valheim world modifiers without changing the world
7 Days to Die
- Edit 7 Days to Die serverconfig.xml safely
- Preserve a 7 Days to Die save when moving or changing worlds
CS2
- Configure a CS2 server and protect its Steam login token
- Load and troubleshoot CS2 Workshop maps
- Diagnose CS2 startup and update failures without losing data
Satisfactory
- Claim and connect to a Satisfactory dedicated server safely
- Diagnose Satisfactory Server API errors and stalled joins
Terraria
- Upload a Terraria world and verify the server connection
- Set up TShock accounts and grant limited administrator permissions
Squad
- Prepare and find your Squad server for its first match
- Diagnose a missing Squad listing or failed server join
ARK: Survival Evolved
- Configure an ARK Survival Evolved server and verify the first connection
- Diagnose ARK Survival Evolved startup and joining failures without wiping
Arma 3
- Configure an Arma 3 server and test a first mission connection
- Diagnose Arma 3 connection failures and mission loading errors
DayZ
- Set up and join a DayZ server without changing its existing world
- Diagnose DayZ startup, mod and joining failures without wiping persistence
Garrys Mod
- Set up Garry’s Mod Workshop collections and gamemodes
- Find the addon behind a Garry’s Mod Lua error
- Fix missing Garry’s Mod textures and client downloads
Unturned
- Configure and join an Unturned server using its assigned connection method
- Troubleshoot an Unturned server missing from the list or rejecting players
Factorio
- Enable a Factorio whitelist without locking out your group
- Resolve Factorio mod and startup-setting mismatches
- Collect a useful Factorio desync report
- Plan a Factorio server update around save compatibility
Assetto Corsa
- Prepare an Assetto Corsa race server and verify the first join
- Diagnose Assetto Corsa startup, lobby and join failures
Hytale
- Authenticate a Hytale server and check the first connection
- Diagnose Hytale authentication, UDP and world-loading failures
Shared game-panel checks
- Back up game files before making changes
- Fix a game console that will not connect or shows a 504 error
- Schedule game server backups and check retention
- Investigate and recover from a full game server disk
- Game server will not start: choose the next safe check
- Players cannot join: follow the connection checks
- Server lag: choose checks for delays, freezes or low FPS
Additional guides in the library
These guides remain available for other server types and existing services; inclusion here is not a promise that every game is currently listed for new orders.
- Set up a FiveM server licence key in Cfx Portal
- Diagnose FiveM joining problems on the assigned TCP and UDP port
- Configure Project Zomboid Workshop mods for the correct build
- Move a Project Zomboid save and preserve its server identity
- Configure a TF2 server and use RCON safely
- Keep a Don't Starve Together cluster token private
- Connect Don't Starve Together Master and Caves shards
When to contact support
Record your server ID, game and client versions, the exact error and its UTC time. Send a redacted startup or connection log through a private support ticket. Avoid repeated reinstalls, forced shutdowns or opening every port. A successful startup is only the first check: join with an ordinary player account and verify the intended save, permissions and gameplay.
Set a Minecraft Java world border without stranding players
A world border gives a Minecraft Java community a defined area to explore. Plan its centre and width around existing builds before changing it. A smaller border can leave bases, portals and logged-out players outside the playable area. It does not remove already generated terrain or shrink your disk usage.
Check the version and save a recovery point
These steps cover the vanilla Java command on Paper, Purpur and vanilla servers. They do not apply to a native Bedrock server. Use Console in the CloudExa game panel; enter commands there without a leading slash. An operator can enter the same commands in chat with a slash. Follow the game backup guide before making changes.
Write down your server version, intended centre coordinates and the location of important builds. Check spawn, shops, farms and transport routes with your staff. Read the current width in the intended dimension:
execute in minecraft:overworld run worldborder getRecord the existing centre from your configuration or administration records. The get command reports width, not centre coordinates. If you cannot establish the old centre, test on a copy and ask support before moving a live border.
Choose the area before applying it
The size is the full side length of a square. For example, a 6,000-block border centred at 0, 0 reaches about 3,000 blocks in each horizontal direction. Treat this as an example; it may exclude your existing builds. Announce the change and move affected players and possessions inside first. Check offline players' last known locations as well.
Apply a planned centre and width only after your checks. This example changes the Overworld immediately:
execute in minecraft:overworld run worldborder center 0 0
execute in minecraft:overworld run worldborder set 6000
execute in minecraft:overworld run worldborder get
Copy the reply into your change notes. Do not use the example centre for a map whose community lives elsewhere. Keep an administrator available to help anyone who reconnects beyond the new boundary.
Check dimensions and portals
Mojang introduced dimension-specific borders in Java 1.21.9. On that version and later, inspect the Nether and End separately by replacing minecraft:overworld with minecraft:the_nether or minecraft:the_end. Choose a policy for each dimension and test both ends of established portal routes. Older releases handle borders differently, so check your exact version before applying a multi-dimension plan.
If you use a timed transition, note that Java 1.21.11 changed unsuffixed border time arguments to ticks. The examples above omit the time argument. Consult your installed version's command help before scheduling a gradual shrink.
Verify and reverse a change
Join as a regular player and visit a safe point near the edge. Test spawn, beds, homes and portal destinations. Check any multiworld or border plugin for overrides if results differ between worlds. Repeat the width query after a normal restart to confirm persistence.
To reverse the configuration, restore the recorded centre and width in each affected dimension. Re-expanding a border cannot recover items lost during an unsafe shrink. Use your recovery plan for lost progress rather than deleting chunks or reinstalling the server. For command errors, include the server version, dimension, exact command and reply using our support-ticket checklist.
Enable Minecraft keep inventory with the right version-specific gamerule
Enable keep inventory when your community wants players to retain carried items after death. Agree on the rule with players first, particularly on an economy or competitive server. Changing this rule affects future deaths; it does not return items lost before the change.
Find the server's edition and version
Use the version shown during server startup, rather than the version of your own Minecraft client. A compatibility plugin can let a different client version connect without changing the server's gamerule syntax. Geyser users joining a Java server also follow the Java server's rules.
For a Java server, open Console in the game panel. You need permission to send console commands. Enter examples without a slash there; operators entering them in in-game chat add a slash. Keep a completed backup as described in our game backup guide, and record the current value before changing it.
Use the matching command
Mojang changed Java gamerule identifiers in 1.21.11 from camel case to namespaced snake case. On Java 1.21.11 and the 26.x releases using that syntax, query the value first:
gamerule minecraft:keep_inventoryRecord the response, then enable it:
gamerule minecraft:keep_inventory trueOn Java 1.21.10 and earlier, use the older spelling instead:
gamerule keepInventory
gamerule keepInventory true
For a native Bedrock dedicated server, consult the Bedrock gamerule reference and use keepinventory. Do not change your Java rule to the Bedrock spelling merely because some players connect through Geyser.
Check the intended world
Run the query again after the change and wait for the confirmation. In a setup with several worlds or dimensions, check behaviour in each place where you expect it to apply. Multiworld and inventory plugins can maintain separate settings or change death handling. Use an operator standing in the intended world, or your world plugin's documented controls, when the console's default world is not the one you mean.
Use a separate test server or a consenting test account with expendable items. Put valuable gear away. Check the hotbar, carried items, armour and experience before and after a controlled death. Also inspect any grave, death-chest or inventory-recovery plugin: retaining the items and creating a recovery chest could produce an unintended duplicate if two systems conflict. Keep the test small and stop if you see unexpected copies.
Resolve an unknown-rule error
Copy the exact startup version and command reply. Confirm capitals and underscores against the examples above. An error from an old tutorial is a reason to check the version, not a reason to reinstall. Use command suggestions in-game where available. If a plugin intercepts commands, consult its documentation rather than granting every player operator access.
To reverse the setting, repeat your version's command with false, or restore the previous value you recorded. Test again with expendable items. Changing the rule back does not reverse deaths, inventory edits or plugin-generated duplicates that happened during testing. If you also plan a version upgrade, follow our Minecraft version-change guide and review the rule again afterward.
Add or replace a Minecraft Java server-list icon
The icon in the Minecraft Java multiplayer list is a small image supplied by the server answering the status request. Updating it does not require a world reset, a new Minecraft version or a plugin. Prepare the artwork locally before opening the game panel. Use an image you own or have permission to publish.
Prepare the file
Export a real PNG image exactly 64 pixels wide and 64 pixels high. Name it server-icon.png, using lowercase letters. Changing a JPEG filename to end in PNG does not convert the image. Open the exported file in an image editor to confirm its format and dimensions, and enable filename extensions in your desktop file browser to catch names such as server-icon.png.png.
Keep the design readable at its actual size. Thin lettering and a detailed banner usually become difficult to recognise after reduction. Check both light and dark backgrounds if the picture contains transparent areas. This is presentation advice; it does not change the network address or authenticate the server to players.
Replace the icon
Arrange a short restart window. In the panel file manager, find the running server's main directory, normally the directory containing server.properties. Download the existing icon before replacing it. Keep that copy outside the server so it cannot be confused with the active filename.
Stop the game server cleanly and wait for the console to finish saving. Upload the new file into the main directory with the exact name server-icon.png. Do not place it inside a world folder, resource pack or plugin directory. Start the server and wait for normal startup to complete. Leave your worlds and startup settings untouched.
Check the endpoint players use
Refresh the entry in the Java multiplayer list. If necessary, close and reopen that screen to clear a cached display. Confirm you are testing the public address advertised to players, rather than a second test server with a similar name. An outdated list entry can still point to another service after an address change.
A Velocity proxy or a server-list plugin may supply its own icon. If players connect through a proxy, editing a backend icon alone may have no visible effect. Check which process answers the public ping before changing additional files. Ask the network administrator when you do not control the proxy; do not disable forwarding or authentication to troubleshoot artwork.
Recover or investigate
If the icon remains unchanged, inspect startup messages for an image-loading error and check filename, dimensions and file format again. Paper versions and plugins can differ in when they load status assets; a clean restart avoids relying on a reload command. These steps apply to the standard Java icon mechanism, not a Bedrock listing image or a panel dashboard thumbnail.
To roll back, stop the server and restore only the saved icon file, then start and refresh the client list. If no icon existed before, download your new file and remove only that icon through the file manager. Do not restore an entire world backup for a cosmetic change.
Related help
- Fix common Minecraft connection errors
- Find Minecraft logs and send useful troubleshooting details
- Back up game files before making changes
Reference
Bukkit server API: loading and validating server icons. Paper server-icon loading implementation. Paper configuration locations.
Change the built-in Minecraft server-list MOTD
The message of the day, usually called the MOTD, is the description shown underneath a Minecraft Java server in the multiplayer list. It is different from a welcome message displayed after joining. This guide changes the built-in description in server.properties; a proxy or MOTD plugin can replace that description before a player sees it.
Establish who controls the message
Record the exact address players enter and the current text. Check whether the address reaches this game server directly or a network proxy. If a proxy answers the status request, its own configuration may be authoritative. Also check the plugin list for a server-list message provider. Editing several competing message sources makes the result difficult to diagnose.
Download server.properties before making changes. Keep it private because that file can contain remote-console credentials. Record the installed Minecraft and Paper release. Options and text handling can evolve between 1.21.11 and 26.x; use the documentation matching the installed build instead of copying a screenshot from another release.
Make a plain-text change first
Stop the server cleanly. In the file manager, open the active server.properties file. Find the existing motd= entry and replace its value with a short plain-text description, such as this illustrative example:
motd=Community survival - new players welcomeKeep the value on the same physical line. Do not add a second motd key at the bottom of the file or wrap the value in quotation marks just because a YAML example uses them. Properties files and YAML use different syntax. Save the file and start the server normally.
Once plain text works, add any formatting supported by the exact software answering the ping. Legacy colour escapes, JSON components and MiniMessage are different formats. A plugin accepting MiniMessage does not mean that server.properties accepts the same markup. Check the relevant implementation before trying colours or line breaks.
Verify the change
Refresh the server entry in Minecraft Java and compare it with your saved screenshot or notes. Join once to ensure the service is still reachable. If the old message remains, check the public address, proxy and plugins before editing again. A server-list website can cache results, so its delayed update is weaker evidence than a fresh client ping.
A listing that appears offline is a separate issue. Check whether status responses were disabled and whether the address and gameplay port are correct. Changing a description cannot repair a failed network connection. Do not alter online-mode, forwarding secrets or firewall settings while investigating a cosmetic message.
Undo the change
Restore the previous motd value in the same file during another clean stop, then start and refresh. If the value changes back by itself at startup, preserve a copy of both versions and inspect panel-managed variables or startup arguments. Report that evidence to support rather than repeatedly overwriting a value controlled elsewhere. Your world files do not need to be restored.
Related help
- Fix common Minecraft connection errors
- Find Minecraft logs and send useful troubleshooting details
- Back up game files before making changes
Reference
Paper server.properties reference. Paper command-line overrides.
Set Minecraft player slots without changing plan resources
max-players controls a Minecraft Java server's configured player limit. Increasing that number does not add RAM, processor time, storage or network capacity to your hosting plan. Choose the limit from the community size you intend to support, then measure how the server behaves during normal play.
Check capacity and routing
Record your current plan resources, player limit and typical busy-period performance. Note whether players are exploring new terrain, standing in a lobby or operating farms. Those workloads can differ even when the online count is identical. A quiet test with one player cannot establish that a larger public event will run comfortably.
For a network, identify whether the public entry point is a proxy and whether backend limits are intentionally lower. A proxy may advertise a separate total or route players between several servers. Coordinate those settings rather than copying the same number everywhere. This guide changes one Java server, not the number of slots sold by a third-party listing site.
Set the limit
Download a private copy of server.properties, announce a short restart and stop the server cleanly. Edit the existing max-players line. For example, a small group's chosen limit might be:
max-players=12This number is illustrative, not a recommendation for a particular plan. Enter a whole positive number and keep only one occurrence of the key. Save, start the server and watch for a normal startup. Do not change the memory startup flags or unrelated network properties at the same time.
Use the reference for the installed release. A current Paper guide may describe options that differ from 1.21.11 or a future 26.x build. If a panel startup variable writes the slot limit automatically, change the supported variable rather than repeatedly fighting the generated file. Ask support if the variable is locked on your plan.
Verify admission and performance
Refresh the Java multiplayer list and confirm the advertised maximum. Check actual joining behaviour with ordinary accounts. Operator accounts, permission-based bypasses and plugins can alter what happens when the server is full, so a successful administrator connection is not sufficient proof that the limit is being enforced for everyone.
During a representative busy period, record online players, tick performance, memory pressure and any complaints. Compare similar workloads rather than a fresh world with an established map. If lag appears, collect a short profiler report and investigate its cause before assuming that a different slot number will fix it. Avoid stress bots or synthetic connection floods against a live service.
Lower the limit or recover
To undo the change, restore the previous value during a planned restart. Warn players first when reducing capacity; do not intentionally test a lower limit by disrupting an event. If the server refuses to start after editing, restore the saved properties file and inspect the earliest configuration error.
If you need more resources, request a plan change separately. Keep the distinction clear in staff notes: the admission limit is a configuration choice, while the hosting allocation controls what the server can actually use.
Related help
- Diagnose Minecraft lag with TPS, MSPT and spark
- Understand Minecraft RAM, CPU and storage usage
- Find Minecraft logs and send useful troubleshooting details
Reference
Paper server.properties reference. Startup arguments that can override properties.
Configure an idle-player timeout on Minecraft Java
Minecraft Java can disconnect idle players after a chosen interval. This can be useful for a small community that wants abandoned sessions to leave automatically. It is an activity rule, not a guarantee that farms will stop running or that every AFK method will be detected. Plugins may implement different AFK policies alongside it.
Decide the policy before enabling it
Tell players how long they may remain inactive and whether staff have separate rules. Consider accessibility needs and time spent reading instructions or chatting elsewhere. Do not choose a very short interval solely to make the online list look tidy. A rule that repeatedly removes legitimate players creates more support work than it saves.
Check the plugin list for existing AFK or idle-kick features. If another system already manages this, decide which one should be authoritative. Two independent timers can produce inconsistent kick messages and make exemption permissions difficult to understand. Record the current player-idle-timeout value before changing anything.
Apply the built-in setting
Download server.properties privately, announce a restart and stop the server cleanly. Edit the existing entry, using minutes rather than seconds. This illustrative example sets a thirty-minute limit:
player-idle-timeout=30A value of 0 disables this built-in timeout. Save and start the server. Keep the release in mind: consult the reference matching the installed Minecraft/Paper build, especially when comparing a 1.21.11 configuration with current 26.x documentation. Do not add duplicate keys or copy a YAML-style key: value line into the properties file.
The timer responds to recognised client activity. That is not the same as detecting whether a human is paying attention. Avoid promising that this setting prevents every idle machine, automated action or farming technique. If you need a different policy, describe the requirement before selecting a plugin rather than layering random exemptions.
Verify with an ordinary account
Run a supervised test during a quiet period using a non-operator account. Note the join time, leave the player safely positioned and wait through the selected interval. Record whether the disconnect happens and what message appears. Do not put the test player near hazards or carry valuable items for this check.
Then repeat with normal activity to confirm an active session is not being removed unexpectedly. If the timer seems inconsistent, check the server log for the actual kick reason. A proxy timeout, network disconnect or plugin kick is a different event. Testing with an administrator alone can hide permission-based behaviour introduced by plugins.
Undo or investigate
If the policy causes problems, restore the previous value, or set player-idle-timeout=0 during a clean stop and restart. Keep the test notes so staff can explain why the rule changed. No world or player inventory restoration is needed.
If all players leave and the server then appears paused, investigate the empty-server pause setting separately. If a player disconnects while actively playing, collect the relevant log interval and client message rather than increasing the idle limit without evidence.
Related help
- Find Minecraft logs and send useful troubleshooting details
- Fix common Minecraft connection errors
- Manage Minecraft operators, permissions and the whitelist
Reference
Paper reference for idle timeout and empty-server pause.
Reduce player IP exposure in Minecraft server logs
Minecraft logs can contain player network addresses. You can reduce this exposure in the native Java server log, but a single server setting cannot control every plugin, proxy, panel or network log. Start by deciding which records staff need for troubleshooting and who should be able to read them.
Check the scope of the change
Record the exact server build and inspect the generated server.properties file. Paper documents log-ips for native IP logging. Confirm that the option exists in the reference for your installed release before adding it to an older configuration. Do not assume every option from current 26.x documentation exists in 1.21.11 or another historical build.
List the other software on the connection path: for example, a proxy, an authentication plugin or an administration tool. Those systems may write their own connection records. Reducing native logging does not remove a player's IP from the network stack, change their account identity or prevent authorised infrastructure monitoring.
Change the native setting
Save a private copy of server.properties. Announce a short restart, stop the server cleanly, and change the existing line to:
log-ips=falseIf your supported release generates this option, edit that generated entry rather than adding a duplicate. Save the file, start the server and check for normal startup. Keep authentication and proxy forwarding settings unchanged. Turning off account verification is not a privacy measure and can introduce identity problems.
Ask a staff member to connect for a supervised test, then inspect the new log interval. Check what the server actually recorded instead of assuming the setting covers all messages. Do not publish the test log unredacted just to demonstrate that the change worked. If a plugin still writes addresses, review its documented logging controls separately.
Handle existing logs safely
The setting affects future output; it does not rewrite old logs or copies in backups. Restrict access to historical logs using the permissions available to your panel account. Decide a retention period that fits your operational and legal needs, and document it for staff. This guide is technical configuration guidance, not a universal retention rule.
When asking for support, preserve useful timestamps, exception messages and server versions. Redact player addresses, session tokens, database passwords and other unrelated secrets. Keep an unmodified private copy if you need to correlate an incident later. A screenshot can expose the same information as a text attachment, so inspect both.
Recover and verify the wider result
To reverse the change, restore the previous log-ips value during another clean stop and restart. If staff need an address for a specific investigation, use an authorised record source rather than permanently broadening log access for everyone.
Review proxy and plugin logging independently and check a fresh connection after each adjustment. Record exactly which component changed and which records remain. That produces a defensible result: native IP logging was reduced and verified, while other systems are tracked explicitly rather than assumed to be covered.
Related help
- Find Minecraft logs and send useful troubleshooting details
- Back up game files before making changes
- Set up a Velocity network with protected backend servers
Reference
Paper server.properties reference: log-ips.
Diagnose Minecraft pausing when no players are online
A Minecraft server can remain running while its game simulation pauses after the last player leaves. That is different from the panel marking a stopped process as offline. Before changing restart schedules or buying more memory, establish which condition actually occurred and whether pausing is intentional on your installed version.
Separate process state from game ticking
Record the last player's departure time, panel state, console output and the next player's join time. If the process exited, collect the final log lines and exit information. If the process stayed running and resumed when someone joined, an empty-server pause is a more plausible explanation. Do not repeatedly force-stop a process to test a pause.
Check pause-when-empty-seconds in server.properties against the reference for your exact release. This option is version-sensitive. Current Paper documentation describes it as disabled by default because plugins may expect continued activity with no players. That is not evidence that every vanilla build, Paper fork or older 1.21.11 installation has the same effective setting.
Decide whether continuous ticking is required
List jobs you expect to happen while the server is empty: scheduled plugin work, economy updates or other background tasks. Confirm their documented behaviour. Some jobs use game ticks while others use separate timing, and a configured timer is not proof that a world will remain simulated under every condition.
Also distinguish pausing from chunk loading. Keeping the server unpaused does not mean every distant farm runs while no players are present. Spawn rules, loaded chunks, dimensions and plugin behaviour still matter. Avoid creating permanent chunk loads just to mask an unexplained pause.
Make one controlled change
Download the properties file and arrange a restart. Stop the server cleanly. If your build supports the documented property and you require pausing to be disabled, use:
pause-when-empty-seconds=-1If you deliberately want empty-server pausing, use the supported non-negative interval for your release only after checking plugin compatibility. Do not copy a vanilla value into a plugin-heavy server without testing. Save, start and confirm there are no configuration errors.
Observe a complete empty-and-rejoin cycle
Have the test players leave during a quiet period and record what the console reports. Wait longer than any configured pause interval. Rejoin using an ordinary client and confirm that normal activity resumes. Test one specific background task you rely on, using its own documented status or output, rather than inferring success from the panel's uptime display.
A frozen console timestamp alone is weak evidence because a quiet server may simply have nothing to log. Conversely, a watchdog dump or out-of-memory exit is not normal empty-server pausing. Keep the distinction in your support notes.
Recover
Restore the original property and restart if plugins misbehave or the test does not meet your needs. If the server actually stopped, investigate the exit separately using the log and resource history. Do not disable watchdog protection, change authentication or reinstall the server as a response to an unverified pause.
Related help
- Find Minecraft logs and send useful troubleshooting details
- Tell a Java memory error from a killed Minecraft process
- Diagnose Minecraft lag with TPS, MSPT and spark
Reference
Paper empty-server pause property. Paper vanilla-like configuration considerations.
Check Paper world autosave intervals without disabling saves
Paper periodically saves world changes during play. Those writes help preserve progress, but they do not replace a recoverable backup. A backup protects an earlier state from mistakes and corruption; autosave writes the current state, including changes you may later want to undo. Keep both responsibilities separate when investigating save-related pauses.
Inspect the current save path
Record the Paper build, affected world and time of any hitch. Download the relevant configuration before editing it. Check ticks-per.autosave in bukkit.yml and the world's Paper chunks.auto-save-interval setting. The latter can inherit the Bukkit interval through the value default. Read the effective configuration, including world-specific overrides, rather than changing only the first matching file.
Use the layout documented for your release. Current 26.x references describe dimension configuration paths that differ from earlier Paper layouts. A 1.21.11 server may organise world folders differently. Locate existing generated files and confirm which world they belong to; do not create a guessed directory tree copied from another version.
Choose a bounded adjustment
If a profiler or timing evidence points to save work, first check available disk space, backup schedules and simultaneous archive operations. A slow storage path cannot be repaired simply by saving less frequently. Keep a note of the original interval and change only one setting at a time.
Paper's interval is expressed in game ticks, not milliseconds. At the normal twenty ticks per second, 6000 ticks represents about five minutes, but lag changes elapsed wall time. Treat that as an explanation of units, not a universal recommended interval. Longer gaps can increase the amount of recent progress exposed to an abrupt crash.
Stop the server cleanly before editing. Adjust the existing chunks.auto-save-interval entry only if the installed release supports it. Keep saving enabled. Do not use save-off as a permanent performance fix, and do not set undocumented zero or negative values based on a forum suggestion. Leave chunk save limits and filesystem flush options unchanged in this first test.
Verify persistence and behaviour
Start the server and check for configuration warnings. Make a small, recognisable change in a safe test area, such as placing a labelled block arrangement. Allow the configured save period to pass during normal operation. Then perform a clean stop and start and confirm that the change persists.
That restart check shows that the world can save and load; it does not prove the maximum loss after a power failure, because a clean stop also saves data. Do not deliberately crash a customer server to measure that boundary. Record save-related log messages where available and compare hitch timing under a similar workload.
Recover
Restore the original interval if the change increases pauses, produces warnings or fails to address the problem. Keep the before-and-after notes and a short profiler capture for support. If disk pressure or a stuck backup overlaps the pauses, investigate that storage problem separately. Never overwrite the current world with a backup merely to undo a configuration interval.
Related help
- Back up game files before making changes
- Schedule game server backups and check retention
- Diagnose Minecraft lag with TPS, MSPT and spark
Reference
Paper world save settings. Bukkit autosave interval. Paper configuration inheritance and paths.
Separate Paper entity activation range from tracking range
An entity that becomes invisible at a distance and a mob that stops behaving normally at a distance are different symptoms. On Paper, tracking settings influence which entity information reaches a client, while activation settings influence how actively certain loaded entities tick. Increasing both together can obscure the cause and add unnecessary work.
Describe the exact symptom
Choose one reproducible example in a safe test area. Record the world, entity type, player position and distance at which the problem appears. Note whether a second player standing nearby changes the result. A villager trading hall, a moving dropped item and a decorative display are different test cases; do not assume one category's setting covers all three.
Record the server build and download spigot.yml before editing. Inspect the relevant world-settings entries, including the default section and any named-world override. Paper's inherited Spigot settings remain relevant even when other world options live in Paper's own files. Use the reference matching your installed release rather than transplanting a complete 26.x example into 1.21.11.
Understand the two controls
entity-activation-range controls distance-based activity for categories such as animals, villagers and miscellaneous entities. entity-tracking-range controls how far entity information is sent to players. Tracking distance can also interact with the server's entity broadcast range percentage. These settings are distinct from chunk view distance and simulation distance.
A tracking adjustment will not load an unloaded chunk or guarantee that a farm ticks. An activation adjustment will not necessarily make a distant display visible. Check whether the entity and its chunk remain loaded before deciding that either range is responsible. Plugins can also alter entity behaviour or visibility independently.
Test a narrow change
Stop the server cleanly. Change one existing category value in the correct world section, keeping the original value in your notes. Use a modest positive adjustment tied to the measured symptom rather than a very large number. Do not set every activation range to zero as a general optimisation: current Paper documentation describes zero or below as disabling this throttling for that category.
Save, start and inspect the console for parsing errors. Repeat the same test from the same positions with the same ordinary account. Then check another nearby build that depends on that entity category. Compare tick performance and player reports during a representative workload before retaining the setting.
Recover and escalate
If the change does not address the symptom, restore the original value and restart before testing a different control. Keep a short record of what changed and what you observed. Avoid stacking speculative edits until the server seems different but the reason is unknown.
If the entity disappears completely or its saved state changes, preserve logs and investigate plugins or world data separately. Do not delete entity files, reset chunks or restore the entire world to troubleshoot a range. Provide support with the entity category, world, effective settings and reproducible distance test.
Related help
- Tune Minecraft view distance and simulation distance
- Diagnose Minecraft lag with TPS, MSPT and spark
- Find Minecraft logs and send useful troubleshooting details
Reference
Paper reference for activation and tracking ranges. Server properties including entity broadcast range.
Enable and test Paper Anti-Xray in one world
Paper Anti-Xray changes the block information sent to clients so hidden ores are harder to identify with an X-ray resource pack or client. It is a mitigation with limits, not proof that cheating is impossible. Configure one world first and verify ordinary play before applying a policy across an entire network.
Choose scope and preserve settings
Record the Paper build and the target dimension. Download the relevant Paper world configuration and check its inheritance. The shared defaults file can affect several worlds; a world-specific override is preferable when you are trialling the feature in one place. Follow the directory layout for your installed release, because current 26.x dimension paths differ from older Paper layouts such as those encountered on 1.21.11.
Read Paper's Anti-Xray guide before choosing a mode. Mode 1 substitutes hidden target blocks with ordinary terrain. Modes 2 and 3 use different fake-block strategies. They have different visual, network and processing trade-offs. A higher mode number is not a universal recommendation, and exposing more fake data does not conceal ores that legitimate exploration already reveals.
Apply a minimal configuration
Take a recoverable backup, arrange a restart and stop the server cleanly. Locate the existing anticheat section and its anti-xray subsection. Merge your intended changes into that section rather than creating a second copy. For a first trial, enabling the feature with its release-appropriate defaults is easier to assess than replacing every block list from an old tutorial.
Set the supported enabled option to true in the correct scope and select a documented engine mode only if you deliberately need a different mode. Retain the generated block lists and height settings until you understand the mode's requirements. Never modify _version to make a pasted example appear compatible. Use spaces rather than tabs for YAML indentation.
Start the server normally and inspect the earliest warnings. Do not use /reload to activate the change. If parsing fails, stop and repair the configuration before allowing players back in. A normal startup is only the first check, not proof that the intended dimension received the policy.
Verify ordinary and restricted views
Use a non-operator test account in the selected world. Permission-based exemptions can make an administrator a misleading test subject, particularly if use-permission is enabled. Check that normal mining, exposed blocks and transitions between areas behave acceptably. Observe client stutter and server performance under a representative workload.
A full validation of obfuscation may require a controlled test client or packet inspection. If you have not performed that test, record the limit honestly rather than claiming that every X-ray method is blocked. Do not direct players to download untrusted cheat clients merely to prove the setting works.
Roll back
Restore only the changed configuration entries during a clean stop and restart if the trial causes unacceptable behaviour. Keep the world data intact. Document the chosen scope and mode for staff, and retain normal moderation measures because Anti-Xray does not address every source of unfair knowledge or client abuse.
Related help
- Back up game files before making changes
- Manage Minecraft operators, permissions and the whitelist
- Diagnose Minecraft lag with TPS, MSPT and spark
Reference
Paper Anti-Xray configuration and limitations. Paper configuration paths and inheritance.
Read a Paper watchdog report without disabling its protection
Paper's watchdog detects when the server stops making timely progress. A watchdog warning is evidence of a stalled or unusually long tick, not a diagnosis by itself. Disabling the watchdog can leave a genuinely stuck process consuming resources indefinitely. Preserve the report and identify the blocked work before changing protection settings.
Capture the complete event
Record the event time, Minecraft/Paper version, player count and what happened immediately beforehand. Download the relevant section of logs/latest.log, including lines before the first warning and the thread dump that follows it. A screenshot of only the final line usually omits the stack trace needed for investigation.
Check whether the process recovered, stopped itself or was killed externally. Paper can emit an early warning before a later termination threshold. Those are different outcomes. A panel displaying an offline state after the event does not prove that the watchdog was the component that ended the process. Preserve exit information and resource history where available.
Read the report as a snapshot
Find the server's main thread in the dump and note repeated method or plugin names. A stack frame identifies where a thread was observed, not necessarily the sole cause of the delay. Disk access, chunk generation, a synchronous plugin operation or external calls can appear differently. Avoid declaring a plugin guilty just because its name appears somewhere in a large dump.
Compare several reports from the same incident. An unchanged stack can suggest blocking; changing stacks may reflect expensive progress. Keep that distinction as a hypothesis until you have supporting logs or a profiler capture. Redact player addresses and secrets before sharing the report publicly, but retain a complete private copy.
Investigate safely
If the server responds again, collect a short profiler capture during the same reproducible workload. Record recent plugin changes, scheduled backups and disk pressure. Test a suspected plugin change on an isolated copy or in a planned maintenance window. Do not unload random plugins or repeatedly force-stop a live world while players are building.
Check the documentation for the installed release. max-tick-time in server.properties, inherited Spigot timeout settings and Paper's early-warning options are related but use different locations and units. A setting described in current 26.x documentation may not match an older 1.21.11 layout. Do not paste a large timeout value merely because another server used it.
Recover service and retain evidence
If the process is still unresponsive, send the log and current panel state to support. A clean stop is preferable when the console can process it. If a forced stop becomes necessary, make that a deliberate recovery decision with awareness of unsaved progress, rather than a repetitive troubleshooting step.
Roll back a known recent configuration or plugin change only after preserving evidence and checking compatibility. Keep the watchdog enabled while you verify normal operation. Success means the triggering workload completes without new stalls and the underlying cause has been addressed; a quiet console after suppressing warnings is not sufficient.
Related help
- Find Minecraft logs and send useful troubleshooting details
- Diagnose Minecraft lag with TPS, MSPT and spark
- Tell a Java memory error from a killed Minecraft process
Reference
Paper basic troubleshooting and watchdog reports. Server watchdog property. Paper early-warning configuration.
Repair a Paper YAML configuration error safely
A YAML error can prevent Paper or a plugin from starting after a configuration edit. The safe repair is usually a small correction near the first reported location. Deleting every configuration file can erase unrelated settings and make recovery harder. Preserve the broken file before changing it, even when the error appears obvious.
Identify the actual file
Open the console or latest log and find the first parsing exception from startup. Record the filename, line and column if shown. A later plugin failure may be a consequence of an earlier configuration error, so begin at the earliest relevant message. Confirm whether the file belongs to Paper itself or to a plugin; their schemas are not interchangeable.
Download the current file and your last known working copy. If the server is repeatedly attempting to start, stop it through the panel while you investigate. Use a text editor that displays line numbers and whitespace. Do not upload a private configuration to a public validator because it may contain database details, webhook URLs or other credentials.
Check structure before changing values
YAML uses indentation to express nesting. Use spaces, not tab characters, and align neighbouring keys at the same level. A line reported as invalid can be where the parser finally noticed a problem that began above it. Inspect the preceding section, especially an unfinished quote, missing colon or list entry with the wrong indentation.
Keep scalar values in the format documented for that option. A duration, integer, Boolean and list are different types. Quoting everything can turn a number or Boolean into text and produce another error even if the YAML now parses. Conversely, a value containing special punctuation may need quoting. Follow the software's example rather than applying one rule to every line.
Do not add duplicate copies of a section to make a new setting fit. Merge the single intended change into the existing section. Leave Paper's internal _version marker unchanged. For Paper world configuration, consult the paths and schema matching the exact installed build; current 26.x examples can differ from the files generated on 1.21.11.
Validate the smallest repair
Compare your edit with the downloaded file and confirm that only the intended lines changed. Save, start the server and read the console from the beginning. If a new error appears, capture it and stop again rather than making a series of unrecorded guesses. Successful parsing does not prove that the setting has the desired effect, so test its behaviour separately.
If you cannot identify the syntax problem, restore the known working copy of that configuration file and restart. Keep the broken version under a different local filename for support. Avoid replacing the whole world, plugin directory or server installation to repair a text-format error.
Prevent a repeat
Make future changes one section at a time and retain a small change note with the build and file path. Use generated defaults from the same release as a structural reference. If no working copy exists, ask support to help compare the damaged file with release-appropriate defaults without discarding your custom settings.
Related help
- Find Minecraft logs and send useful troubleshooting details
- Back up game files before making changes
- Update Paper, Purpur and plugins safely
Reference
Paper configuration files and version markers. Paper world configuration schema.
Fix Minecraft server.properties changes that do not apply
If a Minecraft property returns to its old value or seems to have no effect, first identify what controls it. The file you edited may be inactive, a startup argument may override it, or a panel variable may regenerate it. Repeating the same edit without checking those possibilities can leave several conflicting copies.
Confirm the active service and file
Record the server's panel identifier, installed software and startup line shown to your account. Check that you are editing the service players actually use. Similar server names and downloaded copies can be misleading. The active server.properties is normally in the server working directory, but custom startup arguments can point to another file.
Download a private copy before editing. Properties files may contain RCON passwords and other sensitive settings, so do not paste the whole file into a public ticket or screenshot. Record the exact key and old value separately. Search for another occurrence of that key; leave one authoritative entry rather than relying on how duplicate entries happen to be parsed.
Use properties syntax
An ordinary setting uses key=value on a single physical line. This is not YAML, so indentation and key: value examples from Paper world settings do not belong here. A line beginning with a comment marker does not apply the setting. Avoid smart quotes, rich-text formatting or accidental hidden filename extensions when editing locally.
Use the reference matching the installed release and software. An option recognised by current 26.x Paper may not exist on 1.21.11, and a Paper option may not be supported by another implementation. Unknown entries can remain in a file without producing the behaviour you expected. Confirm the option name and type before treating a lack of change as a panel fault.
Check overriding controls
Inspect the startup fields your panel allows you to view. Paper supports command-line arguments that can override some file values, including connection and player-limit settings. A host-managed variable may also rewrite the file before Java starts. If a field is locked, ask support to identify the intended control rather than altering the startup command or bypassing restrictions.
Stop the server cleanly, make one small supported change, save and start it. After startup, reopen the active file and compare the stored value. If it was rewritten, note when the rewrite happened and provide that evidence. If it stayed changed, test the relevant behaviour; a proxy or plugin may be supplying the visible result elsewhere.
Verify and recover
Choose a test that matches the key. For an MOTD, refresh the correct server-list entry; for an idle timer, observe an ordinary account; for a port, ask support to confirm the allocation. Do not change network ports merely to see whether any edit takes effect.
To undo the test, restore the previous value in the authoritative control and restart cleanly. Keep the original file as a reference rather than overwriting unrelated settings added since your download. Escalate with the build, key, before-and-after values and redacted startup information. No world reset or reinstall is needed to resolve a configuration source conflict.
Related help
- Find Minecraft logs and send useful troubleshooting details
- Back up game files before making changes
- Fix common Minecraft connection errors
Reference
Paper server.properties reference. Paper command-line overrides. Paper configuration locations.
Apply a Paper setting to one world using inheritance
Paper separates settings shared by worlds from settings overridden for one world or dimension. Editing a shared default can change more than you intended, while editing an unused file can change nothing. Use a minimal override when a single world needs a different supported behaviour.
Map the installed layout
Record the exact Paper build and world or dimension you intend to change. Open the configuration reference for that release. Current documentation describes config/paper-world-defaults.yml and per-dimension paper-world.yml files under paths such as world/dimensions/<namespace>/<key>/. Earlier versions, including 1.21.11 layouts, can organise dimensions differently. Inspect generated files rather than creating a guessed current-version path.
Download both the shared defaults and the target world's existing override. Also inspect spigot.yml if the option belongs to its world-settings section. A Spigot setting does not move into Paper's world file simply because it affects a world. Establish the correct configuration owner before editing.
Understand inheritance
A minimal world file can contain little more than its version marker. Missing supported options inherit from the shared Paper defaults; that does not necessarily mean they are disabled. If the option already appears in the world override, that local value can explain why changing the shared default had no effect there.
Choose one documented setting and write down its effective old value, expected new behaviour and rollback. Avoid copying the entire shared defaults file into the override. A large copy hides which differences were intentional and can prevent future shared adjustments from reaching that world. Leave the generated _version marker unchanged.
Add the smallest override
Announce a restart and stop the server cleanly. Add the setting under its correct parent sections in the existing world file, using spaces and the documented value type. Merge with existing sections instead of duplicating the same top-level key. Check the diff against your downloaded copy before starting again.
Use a low-risk behaviour test related to your chosen option. Do not trial destructive settings, chunk resets or entity save limits as a first exercise in inheritance. If your goal is Anti-Xray or autosave, follow that feature's dedicated instructions after establishing the correct scope.
Verify scope, not just startup
Start the server and inspect for parsing or migration warnings. Test the chosen behaviour inside the target world. Then visit a second world that should retain its previous behaviour. A clean startup confirms that the file was accepted, but only this comparison checks that your change stayed within the intended scope.
Record both observations, including any plugin that may override the result. If the setting appears ineffective, recheck the exact dimension and path before adding a second copy elsewhere. Multiverse-style plugin names and on-disk world names may not be identical.
Return to the default
To remove the exception, stop the server, remove only the override entry you added and restart. The setting should inherit again from the current shared defaults. Restore the downloaded file if the edit was malformed. Keep all world data intact and preserve a note explaining why the exception existed.
Related help
- Back up game files before making changes
- Find Minecraft logs and send useful troubleshooting details
- Update Paper, Purpur and plugins safely
Reference
Paper configuration inheritance and paths. Paper world settings. Inherited Spigot world settings.
Enable Minecraft Query on an allocated UDP port
Minecraft Query is an optional server-information listener. It is separate from joining the Java server and from the normal server-list status ping. Enable it only when a monitoring or listing tool specifically requires the Query protocol. If a tool only needs a normal Java status response, an additional listener may be unnecessary.
Confirm the allocation first
Ask support to confirm which IP and UDP port your game server may bind. A port printed in an internet tutorial is not automatically allocated to your service. The default value in a configuration reference is also not a reservation. Some deployments can use the gameplay number for a UDP listener, but that must be confirmed for your actual allocation and host routing.
Identify the tool that will query the server and what information it displays publicly. Review its documentation and privacy implications before publishing player-related data on a third-party listing. Query is an information service, not a remote console, so do not put an RCON password into a Query client.
Configure the supported listener
Download server.properties privately and record the current values. Stop the server cleanly. Set enable-query=true and set query.port to the confirmed allocated UDP port. Replace the existing entries rather than adding duplicates. Do not copy a placeholder word into the numeric field.
Leave gameplay port, bind address and authentication settings unchanged. A game-panel allocation controls what you are allowed to use; editing the properties file does not create a new allocation or open a host firewall. If a required field is locked, let support make the allocation change rather than trying another customer's port.
Start the server and inspect the console for bind failures or listener errors. Use the reference for the installed release and implementation. The Query setting is longstanding, but current Paper documentation should not be treated as proof that every fork exposes exactly the same information or logging.
Test the actual protocol
Configure the intended tool with the confirmed public address, UDP port and Query protocol. A successful Java multiplayer ping or a TCP port check does not verify this listener. Record the tool's result and the test time. Do not use a broad network scan or send a flood of query packets to diagnose a single allocated port.
If it fails, check the effective properties after startup, allocation protocol, address and any source restrictions with support. A UDP timeout alone cannot tell you whether the process is not listening or packets are blocked somewhere along the path. Provide the configuration values without unrelated credentials and include any startup error.
Disable or recover
If you no longer need Query, stop the server, restore enable-query=false and restart. Remove the endpoint from the external tool as well. Keep normal Java status enabled if players rely on the server list; disabling one service should not accidentally disable another.
To undo a failed trial, restore only the Query entries from your saved copy. Do not change worlds, reinstall the server or broaden firewall access to all ports. The desired outcome is one confirmed listener for one documented purpose.
Related help
- Fix common Minecraft connection errors
- Find Minecraft logs and send useful troubleshooting details
- Back up game files before making changes
Reference
Paper Query listener properties. Paper bind-error troubleshooting.
Plan restricted RCON access for a Minecraft Java server
RCON gives a remote client access to Minecraft console commands. Treat it as administrative access, not a public server-information endpoint. The game panel console is usually the simpler choice for occasional manual commands. Only enable RCON when a specific trusted integration needs it and a protected connection path is available.
Establish a safe access path
Confirm with support that your service has an allocated TCP port and a supported restriction method, such as a private management network, VPN path or narrowly restricted source access. Ordinary Minecraft RCON does not provide transport encryption. A strong password alone does not make an unrestricted public connection an appropriate management channel.
Game hosting customers should not run host firewall commands or assume they can bind a private address inside a container. Ask support to confirm the actual routing and listener exposure. If a protected path cannot be provided, leave RCON disabled and use the authenticated panel or an integration designed for the available access model.
Prepare credentials and configuration
Record the installed server build and check its RCON properties. Download server.properties privately; never attach that unredacted file to a public report. Generate a long, unique password in a password manager. Do not reuse the panel login, database password or a community staff password.
Arrange a restart and stop the server cleanly. Set the existing enable-rcon entry to true, set rcon.port to the confirmed allocated TCP port and place the secret in rcon.password. Do not put illustrative placeholder text into a live password field. Save and start the server, then inspect for bind errors without copying the secret into screenshots.
Verify access and boundaries
From the approved management path, use the integration's documented RCON client and run a harmless information command, such as list. Confirm the response is from the intended server. Avoid commands that change the world or players merely to prove connectivity. An RCON login generally grants console-level capability, so do not assume that a player permission plugin limits what the remote client can do.
Ask support to verify that a connection outside the approved path is refused. Record that verification honestly; a successful authorised connection alone does not prove the restriction works. Do not use a third-party public web checker that asks for your RCON password.
Review the integration's secret storage and logs. It should not place credentials in a public repository, shared paste or client-visible page. Where a client supports secure secret input, prefer it to a command that leaves the password in shell history. Limit who can edit the automation because it can issue administrative commands.
Revoke and recover
Test the revocation plan before relying on the integration. To remove access, stop the server, set enable-rcon=false and restart, then confirm the client can no longer connect. If a secret may have leaked, rotate it and review commands or changes made during the exposure.
Restore the saved RCON settings if the setup fails, keeping the secret private. No reinstall, world reset or broad firewall opening is required. Keep a staff note identifying the integration owner and the reason remote console access exists.
Related help
- Manage Minecraft operators, permissions and the whitelist
- Find Minecraft logs and send useful troubleshooting details
- Back up game files before making changes
Reference
Test a Minecraft network compression threshold change
Minecraft Java can compress packets above a configured size. Compression trades processing work for smaller transfers, so changing the threshold can affect bandwidth and CPU use differently. It is not a universal fix for low TPS, high ping or a slow internet connection. Start with a clear symptom and measurements you can compare.
Check the connection path
Record the Paper build, current threshold, typical online count and whether players connect directly or through a proxy. A proxy can apply its own compression policy on another connection leg. Changing a backend alone may not change traffic between players and the public proxy. Coordinate with the network administrator before testing a multi-server setup.
Separate the symptom into useful categories: delayed game ticks, slow chunk delivery, high round-trip latency or bandwidth pressure. A profiler can help identify server-side work, while client observations and network graphs may show a different bottleneck. Do not assume every report of lag comes from packet compression.
Plan a controlled comparison
Download server.properties privately and record the existing network-compression-threshold. Paper's reference expresses the threshold in bytes and documents negative values as disabling compression. That explains the setting; it is not advice to disable it. Turning compression off can substantially increase transferred data for some workloads.
Choose a modest, documented test change only after discussing the relevant metric with support if necessary. Keep the same client version, route and general activity for the comparison. Flying through unexplored terrain in one trial and standing in a lobby in the other will not provide a useful result. Do not run a flood or synthetic traffic test against the live service.
Apply one change
Announce a short restart, stop the server cleanly and edit the existing property. Use a whole numeric value in the format supported by the installed release. Do not alter memory flags, distances, packet limits and compression together. Save, start normally and inspect the log for configuration or connection errors.
Use the documentation for the exact server and proxy versions. Current 26.x Paper settings and an older 1.21.11 deployment may have different surrounding behaviour even when the property name is the same. Avoid copying an optimisation bundle whose other options you cannot explain.
Evaluate the result
Compare a representative session before and after the change. Record player count, activity, tick performance, CPU observations and network throughput where the panel exposes them. Ask the same test players about chunk delivery and disconnects. Separate a measured change from subjective improvement and avoid attributing a quiet period to the new threshold alone.
If network statistics are unavailable, acknowledge that limitation. A lower CPU graph without bandwidth data is not enough to prove the overall trade-off is better. Likewise, packet size changes cannot remove distance-based latency between a player and the server location.
Roll back
Restore the previous threshold during a clean stop and restart if the result is worse, unclear or unnecessary. Keep the comparison notes with the build and connection path so the same experiment does not have to be repeated blindly.
If players continue to experience timeouts, inspect their connection errors and the server log separately. Do not disable account authentication, remove proxy protections or broaden unrelated ports as part of a compression experiment.
Related help
- Diagnose Minecraft lag with TPS, MSPT and spark
- Fix common Minecraft connection errors
- Set up a Velocity network with protected backend servers
Reference
Paper network compression property. Velocity network compression settings.
Fix “UnsupportedClassVersionError” when starting Minecraft Java
UnsupportedClassVersionError means Java encountered a class format that the running JVM does not support. It is different from a plugin's Minecraft API requirement and from running out of memory. The class name and version numbers in the complete error determine which part of the installation needs attention.
Preserve the useful evidence
Copy the first exception and its surrounding startup lines from the panel console. If Java stops before Minecraft starts, logs/latest.log may never receive the error. Record the runtime version printed by this particular server's startup, the Minecraft/Paper build and the last changed JAR. Redact credentials or tokens from the startup information before sharing it.
A message may compare the class file's required version with the highest version the current runtime recognises. Those are class-format numbers, not Minecraft release numbers. Do not assume a number such as 65 describes Minecraft, the amount of memory or a plugin version. Oracle's exception documentation defines this failure in terms of unsupported class-format versions.
Decide whether the server or a plugin failed
If the named class belongs to the server launcher or server implementation, compare that server release's documented Java requirement with the selected runtime. If Paper starts and the failure names a plugin class during plugin loading, check that plugin release's Java requirement as well. A server may be compatible with a runtime while one newly installed plugin is not.
Find the runtime selection in the game panel if your plan exposes it. The Java installed on your own computer, another game service or a host shell is not proof of the Java inside this service's container. Use the startup evidence from the affected service. If no runtime selector is available, send support the complete class-version message and required release rather than changing unrelated startup flags.
Choose a compatible recovery
Preserve a backup and the previous working JAR/configuration. During a planned stop, select a runtime supported by both the exact Minecraft/Paper release and your required plugins. Do not select the newest Java merely because its number is larger; compatibility must cover the whole stack. Requirements differ between historical 1.21.x builds and current 26.x releases.
Alternatively, if only a new plugin requires a different runtime, obtain an author-supported compatible plugin build or return to the previous compatible plugin state. Keep its data and review whether the attempted update already migrated configuration or a database. An older JAR alone may not reverse that migration.
Verify the actual restart
Start once and confirm the runtime banner reflects the intended selection. Check that the original class-version exception is gone, that the server finishes starting and that the relevant plugin feature works with an ordinary account. A panel setting showing the desired runtime is weaker evidence than the new process's output.
If the change fails, restore the previous supported runtime and compatible application state. Do not force a newer world into an older Minecraft release to avoid the Java requirement, edit class files or disable version safeguards. Provide the new first error to support; it may reveal a separate compatibility problem after this one is resolved.
Related help
- Choose the Java runtime for your Minecraft server
- Find Minecraft logs and send useful troubleshooting details
- Update Paper, Purpur and plugins safely
Official references
Paper example of an outdated Java runtime. Oracle definition of UnsupportedClassVersionError. Paper release-specific Java requirements.
Fix “Unable to access jarfile” in a Minecraft startup
Unable to access jarfile is a Java launcher error. Java could not open the JAR named by the launch command, so Minecraft may not have begun loading at all. Adding RAM, resetting a world or updating plugins will not repair an incorrect launcher path. Begin with the filename printed after the error.
Compare the requested file with the actual upload
Read the panel console from the start of the failed attempt and record the exact requested filename. Then open the server's file manager and locate the intended Minecraft server JAR. Compare spelling, capitalization and extension. Linux distinguishes uppercase and lowercase names, and a local desktop can hide an extra extension such as .jar.jar.
Confirm that you uploaded the actual binary download. A ZIP containing several files, a project source archive or an HTML download-error page is not the intended server JAR. Check the official download source and expected file size where provided. Renaming a different file type to end in .jar does not convert it into an executable server.
Check the working directory and launcher field
The startup command's relative JAR path is resolved from its working directory. A JAR uploaded into a nested folder may not match a command expecting it in the main server directory. Inspect the startup JAR-name field if the panel exposes one. Do not assume that changing the visible server name also changes this launch field.
Take a private copy of the current startup information and preserve the existing server files. For a host-managed template, ask support to identify the supported JAR field rather than replacing the entire launch command. The field should name the intended server binary, not a plugin from the plugins directory or an installer that belongs to another server type.
Correct one mismatch
Keep the server stopped while changing launcher files. Either set the supported JAR field to the correct existing filename or upload the verified server binary under the filename the template expects. Choose one approach and record it. Avoid retaining several ambiguously named active binaries while trying different values without notes.
If the file is already in the correct place with the correct name, check the panel upload result and whether the file is readable through the available file tools. Ownership or permission problems may require hosting support. Do not apply broad recursive permissions or make everything globally writable to address a launcher error.
Verify and recover
Start once and check that the launcher proceeds beyond the original error. Confirm the Minecraft/Paper version reported is the version you intended. A replacement JAR that starts successfully can still be the wrong release; do not allow an accidental newer release to upgrade your world unnoticed.
If another error appears, preserve it separately. A class-version or invalid-JAR error means you reached a different stage, not that the same missing-path problem persists. If necessary, restore the previous verified JAR and startup field. Keep world, plugin and configuration folders unchanged. When contacting support, provide the requested path, actual filename, upload source and redacted startup excerpt, rather than a full private configuration archive.
Related help
- Find Minecraft logs and send useful troubleshooting details
- Choose the Java runtime for your Minecraft server
- Update Paper, Purpur and plugins safely
Official references
Paper troubleshooting for an inaccessible server JAR. Paper server downloads and launch command.
Resolve “Circular plugin loading detected!” on Paper
Circular plugin loading detected! reports an impossible plugin load order. One plugin must load before another, but the declared relationships eventually point back to the first plugin. The server cannot satisfy every relationship at once. This is different from a single missing dependency or an invalid YAML setting in your normal configuration.
Capture the entire loop
Download the startup log and find the circular-load message. Copy the plugin sequence reported immediately after it, including every return to the starting plugin. Record each plugin's installed version, download source and the exact Paper build. A later failure may be a consequence of this loop, so preserve the first detection rather than only the final shutdown line.
Message formatting and logger names vary across Paper releases and plugin-loader implementations. Current developer documentation also shows a colon-ended form of the circular-loading message. Match the reported loop and versions rather than assuming every build uses the same punctuation or logger name.
Map the relationships
Check the official dependency and compatibility notes for every plugin in the loop. A hard dependency, a soft ordering preference and a declared load-before relationship can all influence startup, but they do not mean the same thing. Paper-plugin metadata and traditional Bukkit plugin metadata also have different rules.
Start with the last changed component. Was a companion plugin added, a dependency updated or an older add-on retained alongside a new major release? Compare the supported combination as a whole. Merely changing filenames does not change the internal dependency relationships, and adding more copies of the same plugin can introduce another failure.
Prepare an isolated test
Preserve a backup, plugin configurations and any external database state needed for recovery. Use a separate test copy where possible, with mail, scheduled jobs and production database writes disabled. Do not remove moderation or protection plugins from a public server and allow players to join just to see whether startup succeeds.
During a clean stop, move only a deliberately chosen suspect JAR outside the active plugin directory on the test copy. Keep its data. Review which dependants will also fail or need to be excluded from that test. Start and compare the new load sequence. Removing a participant can demonstrate the incompatible combination, but it does not establish which author made the original mistake.
Choose a supported resolution
Use compatible releases recommended by the involved authors, or keep the incompatible optional component out of the deployment. Send the complete loop and version list to the relevant maintainer. Do not unpack JARs and rewrite dependency declarations as an ordinary hosting fix; the declared order may reflect real code requirements.
Paper documents a legacy-loading escape hatch on some versions. Do not treat bypassing the check as proof that the plugin combination is safe. This guide deliberately uses supported combinations and maintainer investigation rather than a blanket JVM flag that can hide ordering problems.
Verify and recover
After the planned correction, check that startup completes without a new dependency failure and test the affected features, permissions and saved data. Keep the old compatible state available. If the trial fails, restore the matched plugin/configuration set, accounting for migrations before restoring an older JAR. No world reinstall is needed to investigate a plugin load-order graph.
Related help
- Install plugins on a Paper or Purpur Minecraft server
- Find Minecraft logs and send useful troubleshooting details
- Back up game files before making changes
Official references
Paper circular plugin loading diagnosis. Paper-plugin dependency and circular-load behaviour. Traditional plugin metadata and dependency declarations.
Resolve “UnknownDependencyException” when a Paper plugin will not load
UnknownDependencyException commonly appears when Paper cannot satisfy a plugin's required dependency. The surrounding message may identify unknown or missing dependency plugins. Installing a random JAR with a similar filename is not enough: the dependency must be the correct platform build, load successfully and meet the dependent plugin's requirements.
Identify the dependent and the dependency
Read the earliest failed loading sequence in logs/latest.log. Record which plugin was being loaded and the exact dependency name reported. Keep the full exception for a private support ticket, with unrelated secrets removed. The outer line saying that a plugin could not load is less specific than the dependency information below it.
Check the dependent plugin's official release page. Distinguish required dependencies from optional integrations and from libraries bundled inside the JAR. A project can offer different builds for Paper, Velocity or a mod loader. A similarly named proxy plugin is not automatically the backend dependency required here.
Follow the dependency backward in the log
If the required JAR is absent, obtain the supported version from its author's official source. If it is already present, search earlier startup messages for that dependency's own failure. It may have been rejected because of an unsupported API, Java requirement, corrupt download or another missing dependency of its own.
Resolve that first failure before repeatedly reinstalling the plugin that reported it later. This is especially important for chains: plugin A may require B, while B failed because C was unavailable. Keep the chain in your notes so an attempted fix does not introduce incompatible versions elsewhere.
Check identity and location
Traditional plugins declare an internal name in their metadata; the filename alone does not establish dependency identity. Do not rename an unrelated JAR to the expected name or edit metadata inside an archive to satisfy the loader. Confirm the author and documented project instead.
Ensure the supported dependency JAR is in the active server's plugin directory, not a nested archive or a different service with the same display name. Check for duplicate releases before adding another copy. On modern Paper, Paper-plugin dependency rules can differ from traditional Bukkit declarations, so follow the documentation for the actual plugin format and release.
Repair a matched set
Back up the plugin data and relevant external database, then stop the server cleanly before adjusting JARs. Preserve the previous compatible files outside the active directory. Install the smallest author-supported combination rather than updating every dependency to an arbitrary latest build.
Do not use /reload to trial dependency changes. Start normally and review the log from the beginning. Confirm the dependency loads before the dependent plugin and that neither reports a new failure. Run plugins in the console where supported, then test the particular feature with an ordinary account. A green plugin name is a useful check, not proof that its database or permissions are correct.
Recover
If the change fails, keep the first new error and restore the known compatible set. Check migration notes before rolling back data or an older JAR. Keep worlds intact and avoid deleting the plugin's data folder to force a fresh start. Send support the dependency chain, versions, official download links and first error for each failing component.
Related help
- Install plugins on a Paper or Purpur Minecraft server
- Find Minecraft logs and send useful troubleshooting details
- Update Paper, Purpur and plugins safely
Official references
Paper missing-dependency troubleshooting. Plugin metadata dependency names. Paper-plugin loader differences.
Fix “Ambiguous plugin name” without losing plugin data
Ambiguous plugin name means the loader found conflicting plugin identities. A common cause is leaving an old JAR in the active directory when uploading an update. Different filenames do not guarantee different plugin identities: two releases can declare the same internal name. Resolve that identity conflict without deleting the plugin's settings or saved data.
Record both candidates
Copy the ambiguity message and the two reported paths from the startup log. Note the server build and the time of the most recent upload. Open the file manager on the affected service and compare those paths carefully, including capitalization. Do not assume the JAR with the shorter or newer-looking filename is the correct one.
Read the release information for both files from their official sources. Establish whether they are two versions of one project, a renamed fork claiming the original identity, or separate components that should not be installed together. Companion plugins normally have their own documented identities; do not remove one solely because its project name looks similar.
Preserve the intended recovery point
Save a backup and download the relevant JARs and plugin configuration privately. If an update may already have migrated a database or data files, check the author's rollback notes. Keeping an older binary does not guarantee that it can safely read data written by a newer version.
Decide which release is supported by your exact Minecraft/Paper and Java versions. Historical versions in a documentation example are examples of duplicate identity, not recommended downloads. A current 26.x server and an older 1.21.11 deployment can require different plugin builds.
Remove the conflict from the active load path
Stop the server cleanly. Move the unwanted JAR outside the active plugins directory, retaining it as private recovery material. Do not move or erase the project's data folder. Avoid using a nested plugins subdirectory as an unexplained long-term archive; keep rollback files clearly separate from the deployment.
Check the supported update workflow as well. A pending replacement in Paper's update directory or an automated deployment can bring the duplicate back at the next restart. Coordinate with anyone uploading files so two staff members do not each restore a different release. Record the single intended version in your change note.
Renaming the duplicate JAR while leaving it active is not a reliable fix because the internal plugin name remains unchanged. Do not patch a JAR's metadata to pretend it is a second independent plugin; both copies may still target the same commands, files and database tables.
Verify one identity and the right data
Start once and inspect the startup log for the ambiguity message and any new loading error. Confirm the selected plugin version using its documented version command or startup output. Test a normal feature and check that the expected settings and saved records are still present.
If the wrong release loaded, stop and correct the active JAR set before continuing play. If a compatible rollback is necessary, restore the matched configuration and data through the author's procedure. Keep the failed attempt's logs. No world reset, broad plugin-folder deletion or server reinstall is needed to resolve duplicate plugin identity.
Related help
- Install plugins on a Paper or Purpur Minecraft server
- Update Paper, Purpur and plugins safely
- Find Minecraft logs and send useful troubleshooting details
Official references
Paper ambiguous plugin-name error. Paper update workflow. Plugin internal name metadata.
Fix “Unsupported API version” when loading a Paper plugin
Unsupported API version indicates that the plugin declares an API version newer than the server supports. Paper's implementation uses this message when checking the plugin's declared API against the current server API. It is not the same as Java rejecting a class-file format, even if both problems appear after a plugin update.
Capture the exact rejection
Find the first loading failure for the plugin in the startup log. Record the declared API version printed in the error, the plugin release and the actual server version. Do not infer the server version from the filename alone; a file named server.jar can contain many releases.
If the server does not remain running long enough to use a version command, use its startup banner. Keep the full error and official download link in your notes. Redact any unrelated connection details or credentials before sending logs publicly.
Compare the compatibility statement
Read the plugin author's supported Minecraft/Paper versions for that exact artifact. Its api-version metadata is a compatibility declaration, not a user preference. Paper documentation explains that a server below the declared version refuses to load the plugin. Since 1.20.5, minor versions can also be included, so a broad major-release match may not be enough.
Do not confuse the API value with the Java runtime requirement. Changing Java alone cannot add a newer Minecraft API to an older server. Conversely, installing a compatible API build can still leave a separate Java class-version mismatch to resolve. Follow the first actual error at each stage rather than changing both layers blindly.
Choose the less disruptive supported option
If the server version must stay unchanged, obtain a plugin release the author supports on that server. Preserve the previous JAR and plugin data before replacing anything. Confirm that you downloaded the Paper/Bukkit artifact rather than a proxy or mod-loader build with a similar project name.
If you genuinely need a newer server version, plan that as a separate world upgrade. Take a recoverable checkpoint, check all plugins and the Java requirement, and trial a copy before changing production. Do not upgrade an established world merely to silence one plugin warning without understanding the wider effect.
Never unpack the plugin and lower its declared API version as a hosting workaround. That can bypass a useful check while leaving calls to methods or behaviour the older server lacks. A successful load after metadata editing does not prove compatibility, and modifying the artifact makes author support harder.
Verify and retain a safe rollback
During a clean stop, install the chosen supported plugin build and start normally. Confirm the API rejection is gone, check the reported plugin version and exercise its intended function. Inspect for new method/class errors rather than declaring success because the original line disappeared.
If the plugin update changed data, follow the documented compatible rollback, not just a JAR swap. If the server itself was upgraded, do not run an older Minecraft binary against newly upgraded world data. Recovery uses the matching pre-upgrade checkpoint and a deliberate plan for any later progress. Ask support with the declared API, actual server build and official compatibility page if no supported combination is clear.
Related help
- Install plugins on a Paper or Purpur Minecraft server
- Choose the Java runtime for your Minecraft server
- Change Minecraft versions with a backup and rollback plan
Official references
Paper api-version metadata rules. Paper implementation of the API-version check.
Fix “This server requires you to connect with Velocity.”
This server requires you to connect with Velocity. is a documented refusal associated with Velocity modern forwarding. It can appear when a client reaches a backend directly or when the proxy and backend disagree about forwarding. The right fix is to restore the intended authenticated proxy path, not to disable backend protections so any connection succeeds.
Establish which endpoint was used
Record the public hostname and port the player entered, the time of the attempt and the backend named in the proxy log. Compare the hostname's DNS/SRV route with the address advertised for the proxy. A saved client entry pointing to an old backend can produce a different result from the current public address.
Ask whether the player can reach the proxy and whether the failure occurs only while switching to one backend. If every player fails before reaching any backend, investigate the shared entry path. If one destination fails, compare that backend's configuration with a working destination without copying secrets into a ticket.
Compare the forwarding mode
Use the documentation for your exact Velocity and backend releases. Modern forwarding is intended for supported Minecraft 1.13+ connections, with additional backend requirements. Paper 1.21.11 and current 26.x releases use the modern Paper configuration structure, while Paper 1.18.2 and older place the related options elsewhere.
Check the effective player-info-forwarding-mode in velocity.toml. For a network deliberately using modern forwarding, it should select modern. Then inspect whether the backend enables Velocity forwarding and uses the matching shared secret. Compare secrets privately; do not print them in screenshots, public logs or a support message visible to other customers.
Also check whether legacy BungeeCord forwarding was left enabled alongside the modern arrangement. Forwarding modes are not interchangeable. A related complaint that the backend did not request forwarding may point to the opposite side of the same configuration mismatch. Follow the documented mode consistently rather than toggling options until a connection happens to pass.
Keep the trust boundary intact
A proxy-backed backend normally delegates account authentication to the proxy under the documented configuration. That arrangement depends on restricting direct backend access and preserving forwarding verification. Do not turn off authentication on the public proxy, expose an unauthenticated backend or remove the shared secret as a shortcut.
Game hosting users should ask support to confirm backend reachability restrictions instead of running host firewall commands. If the network was intended to be a standalone server rather than a proxy backend, have the administrator review the whole authentication design before removing forwarding requirements. That is a different deployment decision, not a one-line universal fix.
Apply and verify a coordinated correction
Save private copies of the relevant configurations and arrange a maintenance window. Correct the identified route or forwarding mismatch and restart only the components that require it through their normal management workflow. Do not change world data or player UUID handling speculatively.
Connect through the public proxy with an ordinary authenticated account, switch to the affected backend and verify the expected identity, permissions and inventory. Ask support to confirm that unintended direct backend access remains blocked. A successful proxy join alone does not prove that restriction.
If the trial fails, restore the saved matched configuration and retain both sides' logs. Stop making further identity-related changes until the route, mode and secret are understood. No reinstall or world reset is required to diagnose a forwarding refusal.
Related help
- Set up a Velocity network with protected backend servers
- Connect a domain to your Minecraft server
- Find Minecraft logs and send useful troubleshooting details
Official references
Velocity documented forwarding refusal. Velocity modern forwarding configuration. Velocity backend security.
Investigate “A plugin tried to cancel a signed chat message.”
A plugin tried to cancel a signed chat message. is a documented Velocity warning associated with disconnecting a player after a proxy plugin tries to cancel signed chat. The connection may work until someone sends a message or triggers a moderation rule. This is a chat-processing compatibility problem, not evidence that the player supplied an invalid password.
Reproduce the narrow symptom safely
Record the client version, Velocity build, backend software/version and relevant chat or moderation plugin releases. Note whether the disconnect happens on every message, only blocked phrases or only one backend. Preserve the proxy log around the event and the backend log for the same time.
Use a controlled staff test account and a harmless test rule rather than publishing abusive text or removing moderation for the whole community. Keep logs private where they contain player messages or personal information. A client screenshot of a disconnect is useful context, but the proxy's original warning identifies this failure more precisely.
Identify the component trying to cancel
Check which proxy plugins inspect, rewrite or block chat and commands. A plugin configured to cancel a message can trigger a different path from one that merely observes it. Compare recent configuration or plugin updates with the first occurrence of the problem.
Minecraft's signed-chat changes began with 1.19.1-era behaviour described by Velocity's FAQ. Signing is about message authenticity; it does not make chat confidential. Current server releases and plugins may have different handling, so verify the exact compatibility matrix instead of treating an old workaround as universal for 1.21.11 or 26.x.
If possible, isolate the suspect combination on a separate network copy with production integrations disabled. Do not broadly unload protection plugins on a public server. A plugin name elsewhere in the log is a clue, not proof: compare the specific rule or action that triggers cancellation.
Check the supported integration path
Velocity's FAQ points to SignedVelocity for coordinating certain proxy message/command changes with the backend. If that approach is appropriate for your versions, read its current author's instructions and release compatibility first. It is not enough to upload one arbitrary JAR bearing that project name.
The project's documented deployment uses the proxy component and the appropriate component on every relevant backend. Download the correct platform artifacts from the official project, preserve previous plugin state and avoid duplicate releases. A mixed or incomplete installation can leave the symptom on only some destinations. If your version or backend is not supported, ask the plugin maintainers for a supported alternative.
Verify behaviour rather than only startup
Apply an agreed plugin/configuration correction in a planned maintenance window and start the affected components normally. Test an ordinary permitted message and the harmless moderation test case. Confirm both the expected moderation result and that the player remains connected. Repeat after switching between each backend that uses the chat path.
Inspect fresh logs for the original warning and any replacement error. A green plugin entry or disappearance of one warning is not sufficient if messages are now duplicated, blocked incorrectly or bypassing moderation. Keep the test results with the exact versions used.
Recover without weakening authentication
Restore the previous compatible plugin/configuration set if the trial fails, accounting for any data migrations. Do not disable public account authentication, remove forwarding verification or blindly disable secure-profile checks to suppress the symptom. Send maintainers a minimal version list, redacted log interval and reproducible harmless rule. World files do not need to be deleted or restored for this chat-processing investigation.
Related help
- Set up a Velocity network with protected backend servers
- Find Minecraft logs and send useful troubleshooting details
- Update Paper, Purpur and plugins safely
Official references
Velocity signed-chat cancellation warning. SignedVelocity author installation instructions.
Resolve a Fabric dependency error without bypassing mod requirements
Fabric Loader checks declared mod requirements before starting Minecraft. A message about an incompatible mod set often identifies a missing library or an unacceptable version range. Read that requirement before replacing the world, raising memory or copying a dependency override from a forum.
Record the requirement, not just the filename
Save the console output from the first dependency failure and the relevant logs/latest.log. Record the Minecraft version, Fabric Loader version, Java runtime and exact pack release. Note the mod ID named by the error, its installed version and the dependency it requests. A mod's display name, download filename and internal ID can differ.
Fabric API is a separate mod, not another name for Fabric Loader. A requirement for fabric-api does not become satisfied by updating the loader alone. Likewise, a requirement for fabricloader concerns the loader rather than an API JAR. Use the log's actual IDs when building your correction list.
Inspect a downloaded copy
- Stop the service and download the implicated mod JAR plus its current configuration for reference. Keep your complete pre-change backup outside the server.
- Open the downloaded JAR as an archive on your own computer. Read
fabric.mod.jsonat its root without modifying it. - Compare
id,versionand thedependsentries with the error. Fabric also distinguishes recommendations and incompatibility fields; not every optional suggestion is a startup requirement. - Check the mod author's official release page for the correct Minecraft and Fabric build, along with the required library release. Do not substitute a Forge or NeoForge download with a similar name.
Choose a matched correction
If the library is absent, choose its supported release for the existing Minecraft version. If it exists outside the accepted range, identify a compatible pair of mod and library versions. Several mods may depend on the same library, so confirm that the replacement satisfies their requirements too. Keep old copies outside the loaded mods/ directory to avoid duplicate IDs.
If the requirement calls for a newer loader or Java runtime, use the hosting panel's supported controls or ask support to update the launch configuration. Do not run an installer against the customer instance during dependency troubleshooting. Changing Minecraft to satisfy one mod is a separate pack upgrade with world-migration risks.
Verify on an isolated copy
Make the correction on a test copy with an isolated world and external integrations disabled or redirected. Start it normally and confirm that dependency resolution passes. Then check the affected mod's feature and a matching client connection; reaching the menu or removing the first error does not establish gameplay compatibility.
Fabric's official override guide warns that dependency overrides target modpack developers, not ordinary players. Do not add fabric_loader_dependencies.json to suppress the requirement as your first fix. A forced load can expose code incompatibilities the metadata was intended to prevent.
Recover the previous combination
Restore the saved mod and library pair if the test fails. Keep the original world untouched. If the newer set already opened and migrated a test world, recover from its complete pre-change checkpoint rather than loading the changed save under older mods. Send support the requirement text and version list, with private paths and credentials removed.
Related help
Install or change a Minecraft modpack safely · Diagnose Minecraft mod conflicts on a test copy · Find Minecraft logs and share useful evidence
Official references
Find a client-only Fabric mod in a dedicated-server crash
A Fabric pack can work in singleplayer and fail on a dedicated server because one mod references client-only classes. A dedicated server has no rendering client. Diagnose that side mismatch before removing world content or treating every class-loading error as a missing library.
Identify the first client-side reference
Save logs/latest.log, console startup output and the matching file in crash-reports/ when one exists. Record the Minecraft, Loader and mod versions. Look for the first relevant cause and its mod or mixin name. References under net.minecraft.client can indicate client code, but a missing class can have other causes, including a wrong Minecraft build. Treat the name as evidence to investigate.
Do not diagnose from the final exit line alone. A later failure may follow the original loading error. Keep the full private report, then redact unrelated player information, tokens and external-service credentials before sharing an excerpt.
Check the implicated mod's environment
- Find the exact JAR named or associated with the first error. Download a copy and open it as an archive on your computer.
- Read its root
fabric.mod.json. The current Fabric specification usesenvironmentvaluesclient,serveror*. - A mod declaring
clientshould not load on a dedicated server. The default*declares availability in both environments; it does not prove the author's implementation contains no side-related bug. - Inspect the documented entrypoint and mixin environment declarations as evidence. Compare them with the author's server-support statement and the release matching your Minecraft version.
Singleplayer includes both a physical client and an integrated server. A mod that loads there can still fail when the same code runs without client classes. A crash mentioning a rendering class is therefore worth comparing against dedicated-server support, even if the owner reports that the pack works on their laptop.
Test a narrow removal on a copy
Use a backed-up, isolated test server. If the author confirms that the implicated mod is client-only, move that one JAR outside the test server's mods/ directory. Keep it installed on clients when the pack requires its client feature. Do not copy the whole desktop mods folder onto the server as a correction.
If the mod adds world blocks, dimensions or entities, stop and verify its supported removal procedure before opening a save without it. A mod with both client and server content needs a compatible release or an author fix, rather than a blind deletion. Do not edit its metadata to make the loader ignore a side declaration.
Verify the dedicated-server path
Start the test server and confirm that the original class-loading error disappears. Join with the matching client pack and check the feature involved. Preserve a short before-and-after record. If a new missing-dependency error appears, review the removed mod's dependants instead of repeating random removals.
To undo the trial, restore the original JAR set and configuration. Restore the complete test-world checkpoint if a content change already altered it. Report a genuine side-loading bug with a minimal reproduction and precise versions; an entire private server archive is unnecessary.
Related help
Diagnose Minecraft mod conflicts on a test copy · Find Minecraft logs and share useful evidence · Back up game files before making changes
Official references
- Fabric environments, entrypoints and mixins
- Fabric crash-report interpretation
- Fabric Loader behaviour
Fix a modern Forge startup path that points to a missing JAR
A modern Forge server can have its files present and still fail before Minecraft starts when the panel uses an old standalone-JAR command. Errors such as “Unable to access jarfile” need a launch-path check before any world investigation. Do not rename a random Forge library to server.jar.
Read the actual startup error
Capture the panel's startup command and first error, keeping private variables redacted. Record the exact Minecraft and Forge versions. Check whether the error names a missing executable JAR, unix_args.txt, a library or a Java class version. These point to different stages.
This guide concerns Forge layouts with generated argument files, verified against the official Minecraft 1.20.1 launch template. Legacy Forge versions can use a standalone JAR. A procedure for an older pack is not automatically valid for a modern one. Keep the pack author's server instructions and the launch files from the selected release together.
Inspect the generated launch files
- Stop the service. Save the existing Startup fields and a backup of the installed files before changing anything.
- In the server root, inspect
run.shanduser_jvm_args.txt. The official template starts Java with an argument-file reference touser_jvm_args.txt, followed by a version-specificlibraries/path ending inunix_args.txt. - Follow the exact relative path written in your generated script. Check that its argument file and referenced libraries exist, with the same filename case.
- Check that the panel uses the corresponding server root as its working directory. Relative paths can fail when launched from a different folder.
The source template contains a build placeholder that the installer replaces. Your installed script should contain the actual versioned path, not @MAVEN_PATH@. Do not paste the repository template over a generated script or guess a library version to make the path look complete.
Check the selected Java runtime
Forge 1.20.1's official guide specifies Java 17; current Forge documentation can target a different Minecraft generation and runtime. Check the requirement for your exact pack. A newer Java image is not automatically compatible with an older pack. The panel's Docker Image controls the container runtime; a local desktop Java installation does not change it.
If shell access exists on an isolated test copy, java -version reports that shell's runtime. With panel-only access, use startup output and the selected runtime field instead. Keep memory within the plan allocation and avoid duplicating conflicting heap flags between the panel command and user_jvm_args.txt.
Correct the launch configuration through support
If the panel still launches a nonexistent standalone JAR, provide support with the generated script and missing path so they can set the supported Forge startup mode. Do not execute an installer or replace the customer's existing installation as a troubleshooting experiment. An incomplete library tree needs repair from the exact trusted server distribution under a separate plan.
Verify on a copy that Java reaches Forge loading and then Minecraft's normal ready message. Join with the matching pack. Restore the previous launch settings if the change fails; world deletion and reinstalling are unnecessary for a path mismatch.
Related help
Choose the Java runtime for your Minecraft server · Install or change a Minecraft modpack safely · Find Minecraft logs and share useful evidence
Official references
- Official Forge 1.20.1 launch-script template
- Forge 1.20.1 Java requirement
- Current Forge runtime guidance
Trace a Forge client-server mod channel mismatch when joining
A Forge server can reach its ready message and still reject a client because a mod's network channel is missing or incompatible. This is a join-time compatibility problem. Treat the existing server pack as authoritative until you know which endpoint differs.
Capture both ends of the failed join
Record the full disconnect message and its time. Save the client logs/latest.log and the server log covering that attempt. Write down the exact Minecraft version, Forge build and modpack release on each side. A shared pack name does not prove that both installations contain the same release.
Find any named channel or mod ID in the rejection. Channels often use a namespace-style identifier, but a channel name need not match the JAR filename. Read the surrounding log before assuming the last named mod caused the entire failure. A dependency failure earlier in client startup can leave a channel unavailable later.
Compare the intended mod set
- Check that the player launched the correct Forge profile, rather than vanilla, Fabric or NeoForge. Confirm the loader version from the running log, not only the launcher's display label.
- Compare the implicated mod's exact release on both sides using its official project page and the pack manifest.
- Check its required libraries and Minecraft support. A matching visible mod version may have separate downloads for different Minecraft versions or loaders.
- Look for a stale duplicate JAR or a download saved under an unexpected filename. Keep removed copies outside the loaded
mods/directory.
Understand what the network check means
Forge's SimpleImpl documentation explains that each mod defines a protocol check for its network channel. The example requires matching protocol versions, while a mod can choose other compatible behaviour. A missing channel on another Forge endpoint differs from a vanilla or non-Forge endpoint. Server owners should not assume all channels accept either condition.
A red compatibility marker in the multiplayer list can use related checks, but the actual join error and logs provide stronger evidence. Do not disable authentication, install protocol translators or edit metadata to force a content pack through a network rejection. Those actions do not supply missing mod behaviour.
Correct the client before changing a working server
If other players with the agreed pack can join, repair the affected player's separate launcher instance to the published pack release. Preserve their local screenshots, options and worlds first. Use the pack author's supported repair or clean-instance workflow instead of copying an entire server directory to a desktop.
Some mods belong only on one physical side. Follow the author's supported environment instructions rather than demanding identical folders in every case. If the implicated mod truly needs a server update, test the complete matched client/server release on an isolated copy before touching the production save.
Verify and recover
Retry one normal join and check that the original channel rejection disappears. Test the feature that uses that mod's packets, such as its menu, rather than stopping at login success. Keep the exact successful version combination in your pack notes.
If the test fails, restore the previous client profile or server test files and retain the logs. Restore a pre-change world checkpoint if a content update already migrated it. Send support the two version lists and redacted rejection, without sharing paid mod archives or private account information.
Related help
Diagnose Minecraft mod conflicts on a test copy · Install or change a Minecraft modpack safely · Find Minecraft logs and share useful evidence
Official references
Resolve a NeoForge required-mod or version-range failure
NeoForge can refuse a mod set before loading the world when a required dependency is absent or outside its accepted version range. Read the named requirement and the selected release's metadata. Uploading the latest file with the same project name can create another incompatibility.
Keep the first dependency report
Save console output, logs/latest.log and the matching crash report if one exists. Record Minecraft, NeoForge and Java versions plus the pack release. List the requesting mod, required mod ID, accepted version range and actual version that the loader found. Keep those fields separate from display names.
NeoForge's numbering follows the Minecraft generation, but its version format has evolved. The official versioning page gives examples such as 20.2 for Minecraft 1.20.2 and a full-version form for 26.1. Choose the intended Minecraft release first; do not compare only the largest number across unrelated branches.
Inspect the published metadata without changing it
- Download the implicated JAR and open a copy as an archive on your computer. Do not unpack or modify the production installation.
- For releases using the current documented format, inspect
META-INF/neoforge.mods.toml. Older NeoForge generations can differ; use their release documentation rather than renaming a metadata file. - Find the relevant dependency section. Current documentation describes fields including
modId,type,versionRangeandside. Distinguish a required dependency from an optional or incompatible declaration. - Compare that record with the loader's first dependency message and the author's download requirements.
NeoForge uses Maven-style version ranges in relevant metadata. For illustration, [1.0,2.0) includes 1.0 and excludes 2.0. This example explains the brackets; it is not a real library recommendation. Read the actual range and the project's version conventions instead of assuming an equal prefix proves compatibility.
Build a compatible set
Select the correct NeoForge download for the existing Minecraft release. A Forge or Fabric build of the same project is not an automatic substitute. If the dependency already exists, check for duplicate or older copies and for other mods that require a conflicting range. Keep removed copies outside mods/.
Do not change type to optional, widen versionRange, or rename a Forge JAR to bypass loading. Those metadata edits cannot supply missing classes or restore an API. A requirement for a newer NeoForge branch may mean you need a compatible older mod build or a separately planned Minecraft upgrade.
Verify before changing the live pack
On an isolated test copy, apply the matched files and confirm that the original dependency check passes. Read any new first error rather than calling the entire pack fixed after one message disappears. Join with a matching client and test the requesting mod's feature.
Return to the saved mod set if verification fails. Preserve the production world throughout. Recover a migrated test save from its complete checkpoint before using older content versions. Provide support with the mod IDs, exact files and range error, with credentials removed; no reinstall is needed to inspect a dependency mismatch.
Related help
Diagnose Minecraft mod conflicts on a test copy · Install or change a Minecraft modpack safely · Back up game files before making changes
Official references
- NeoForge dependency metadata
- NeoForge version numbering and ranges
- NeoForge server distribution and updating guidance
Find the active NeoForge server config after a mod update
A NeoForge setting can appear unchanged after an update because you edited a client-only file, a shared value or a file overridden by the current world. Identify the mod's configuration system and active file before deleting generated configuration or resetting the world.
Record one setting and its expected effect
Write down the mod version, Minecraft and NeoForge versions, the setting name and the behaviour you expect. Save startup warnings around configuration loading. Keep private copies of the original files and the complete pre-update server backup. An update may rename a key or change its accepted type, so retain the mod author's release notes.
This guide covers mods using NeoForge's documented configuration registration. Mods can use their own filenames, formats and locations. A file ending in .toml does not prove that its author uses the standard system or default suffixes.
Identify the configuration type
- Read the mod's configuration documentation for the selected release. Determine whether the setting belongs to a client, common or server configuration.
- Inspect the actual files under
config/. Default names often end with-client.toml,-common.tomlor-server.toml, but registration can supply custom names. - Check the intended world for
serverconfig/overrides. Derive the world name from your installation andserver.properties, rather than assuming its directory is literallyworld. - Record the relevant value at each applicable location before editing. Keep client launcher files separate from the dedicated server's files.
Use the version's documented precedence
The current 26.1 NeoForge reference describes SERVER configuration loaded from the config folder, with per-world overrides such as world/serverconfig/ on a dedicated server. It also documents synchronisation of SERVER values to connected clients. Consult the reference for your installed generation; do not treat one current layout as a guarantee for every historical loader or mod.
A local client's common setting is not necessarily the server's rule. Nor does copying a template into a defaults directory establish that an existing world's active configuration changed. Identify the file the mod actually loads, using documentation and startup evidence.
Apply one reversible correction
Stop the test copy cleanly. Edit one documented key in the identified active file, preserving TOML section names and value types. Keep the old value in your notes. Do not copy a complete old configuration over a new schema or delete all files to force regeneration.
Start normally and inspect any correction, migration or unknown-value warning. Reopen the file to see whether the mod retained or rewrote your value. A rewritten value can indicate a validation rule or outdated key; repeating the same edit will not establish a fix. If the mod supports live reload, follow its own instructions rather than assuming every setting reloads.
Check behaviour and scope
Test the intended feature with a matching non-operator client, then check a second world if the change should affect only one. Record the outcome and the exact active path. Startup success proves parsing, not that your setting controls the reported feature.
If the test fails, restore only the changed file or entry and restart. Preserve worlds and player data. Send support the mod version, key, redacted loading warning and both candidate paths. If the update migrated world content as well, recover that test from the complete checkpoint rather than downgrading files against a changed save.
Related help
Find Minecraft logs and share useful evidence · Diagnose Minecraft mod conflicts on a test copy · Back up game files before making changes
Official references
- Current NeoForge configuration types and locations
- NeoForge version-selected configuration reference
- NeoForge server update guidance
Game server will not start: choose the next safe check
Use this guided check when a game service stays offline, exits during startup or never becomes ready. It routes evidence to a next action; it cannot establish the cause from a panel status alone. Have access to the correct service and its console or log files. Preserve your worlds, player data and current configuration.
Choose what you can observe
Follow the link matching your symptom. All sections remain visible. Keyboard users can Tab to a link and press Enter; use the return links to choose another branch.
- The panel or console itself will not connect.
- I can open the console and see startup output.
- The process exits with no useful output.
- It says ready, but players cannot join.
1. Is the console unavailable?
Check: note the exact browser error and timestamp. Open this service's file manager, if available, and see whether its latest log has new entries. Do not assume the game is stopped because its browser console is disconnected.
If files or logs are accessible: follow the console connection guide. Then continue with the startup log if it shows an actual game failure.
If the service's controls are unavailable or the panel reports a node connection error: collect a support report. Reinstalling the game or changing its world cannot repair an unavailable management connection.
2. What is the first relevant error?
Read from the beginning of the failed attempt, not only the final exit line. For Minecraft, use the log collection guide. Record the first error plus surrounding lines without posting credentials or player addresses.
- Java/runtime or missing JAR error: check the selected software and file.
- Plugin/mod/dependency error following a change: compare the changed component.
- Memory, killed process, full disk or write failure: check resource evidence.
- Bind/listen error, unfamiliar error or another game: use the relevant game route.
3. Does the runtime match the selected release?
Check: compare the startup-selected runtime, installed server release and configured JAR filename with the actual uploaded file. Paper's current requirements list Java 21 for Paper 1.20–1.21.11 and Java 25 for 26.1+. Other loaders and older releases have their own requirements.
If a mismatch is confirmed: follow the compatibility and update procedure for the exact installed release. Do not bypass Java-version protection or downgrade the world. If those values match: continue to game-specific evidence.
4. Did one component change?
Check: write down the last known working time and the exact file or setting changed. Back up the current state before correction. Use a separate mod-conflict test copy for modded Minecraft, or the plugin compatibility checks for Paper/Purpur.
If the change explains a documented incompatibility: apply the supported correction on the copy first. Restore matching code and data together where a migration occurred. If no change is established: do not remove half the production plugins speculatively; send the evidence for review.
5. Is there a resource error?
Memory message or abrupt exit: use the Java-versus-process-kill guide. High RAM usage or an exit code alone does not prove host OOM. Host-side evidence may require support.
Full disk or write error: inspect quota and file sizes through the storage investigation guide. Do not delete worlds, plugin data or your only backup to make space. If neither branch provides evidence: escalate with the original logs.
6. No useful output?
Check whether installation, a restore or another panel task is still active. Record its status and age; do not start a competing task. If it is unexpectedly stalled, or the process disappears without a log, ask support to inspect the task and process event. Avoid repeated start clicks or forced kills.
7. Use the game-specific route
A bind error needs the service's assigned endpoint checked, not an arbitrary replacement port. Rust startup checks, CS2 startup checks and FiveM/ESX dependency checks provide narrower paths. Paper's official troubleshooting reference covers its own startup errors. If the route does not match your game, send the exact error.
8. The game reports ready
A ready message changes the question to reachability or login. Follow Minecraft connection checks or your game's joining guide. Keep the running world intact.
Outcome: verify a correction or request investigation
After a supported correction, verify readiness, one normal player join and the expected world. If it fails, preserve the new log and stop stacking changes. Open a support ticket with the service ID, game/build, incident time, first error, last change and task status. Never include passwords or tokens. Return to symptom choices.
Players cannot join: follow the connection checks
Use this route when a service appears running but one or more players cannot enter. Start with what fails, then narrow the check. A timeout, refusal or failed login suggests where to investigate; it is not a definite diagnosis. Keep the server's authentication, whitelist and assigned allocations intact.
Choose the closest symptom
Use Tab and Enter to follow links, or tap one on mobile. The full checklist remains visible without scripts.
- Nobody can join and readiness is uncertain.
- The address times out or cannot be resolved.
- The server responds with a specific login error.
- Java works but Bedrock does not.
- Other players can join; one player cannot.
- This is Rust, FiveM or a survival game.
1. Is the game actually ready?
Check: read the current console or latest log for completed startup and an active process. “Running” in the panel can include a game still loading a world. Check whether installation or restoration is in progress before attempting another operation.
If startup has an error: use the existing startup guide for your game; for Minecraft, collect the first startup error. If the browser console itself fails: use the console connection guide. If readiness is confirmed: check the player address.
2. Does the address match the service?
Check: copy the assigned game endpoint from this service, including its port. Do not use the panel web address, a database endpoint, RCON port or a different service's allocation. Ask one authorised player to try the exact current endpoint and note the result.
If a custom domain fails but the assigned endpoint works: follow the Minecraft DNS/domain checks; that is evidence to inspect DNS rather than reinstalling the server. Use the edition-specific connection format when entering a Minecraft address.
If the correct endpoint also fails: check whether anyone else can join. If yes, follow the single-player branch. If nobody can, check the game-specific route and then report the failed path. Do not open all firewall ports or assign yourself an unallocated one.
3. What does the login error say?
Record the complete player-facing message and matching server log time. A rejection shows more than a generic timeout, but its cause still needs confirmation.
- Version/protocol mismatch: compare the client's edition and exact version with the server and supported compatibility plugins. Use the Minecraft error guide; do not downgrade a world merely to match one client.
- Whitelist, ban or permission denial: have authorised staff check the specific account through the access-management guide. Keep authentication enabled. A player request alone does not authorise removing a ban.
- Missing mods or resource mismatch: compare the required pack and loader with the player's installation. Use the modpack compatibility procedure before altering server files.
- Unrecognised message: send the exact text privately, not a paraphrase such as “broken.”
4. Does only Bedrock fail?
Check: record the Bedrock client version, Geyser build, configured transport/signaling mode and allocated Bedrock endpoint. Java and Bedrock connection paths differ. Follow the Geyser/Floodgate guide for the installed release.
For NetherNet-capable deployments, the current Geyser setup documentation and NetherNet transition notes distinguish built-in TCP signaling plus UDP gameplay from external signaling arrangements. Old UDP-only advice is not universally sufficient. Ask support to confirm the exact allocation and mode; do not reuse the Java port blindly or disable host protection.
If another Bedrock player joins: check the affected player's path. If all fail: include the transport details in the report. Do not change account authentication to disguise a network error.
5. Is one player or network affected?
Check: compare a successful and failed attempt at the same time, recording client versions and exact addresses. Ask the affected player to check normal account sign-in and their edition's connection method. With permission, compare another connection such as a personal hotspot, considering data charges. Do not request their account password.
If only one network fails: retain that evidence for support or the player's network provider. Do not direct players to disable security software wholesale. If the failure follows one account across networks: revisit the login/access message. If everyone now fails: return to readiness.
6. Match the game and network mode
Use Rust endpoint checks, FiveM joining checks, ARK Ascended checks or Valheim Steam/crossplay checks. Browser listing, direct joining and administration can use different paths. Do not treat one successful path as proof of all the others.
Outcome: verify access or request a path investigation
After one supported correction, repeat the original join attempt with an ordinary player. Verify the expected world and access rules. If unsuccessful, report the service ID, game/build, time, public endpoint, full error, affected editions and whether others can join. Redact tokens and private logs. Return to symptom choices.
Server lag: choose checks for delays, freezes or low FPS
“Lag” can describe a slow game loop, a delayed network connection or a client struggling to draw the scene. Choose the symptom before changing RAM or removing content. This route starts with observation and bounded measurements. It does not assume an overloaded host, a faulty plugin or insufficient memory from one graph.
What happens during the problem?
Follow a symptom link using mouse, touch, or Tab and Enter. These sections are ordinary visible HTML and do not run a diagnostic program.
- One player's picture stutters or FPS drops.
- Players move back, actions arrive late or ping spikes.
- Everyone's game actions slow down together.
- Short freezes happen during travel or scheduled work.
- The game freezes, disconnects everyone or goes offline.
- This is a game other than Minecraft.
1. Is the display slow for one player?
Check: ask another player at the same location whether interaction timing is also slow. Have the affected player record their FPS and compare the scene without optional shaders or a local visual pack, preserving their settings first. Change one client option at a time.
If FPS improves while other players and game timing remain normal: continue client graphics or pack troubleshooting. That result does not justify changing the server world. If everyone sees slow interactions too: check server tick timing. If FPS is normal but actions arrive late: check the network pattern.
2. Who experiences the delay?
Check: note the time, affected players and region, whether voice or other applications also struggle, and whether server tick measurements stay normal. Compare a second authorised player's report during the same incident. Avoid publishing player addresses.
If one network is affected: investigate its local connection with the player; a permitted alternate connection can provide comparison evidence. If several independent networks are affected while ticks look normal: request a network-path investigation. If ticks also deteriorate: collect a server-side sample. Healthy ticks do not by themselves prove the network caused the delay.
3. Does the server game loop slow down?
For supported Paper installations, follow the TPS/MSPT and spark guide. Paper's command reference identifies 20 TPS as the target and below 50 milliseconds per tick as the budget for that rate. These numbers are Minecraft tick metrics, not universal targets for every game.
If timing deteriorates during the complaint: take one short, representative profile with the documented tool. Current Paper includes spark; older or other server platforms require their own supported setup. Follow the official profiling instructions, and share reports privately because metadata can reveal your server configuration.
If timing remains normal: revisit network evidence or client FPS. If the profile points to a component: compare its documented behaviour and reproduce on a test copy before changing production. A sampled stack is a clue, not automatic proof that the named plugin is defective.
4. Do freezes match travel or scheduled jobs?
Check: record the spike times alongside exploration, backups, map renders, world generation and plugin jobs. Check free storage and whether more than one heavy task overlaps. Correlation helps choose a next check; it does not establish the cause.
If spikes follow travel into new terrain: review planned terrain generation, including its storage requirements. Do not start a generation job during the active incident. If spikes match backup or render schedules: review the task schedule and profile one representative period; preserve recovery coverage rather than disabling all backups.
If disk writes fail or quota is exhausted: use the storage investigation. Never delete worlds or persistent plugin data as a performance experiment. If no pattern emerges: send the time window and observations.
5. Is this an exit or watchdog event?
Check: preserve the first error before and after the freeze. Use the Paper watchdog guide for a long-tick report, or the memory-versus-process-kill guide for an abrupt exit. The Paper troubleshooting reference distinguishes severe stalls and exits requiring host evidence.
Do not disable the watchdog, repeatedly force-kill the process or assume adding RAM solves a stall. If the console also stops responding or the whole service disappears, ask support to inspect process and node evidence.
6. Use the game's own measurements
Use Rust lag and entity checks or FiveM resource performance checks where applicable. Do not apply Minecraft TPS thresholds or Java flags to these games. For another supported game, record its performance indicators and ask for the appropriate route.
Outcome: compare one correction or escalate
Keep a completed backup before changing configurations. Apply one documented correction and repeat the same observation under comparable normal play; undo it if behaviour worsens. Do not stage a load test against production. Send support the service ID, build, times, affected players, relevant measurements, redacted first error and private profile link. Distinguish observations from guesses. Return to symptom choices.
Configure an Arma 3 server and test a first mission connection
An Arma 3 service needs the right configuration file, a working mission and matching client content. Begin with the installation supplied for your service. A full dedicated-server installation guide is not an instruction to reinstall an already provisioned CloudExa game server.
1. Record the active startup settings
Note the public address, assigned game port, server build and selected mission. Preserve existing mission files, profiles, configuration and any persistence used by your community. If the server is already in use, arrange a normal stop and completed backup before changing settings.
Check the existing launch options. In Arma 3, -config selects the server configuration file; the filename does not have to be server.cfg. Editing a similarly named file elsewhere will not change a process that loads a different path. The profile location can also be set by startup options, so do not assume every template stores logs and profiles in the same directory.
2. Make a small configuration change
Download the active configuration before editing it. Arma's configuration syntax uses assignments with semicolons; it is not an INI file. For example, change the existing advertised name:
hostname = "CloudExa Arma Community";Keep the file's other settings and mission definitions intact. The password value controls joining, while passwordAdmin protects administrator login. Use different private values when both are required. Do not publish the complete file if it contains credentials.
A player-slot setting does not increase your hosting resources, and the mission can have fewer playable slots than the server's configured maximum. Choose values appropriate to your plan and the mission instead of copying a large public-server configuration.
3. Check the mission and content
For a first test, use a mission known to work with the installed server build and the content available to the client. Custom mission PBOs normally belong in the installation's MPMissions directory, but confirm the existing layout. Do not overwrite a mission or persistence database to make room for a test.
Record the required mod list and distinguish client-required mods from server-only components. Use a separate test copy for an unfamiliar framework. A client reaching the lobby does not prove all mission dependencies will load.
4. Match the allocated UDP ports
The documented reference game port is UDP 2302, with adjacent UDP roles at game port plus one through plus four. Those include query, Steam and BattlEye traffic. Your actual game port may differ. Check that the service's supplied allocations and template agree; ask support about missing companion ports instead of choosing an arbitrary range.
5. Verify as a normal player
Start the service once, review startup output and connect using the supplied address and game port through Arma's server browser or direct connection. Confirm the advertised name, join-password behaviour, mission lobby and an actual playable slot.
Then test any administrator access privately without giving ordinary players the administrator secret. If the change fails, restore the specific saved setting and collect the first relevant error. Keep mission and profile data unchanged while support checks the active launch path.
Related CloudExa guides
Official references
- Bohemia Interactive: Arma 3 dedicated server
- Bohemia Interactive: server configuration file
- Bohemia Interactive: startup parameters
Diagnose Arma 3 connection failures and mission loading errors
An Arma 3 timeout, a signature kick and a mission that returns to the lobby are different faults. Begin by identifying the last successful stage. Preserve the community's mission, profile and persistence data; a reinstall is not a useful first response to an unknown error.
1. Reproduce the failure once
Record the UTC time, client build, selected server and exact message. Note whether the server appears in the browser, whether the player reaches the lobby, and whether the mission begins. Ask one other player to report the same stages when practical. A problem affecting one client needs different evidence from a failure affecting everyone.
Keep the existing server output and locate its current RPT log using the configured profile and logging paths. Arma startup options can relocate this information. Avoid assuming that an old RPT in another directory belongs to the latest attempt.
2. If the process never becomes ready
Compare the active -config, mission selection and mod paths with the last working startup configuration. A file simply named server.cfg is not automatically the file loaded by the service. Look for the first missing dependency, configuration error or failed content load, rather than changing unrelated network settings.
Do not repeatedly launch additional instances. A process can fail because a required port is already occupied; a second start does not create a second allocation. Send the service identifier and first error to support if the panel status and running process appear inconsistent.
3. If the server is not reachable
Compare the supplied game address and game port with the current startup settings. Arma 3's reference incoming UDP set runs from the game port through game port plus four, with distinct query, Steam and BattlEye roles. Actual allocations may use different numbers. A TCP port-checking website does not validate an Arma UDP game connection.
Report which companion allocation is missing instead of opening all ports or changing the base port blindly. Browser visibility and playable connectivity are separate checks. Retain anti-cheat and authentication settings while investigating reachability.
4. If the lobby works but the mission fails
Compare the mission's required content with the server's and client's actual mod lists. Preserve the order and identifiers in a private incident note. A successful download does not prove that the expected build was loaded. Review the RPT for the first dependency or mission-load error at the recorded time.
For signature-related kicks, verify the intended approved mod files and corresponding server key configuration. Do not disable signature verification or BattlEye to conceal the mismatch. A vanilla comparison should run on an isolated test copy with separate persistence, not by removing production mods and overwriting the active mission.
5. Verify the complete path
After correcting one identified issue, start a new connection and test entry into the intended mission with an ordinary player account. Verify persistent progress if the mission framework stores it. Reaching the server browser or an empty lobby is not the final success condition.
Escalate with the service ID, stage of failure, exact client message, build/mod comparison and redacted RPT excerpt. Remove passwords, tokens and private player information. Keep the original configuration and last working mission available for a controlled rollback rather than deleting data during diagnosis.
Related CloudExa guides
Official references
- Bohemia Interactive: dedicated server networking and troubleshooting
- Bohemia Interactive: configuration and server security
- Bohemia Interactive: active startup parameters
Prepare and find your Squad server for its first match
A new Squad instance needs a successful game connection as well as a running process. Its place in the browser also depends on its licensing status. Hosting a server and obtaining Offworld's approval for the primary browser are separate tasks; a CloudExa purchase does not automatically supply that approval.
1. Record the service baseline
Open the correct game-panel service and record the server ID, assigned address and port allocations. Read the startup output and confirm that it belongs to Squad, with the intended server build and map or layer. Keep the original startup settings and configuration files before editing them. Do not replace a supplied configuration folder with a downloaded pack intended for another host.
For an existing community, make a completed backup of configuration, administrator and ban data before a change. Arrange a maintenance window if players are already connected. First setup should not become an accidental reset of an established community.
2. Make the server recognisable
- Use the installed template's documented configuration to choose a clear server name.
- Check the intended initial layer and player settings against the files supplied with that server build.
- Keep administrative and remote-management credentials private; they are not player joining details.
- Apply one controlled configuration change and read the next startup for parsing or loading errors.
A setting may be supplied by startup variables rather than the file you opened. If it changes back after starting, compare the template configuration before repeatedly editing the file. Ask support which setting is authoritative instead of guessing at a new host path.
3. Check the appropriate browser listing
Offworld's current policy distinguishes licensed servers appearing in the primary browser from other custom hosting. Check the appropriate browser category and its filters before concluding that the process is offline. Search for your exact chosen name, and allow empty or passworded entries when those filters apply to your test.
If you want licensed visibility, use the publisher's application route and read its current administration requirements. Keep any issued licence credentials private. Changes of ownership, hardware or provider can require publisher follow-up; do not assume a copied key is valid for every new instance. CloudExa cannot guarantee the publisher will grant or retain a licence.
4. Run a small first-match test
Ask an ordinary authorised player to join from outside the hosting network. Confirm that the expected layer loads, the player enters a team and normal gameplay begins. Have a second player repeat the test where possible. A browser entry or query response alone does not validate a full match connection.
Use only the allocations shown for your service. Game, discovery and remote management are different roles; never publish remote-management credentials or open all ports to improve visibility. If an additional allocation is needed, have support review it against the running template.
Finish with a recoverable configuration
Save the working configuration and backup location after the test. Record the server name, build and layer so staff can distinguish the production instance from a test. For failures, send the UTC timestamp, server ID, browser category, filter state and redacted startup messages. Stop before reinstalling, removing community data or changing licensing files without an agreed plan.
Related CloudExa guides
References
- Offworld server hosting and licensing
- Current Offworld server licensing policies
- Offworld server-browser support
Diagnose a missing Squad listing or failed server join
“My Squad server is missing” and “Squad closes when I join” are different faults. Browser visibility, discovery traffic, client content and server readiness can fail independently. Follow the branch matching the symptom and preserve the first useful evidence before restarting anything.
1. Check whether the client sees other servers
If the entire browser is empty, compare another working player's results before changing your own instance. A client, connection or browser-filter issue is more likely when one player cannot see any listings while others can join normally. Note the client build, connection type and filters used.
Offworld has a client-side browser troubleshooting article, but some older suggestions involve broad network changes. Do not disable security software or the whole firewall on a production machine as a routine test. Start with a fresh browser refresh, sensible filters and comparison from another authorised connection.
2. If only your listing is missing
- Check that the intended Squad process is still running and has finished loading.
- Search the exact configured name in the appropriate browser category.
- Review filters that exclude empty, passworded, full or differently configured servers.
- Compare the instance's current licensing state with the category where you expect it.
Primary-browser visibility is governed by Offworld's licence policy. It is not a generic promise made by a hosting plan. Do not edit another community's licence credentials into your configuration or treat a licence issue as proof of a network outage.
3. If the listing exists but joining fails
Capture the exact rejection, timeout or crash text and UTC time. Compare the client and server builds, then check the active layer and any required mods. A player who crashes before reaching the server needs a client investigation; a server that exits as players connect needs its own log review. Avoid removing all mods from a working community merely because one player's client fails.
Use the current game-panel allocations and startup output to check the gameplay and discovery paths with support. A visible listing proves less than a completed player join. Do not expose remote-management ports or widen every firewall rule to make a query tool respond.
4. Collect the correct logs
Save the server's first relevant startup or crash section from the panel, with the lines immediately before the failure. On a Windows player PC, Offworld places client logs beneath %LOCALAPPDATA%\SquadGame; the Saved folder is the area its support instructions ask players to collect. This is a client path, not the Linux server's data directory.
Inspect a log bundle before sharing it. Redact licence keys, connection credentials and unrelated player information, and use a private support ticket rather than public chat. If the panel console itself fails, report that separately rather than assuming the game process has stopped.
Verify one change at a time
After the identified cause is corrected, repeat the same browser search and an ordinary player join. Check that the intended layer runs and that another player can connect. Keep the original configuration and community data until recovery is confirmed. If the cause remains uncertain, send the server ID, UTC time, category, versions, affected-player count and redacted client/server errors; repeated reinstalls will not supply that missing evidence.
Related CloudExa guides
References
- Offworld server-browser troubleshooting
- Offworld guidance on collecting client logs
- Offworld mod-related launch faults
- Current Offworld hosting policies
Prepare an Assetto Corsa race server and verify the first join
This guide covers the original Assetto Corsa dedicated server. Assetto Corsa Competizione and EVO use different server software. Start with a small race using content your group already owns; add custom cars, tracks and extensions only after the baseline works.
1. Record the current service
- Open your own server in the game panel and record its assigned address and port allocations.
- Read the startup output to identify the implementation. The stock Kunos server and the optional AssettoServer free-roam implementation are different programs. Do not replace either executable to follow a settings guide.
- Download the current configuration and any custom content before editing. Plan a short maintenance window if other drivers are using the service.
Use the service's normal stop action and wait for the process to finish before changing files. A green panel status alone does not establish that a race session is ready for drivers.
2. Find the active race files
For the stock distribution, the two main files are cfg/server_cfg.ini and cfg/entry_list.ini, relative to the actual server directory. A hosting template or manager can generate these files, so confirm which copy the startup process reads. If settings revert at launch, ask support which configuration source owns them instead of repeatedly overwriting generated files.
In server_cfg.ini, check the selected CARS, TRACK and CONFIG_TRACK. They identify installed content and, where applicable, the chosen track layout. Display names from a download website are not necessarily the folder identifiers the server expects.
3. Match the grid and content
The entry list supplies the available cars. Confirm that each configured model is allowed by the race configuration and that there are enough entry slots for the planned drivers. Keep MAX_CLIENTS within the selected layout's pit capacity. A service's hosting resources do not increase the number of pits a track provides.
For the first test, use a known-good car and layout available to every tester. Keep the player password separate from ADMIN_PASSWORD, choose unique values, and share only the player credential. Do not publish either configuration file without removing secrets and driver identifiers.
4. Preserve the assigned network settings
The stock server has separate UDP, TCP and HTTP port settings. Retain the allocations supplied for this service; an example from a home-hosting tutorial is not an allocation on CloudExa. Ask support if a required listener has no assigned port. Do not copy a desktop router-forwarding procedure onto the shared node.
5. Prove the session works
Start once, watch for configuration or content errors, then join from an ordinary client with the matching content. Select a car, enter the track and complete a short driving test. Have a second player join before adding mods or changing race rules. Save the working settings as your rollback point. If it fails, provide the server ID, first relevant log error, chosen layout and test time; do not reinstall the service or overwrite the content tree.
Related CloudExa guides
Developer references
Diagnose Assetto Corsa startup, lobby and join failures
An Assetto Corsa server can be running but absent from the lobby, visible but unreachable, or reachable until the client rejects its content. Treat these as separate stages. This guide applies to the original game; Competizione and EVO instructions are not interchangeable.
1. Identify the first failed stage
- Record the server ID, incident time, exact client message and whether any other driver can join.
- Read the current startup output from its beginning. Look for the first relevant configuration or content error rather than only the last shutdown message.
- Identify whether the process is the stock Kunos server or AssettoServer. Keep implementation-specific errors with the documentation for that program.
If the panel console itself cannot connect, diagnose that separately from a game-client connection. Repeatedly pressing Start can obscure which log belongs to the original failure.
2. When the process exits during startup
Compare the current cfg/server_cfg.ini and cfg/entry_list.ini with your last working copy. Check the track and layout identifiers, permitted car list and available entry slots. Confirm that the requested driver count fits the layout's pits. A newly uploaded archive with an extra enclosing directory can leave files outside the path the server actually loads.
Stop before correcting a configuration, change only the identified error and keep the previous file. Do not remove the whole content directory or regenerate every setting to clear one error. If the template rewrites your correction, ask support to identify its active configuration source.
3. When the lobby or network stage fails
Compare the server's configured UDP, TCP and HTTP listeners with the service's assigned allocations. Listing and gameplay are different checks; success at one does not prove the other is reachable. Give support the exact listener and protocol information rather than asking for every port to be opened.
A listing problem affecting several unrelated servers may be upstream, while a failure confined to your service needs its own logs and settings checked. Avoid changing the public IP, disabling firewalls or installing a tunnelling tool as a first response.
4. When a driver is rejected for content
Kunos documents car and track mismatches after game or server-content updates. Compare the selected car, track layout and exact release on the server and the affected client. Obtain required custom content from its authorised publisher. Test with a known-good content combination during an agreed maintenance window before rebuilding a complex modded race.
For AssettoServer specifically, a missing-car-checksum configuration error is documented by that project's authors. Restore the required legitimate content and follow that implementation's explanation. Do not disable integrity checks just to make the error disappear; its additional settings are not universal stock-server options.
Verify and escalate
After one controlled correction, repeat the same failing action with a normal driver account and retain the resulting log. A successful startup should be followed by an actual track join and short driving test. If the cause remains unclear, send support a redacted error excerpt, implementation name, content versions, affected allocations and UTC time. Keep race settings, results and custom files intact while investigating.
Related CloudExa guides
Developer references
- Kunos dedicated server configuration and mismatch guidance
- AssettoServer-specific configuration errors
Plan a Squad Workshop mod setup without losing server configuration
Squad mods can replace maps, factions or substantial parts of a match. Installing one is a coordinated change to server content, map rotation and player downloads. Choose the exact Workshop item and its current instructions before changing an active service.
Establish the supported content set
Start from the Squad Steam Workshop and the selected author's own item page. Record its numeric item ID, current update date, dependencies, supported game release and installation notes. A Workshop collection groups items; it does not establish that every included item works together on your server.
Identify whether the project supplies server content and which hosting platforms it supports. A client subscription confirms neither the server's downloaded files nor the active rotation. Do not copy another game's Workshop directory layout or assume a generic plugin installer can manage Squad packages.
Prepare before the maintenance window
- Record the current server build, rotation, administration configuration and any existing Workshop items.
- Keep a downloadable copy of configuration and any persistent data used by your current extensions. Retain the previous working rotation separately.
- Read the mod author's required-item list and exact layer names. Do not infer a layer identifier from its friendly display name.
- Confirm with CloudExa how the current Squad template downloads and exposes Workshop content. Supply the item ID rather than requesting an unspecified mod pack.
Where a template has no documented Workshop integration, ask for a supported installation procedure before uploading executable content. This guide does not assume a particular panel field, filesystem root or automatic subscription mechanism.
Check the CloudExa template
The current Squad template exposes Download Workshops Items, which accepts comma-separated Workshop item IDs. Its installer downloads those items; editing the list alone does not establish that a running server has received them. The field description refers to a reinstall. Do not trigger a reinstall on an established service to follow this guide: give support the item IDs and ask for a content deployment that preserves your files, settings and existing data. A different or updated template may expose another supported workflow.
Trial the mod and rotation together
Use an isolated test instance where possible. Stop it cleanly, apply the documented content installation, wait for downloads to finish, then add one author-documented modded layer to the test rotation. Preserve the unmodified configuration so it can be restored without reconstructing it from memory.
Start the instance and read startup output for missing packages or unknown layers. A running process does not prove the selected modded map loaded. Join using a prepared client, let its required downloads complete and confirm the expected map, factions and match behavior. Test a map transition as well as the initial join.
Understand browser placement and licensing
Offworld's current hosting policies distinguish licensed servers in the primary browser from unlicensed servers in Custom Servers. Licensing has separate hardware, ownership and administration requirements; installing a mod does not grant a license or guarantee browser placement. In particular, the current policy excludes VM/VPS/VDS hosting from licensing. Check your intended service with support before advertising a primary-browser listing.
Validate and keep rollback simple
Ask a second prepared player to connect and verify the selected layer before announcing the change. Record the successful game build and Workshop versions so future updates can be compared against a real baseline.
If startup fails after adding the layer, restore the saved working rotation and investigate the mod installation separately. Preserve downloaded packages and logs for diagnosis rather than deleting the entire server directory. Reinstallation is not needed to answer whether a layer name or dependency is wrong.
Diagnose Squad Workshop mismatches and modded-map failures
A Squad server can appear online while a modded map fails to load or players disconnect during joining. Distinguish incomplete content downloads, incompatible releases and rotation mistakes before changing networking or reinstalling anything.
Capture one reproducible failure
- Record the server ID, affected Workshop item IDs, selected layer and the exact connection time.
- Compare the server and client game builds. Note when Steam last completed each mod download.
- Keep the server startup output and the affected client's error. Preserve the first relevant message rather than only the final timeout.
- Save the current rotation and configuration, alongside your known working versions, before changing the mod set.
Interpret where the failure occurs
The server never reaches the intended map: check the selected layer against the author's exact identifier and confirm the relevant Workshop package completed its server-side installation. A missing layer points toward content or rotation; a later client timeout is not the primary error.
Everyone fails after a mod update: compare the downloaded server content with the release expected by clients, including dependencies. Wait for any active download to finish before another clean start. Do not repeatedly restart into a partially updated package set.
Only one player fails: compare that player's game build, required subscriptions and completed downloads with a working client. Keep unrelated client changes out of the initial test. A client-specific fault does not justify replacing the server files.
Account for game fixes as well as mod fixes
Offworld's 10.5.3 hotfix notes describe a historical checksum problem that let outdated mods go undetected and caused network-object errors and disconnects. They also describe corrected mod-related crashes. This is evidence that ambiguous connection errors can involve game/content compatibility, not evidence that every current error is that fixed bug.
Check the release notes for the game version actually installed and the mod author's matching update. Avoid declaring a package compatible just because it worked before an engine or game update. Keep the exact versions in your support report.
Test a controlled comparison
Use a separate test instance with a known working standard layer and no unrelated extensions. Confirm it can start and accept a prepared client. Add the affected mod with its documented dependencies and one known-valid layer, then repeat the connection test. Compare the first new error between those attempts.
If a standard layer works but the modded one fails, focus on the content and layer requirements. If both fail, widen the investigation to the game build, service status and allocation. Do not disable host firewalls or expose administration ports as a shortcut.
Recover without discarding evidence
Return to the saved working rotation if you need to restore availability while investigating. Keep the failed configuration and logs archived. If an extension stores persistent progress, retain its matching data checkpoint before rolling back package versions.
Send CloudExa the item IDs, build comparison, first error and minimal test result. Ask before changing download paths or loader mechanisms on a hosted template; a generic filesystem recipe may target a different layout.
Install an Arma 3 mod set with the correct client and server roles
An Arma 3 mod can affect the server, the player or both. Downloading a Workshop item does not choose its role or make it compatible with a mission. Build a small documented mod set before adding it to a community's active service.
1. Read the authors' requirements
Record each original Workshop ID, required dependency and supported game branch. Check the mission's requirements separately; an apparently optional content mod may be needed by its mission assets. Follow the author's instructions for client and server use rather than classifying a mod from its name.
Keep a known working client preset or equivalent written inventory. A shared preset is useful only when it refers to the intended items and versions. Do not distribute private paid content or account credentials with it.
2. Back up mission and persistence data
Keep the active startup configuration, server configuration, profiles, mission PBOs and any framework persistence together. Export an external database through its normal backup procedure if the mission uses one. Confirm which files actually belong to this instance before copying a directory from another service.
Use a separate test deployment for a framework or large mod pack. It must not write to the production database or integrations. A mission that creates a fresh campaign state is not a safe diagnostic against your existing persistence.
3. Stage complete mod directories
Use the original publisher's release or the supported Workshop deployment workflow. Keep the PBOs and their supplied signatures together. Mod directories often begin with @, but the important check is that the actual launch path matches the directory you deployed. Linux path spelling and case need particular care.
Do not merge files from unrelated mods into one anonymous folder. Preserve a manifest mapping each directory to its source ID and release. Ask support how the template stages Workshop files if only a numeric cache directory is visible.
4. Select the correct launch lists
-mod loads ordinary mods, while -serverMod identifies server-side content that is not broadcast to clients. Both accept semicolon-separated folder lists. This is illustrative startup syntax, not a complete command to replace your existing launch configuration:
-mod=@RequiredFramework;@RequiredContent
-serverMod=@ServerOnlyTool
Shell quoting and escaping vary by launcher and operating system. Preserve the existing template's handling of semicolons. Putting a client-required mod in the server-only list does not make its client dependency disappear.
5. Verify trusted signatures and gameplay
A publisher's public .bikey is used to verify signed addons; .bisign files accompany the addon data. Trust only keys obtained from the intended publisher. Review the instance's configured key locations rather than turning signature checks off to accept an unknown package. Never request or share a publisher's private signing key.
Start the test server, inspect its RPT output and join with the intended ordinary client preset. Test a playable mission, representative mod features and a normal save/restart. If it fails, preserve the first dependency or signature error and restore the complete test checkpoint. Do not strip production mods and save over campaign data as a shortcut.
Related CloudExa guides
- Configure an Arma 3 server and test a first mission connection
- Back up game files before making changes
Official references
- Bohemia Interactive: mod and serverMod startup parameters
- Bohemia Interactive: addon files, public keys and signatures
- Bohemia Interactive: Launcher and mod management
Resolve an Arma 3 mod update or signature mismatch without bypassing checks
“Wrong signature”, missing-addon errors and a mission returning to the lobby point to different stages of an Arma 3 mod problem. Keep the intended security settings in place and find the exact disagreement before changing the community's mod set.
1. Identify the first failing stage
Record the client message, UTC time, mission and server build. Note whether all players fail or only one preset does. Save the current RPT excerpt around that attempt; an old report from a different profile can lead you toward the wrong launch configuration.
If the process never becomes ready, examine the first dependency or path error. If players reach the lobby but a mission cannot start, check the mission's requirements. If a player is rejected during joining, identify the named addon or signature rather than changing unrelated gameplay settings.
2. Compare intended and loaded content
Read the active -mod and -serverMod lists and compare them with the directories actually staged for this service. Verify folder spelling and dependency instructions. A downloaded Workshop item that is absent from the relevant launch list may never load.
Check the client preset against the ordinary mod list. Server-only mods are not broadcast as client requirements, so do not move a required client package to -serverMod just to hide the mismatch. Use the author's role requirements for each component.
3. Check the signature chain
For the named addon, compare the trusted publisher's public .bikey, the supplied .bisign and the PBO from the same release. A correctly named file is not evidence that it came from the correct publisher. A stale key, mismatched artifact or modified signed PBO needs a supported release, not a new exception for every rejected player.
Review the configured key directories; installations may use additional key-folder options. Do not disable signature verification, bypass BattlEye or manufacture a replacement signature for somebody else's release. Keep full configuration dumps private because they can contain administrator passwords.
4. Coordinate the update
Close the affected player's game and launcher before allowing Steam to finish applicable updates, then check the selected preset again. On the server, schedule a normal stop and preserve mission files, profiles, configuration and framework databases before replacing artifacts through the supported workflow.
Stage risky updates separately. A mission framework can migrate stored campaign state, making a simple binary downgrade insufficient. Retain the pre-update matching dataset and permitted artifacts; a Workshop ID list alone may not retrieve an older release.
5. Isolate and verify
Use an isolated copy to test the named dependency group with an ordinary player account. Change one variable at a time and retain logs from each run. Do not remove production content mods and let the active campaign save without them.
Success means the intended client joins, the mission actually runs, required features work and persistent progress survives a normal restart. Send support or the mod author the named error, affected source IDs, role lists, server/client build comparison and redacted RPT excerpt if the issue remains. Recover the compatible mission/database/configuration checkpoint together when rollback is required.
Related CloudExa guides
- Diagnose Arma 3 connection failures and mission loading errors
- Schedule game server backups and check retention
Official references
- Bohemia Interactive: active mod roles and startup options
- Bohemia Interactive: addon signature file relationships
- Bohemia Interactive: Workshop update and Launcher behaviour
- Bohemia Interactive: server configuration and security
Add custom cars and tracks to an original Assetto Corsa server
Custom cars and tracks must agree with the race configuration and with the content players use. Start with one small, known content set. These instructions cover original Assetto Corsa, including its stock dedicated server; Assetto Corsa Competizione and EVO have different server systems.
Identify the server software
Check the startup command before choosing an extension. CloudExa's stock template runs ./acServer; the separate Freeroam + AI template runs ./AssettoServer. A package written for one is not automatically a plugin for the other. Do not replace the executable to follow a guide intended for a different template.
The Kunos manual describes stock race configuration. The separate AssettoServer project guide documents its own plugin system. Adding cars or tracks does not require converting a stock service into AssettoServer.
Prepare a reproducible content set
- Choose the exact car and track releases from their authors, including the intended track layout and any stated dependencies. Keep the release links and archive versions in a short list for players. Check that the author permits the content's intended distribution.
- Test the content in the original game locally. Confirm the car can enter the chosen layout before involving the dedicated server. Keep this baseline separate from additional graphics changes or unrelated client apps.
- Back up the hosted server's content and configuration. Stop it normally before changing files and preserve the original working race preset. Use a test service when available.
- Prepare the server content using the author's dedicated-server instructions or the stock server manager's content preparation workflow. Preserve the expected folder structure. Do not upload an arbitrary desktop installation over the hosted server or include a replacement executable.
Match configuration to files
In the confirmed active preset, check cfg/server_cfg.ini. Set CARS to the exact car folder identifiers, separated as documented, rather than display names. Match TRACK to the track identifier and CONFIG_TRACK to the selected layout. Paths are relative to the service's actual server directory; templates can select a different preset.
Review cfg/entry_list.ini so every configured car model is allowed by the race configuration. Keep the slot count within the selected layout's pit capacity. Preserve your allocated network settings and private admin password while editing content choices.
Prove a player can drive
Start the server once and read the earliest content error. Join with a client using the recorded releases, choose a configured car and drive out of the pits. Repeat with a second player before sharing the server widely. Seeing a lobby listing alone is not a content compatibility test.
If one car fails, compare that model's files and identifier first. If the layout fails for everyone, inspect its release and configuration. Revert to the complete saved content-and-preset pair if needed, preserving the failed candidate for investigation. Keep checksum protections intact and ask support before changing template-specific plugin behaviour.
Related CloudExa guides
- Back up game files before making changes
- Prepare an Assetto Corsa race server and verify the first join
Update Assetto Corsa content and isolate extension conflicts
When a race stops working after a content update, identify whether the change affected the car, track, server software or an extension. Keep those changes separate during testing. This guide covers original Assetto Corsa and explicitly distinguishes the stock dedicated server from the optional AssettoServer implementation.
Preserve the working combination
Record the server implementation and version, car and track releases, selected layout, active preset and any client requirements stated by the content author. Save a copy of the entire working content and configuration set. Include results and extension data where present, then verify the backup can be opened.
Stop the service normally before replacing active files. Keep an untouched working copy and a candidate copy. If there is no staging service, arrange a maintenance window and retain a clear return path instead of experimenting while players are racing.
Classify the first failure
- Server fails before players join: capture the earliest startup error and the exact files changed. Check archive layout, folder identifiers and the selected track layout before altering network settings.
- Only updated clients fail: compare the actual car or track release with the server's release. A shared display name does not establish identical content. Use the author's original package rather than collecting individual replacement files from different versions.
- A particular car fails: compare its configured model in the entry list with the allowed car set. Recheck layout pit capacity when changing the entry list.
- Driving works but an extension fails: investigate that extension separately. Retain its error log and configuration rather than replacing the race server or clearing all content.
Apply the correct extension rules
For the stock ./acServer service, use the Kunos configuration reference and the specific extension author's instructions. AssettoServer's extra_cfg.yml and bundled-plugin configuration do not control the stock implementation.
For the separate ./AssettoServer service, the upstream update guide warns that extra and plugin configuration parameters can change between releases. Prepare the new release in staging and transfer intended settings into its current generated configuration rather than blindly replacing it with an old file. Preserve any plugin-specific database or credentials separately.
AssettoServer's missing car checksum diagnostic identifies missing car data. Repair the complete content package instead of suppressing protections. A YAML parsing error is another distinct case: inspect the changed indentation and spelling against the current generated configuration, not a copied example for another version.
Verify and retain a rollback
Change one content release or extension at a time in staging. Test a real join, car selection and several minutes of driving, then test the extension's advertised feature. Repeat after a controlled restart so success does not depend on a previous process's state.
If the candidate fails, preserve its files and logs and restore the stopped service's complete working set. Tell players which exact content versions to use. Avoid combining an old server preset with a newly updated track or mixing extension data from different releases without the author's migration guidance.
Related CloudExa guides
Find mod and plugin guides for your game
Choose the modding instructions for your exact game and server implementation. This directory covers all 18 games currently advertised on the CloudExa website. A Workshop item, client mod and server plugin are different kinds of extension: installing one does not automatically enable the others.
Choose your game
- Minecraft
- Rust
- ARK: Survival Ascended
- Palworld
- Valheim
- 7 Days to Die
- CS2
- Satisfactory
- Terraria
- Squad
- ARK: Survival Evolved
- Arma 3
- DayZ
- Garrys Mod
- Unturned
- Factorio
- Assetto Corsa
- Hytale
Check support before installing anything
Match the game build, platform, loader and extension release before uploading files. Some extensions need a different server template or runtime; their presence in an online catalogue does not mean your current service can load them. Use a separate test copy for changes that affect a modded save. Keep a recovery checkpoint containing matching saves, configurations, mod versions and external databases where applicable. Removing a content mod can remove objects or make its save unreadable.
Minecraft
- Install plugins on a Paper or Purpur Minecraft server
- Install or change a Minecraft modpack safely
- Diagnose Minecraft mod conflicts on a test copy
- Install Minecraft Java data packs and plan safe removal
Rust
- Install and troubleshoot Rust Oxide plugins
- Manage Oxide plugin permissions without granting everyone admin
- Repair a Rust plugin JSON configuration without losing data
- Move Rust plugin data to a test server without losing state
ARK: Survival Ascended
- Choose an ARK Survival Ascended map and CurseForge mods
- Investigate ARK Ascended mod updates and startup conflicts
Palworld
- Choose a supported Palworld dedicated-server mod installation
- Diagnose Palworld mod update failures and client mismatches
Valheim
7 Days to Die
- Install 7 Days to Die mods into the active user-data folder
- Trace a 7 Days to Die mod failure after an update
CS2
Satisfactory
- Choose and install Satisfactory mods for a dedicated server
- Fix Satisfactory mod version conflicts after an update
Terraria
- Set up TShock accounts and grant limited administrator permissions
- Choose tModLoader mods or TShock plugins for a Terraria server
- Resolve Terraria mod mismatches without losing modded saves
Squad
- Plan a Squad Workshop mod setup without losing server configuration
- Diagnose Squad Workshop mismatches and modded-map failures
ARK: Survival Evolved
- Install a compatible ARK Survival Evolved Workshop mod set
- Update ARK Survival Evolved mods and diagnose a client mismatch safely
Arma 3
- Install an Arma 3 mod set with the correct client and server roles
- Resolve an Arma 3 mod update or signature mismatch without bypassing checks
DayZ
- Install a DayZ mod set with matching client content and signature keys
- Diagnose DayZ mod updates, script conflicts and signature kicks safely
Garrys Mod
- Set up Garry’s Mod Workshop collections and gamemodes
- Find the addon behind a Garry’s Mod Lua error
- Fix missing Garry’s Mod textures and client downloads
Unturned
- Add Unturned Workshop content or maintained server plugins safely
- Diagnose Unturned Workshop and plugin failures after updates
Factorio
- Resolve Factorio mod and startup-setting mismatches
- Build and activate a tested Factorio mod collection
- Stage a Factorio mod collection update and preserve a complete rollback
Assetto Corsa
- Add custom cars and tracks to an original Assetto Corsa server
- Update Assetto Corsa content and isolate extension conflicts
Hytale
- Install a compatible Hytale mod or plugin on a test copy
- Stage Hytale mod updates and diagnose build compatibility failures
Plugin-specific instructions and shared checks
- Find a Minecraft plugin setup or troubleshooting guide
- Back up game files before making changes
- Fix a game console that will not connect or shows a 504 error
- Game server will not start: choose the next safe check
- Players cannot join: follow the connection checks
Verify before inviting players back
Read startup logs, join with an ordinary player and test the changed feature on the intended world or map. A running process is not proof that inventories, permissions, mod downloads or clients work. After an update, verify a new save and the next controlled restart. For help, send your server ID, exact build, extension names and versions, failure time and a redacted log. Do not post tokens, licence keys or player databases.